
- Sails & Canvas
- Hull & Structure
- Maintenance
- Sailing Stories
- Sailing Tips
- Boat Reviews
- Book Reviews
- Boats for Sale
- Post a Boat for Sale
- The Dogwatch
- Subscriptions
- Back Issues
- Article Collections
- Free for Sailors
Select Page

Rise Up! How to Raise Your Sailboat Mast
Posted by Zoran Glozinic | Dogwatch , Projects , Sails & Canvas

Spring is here and marinas will soon be filled with mast-raisers. And while the world is filled (to the brim?) with mast-raising solutions, I have another. I believe my method is possibly the simplest solution most applicable to a wide range of boats. It allows a sailor to raise a mast independently, without a crane, affording freedom. It also enables a sailor to do it by themself. And while most mast-raising solutions require various panoply of items a sailor needs to either purchase or fabricate—various gin poles, A-frames, lifting poles, winches, 2×6 boards, lawn-mower wheels, and mast supports mounted to rudder fittings on the transom—and while sailors who trailer their boats to various waters have to carry all of that with them, the solution I’ve come up with uses a very small amount of extra equipment, so small it can almost be carried in one’s pocket.
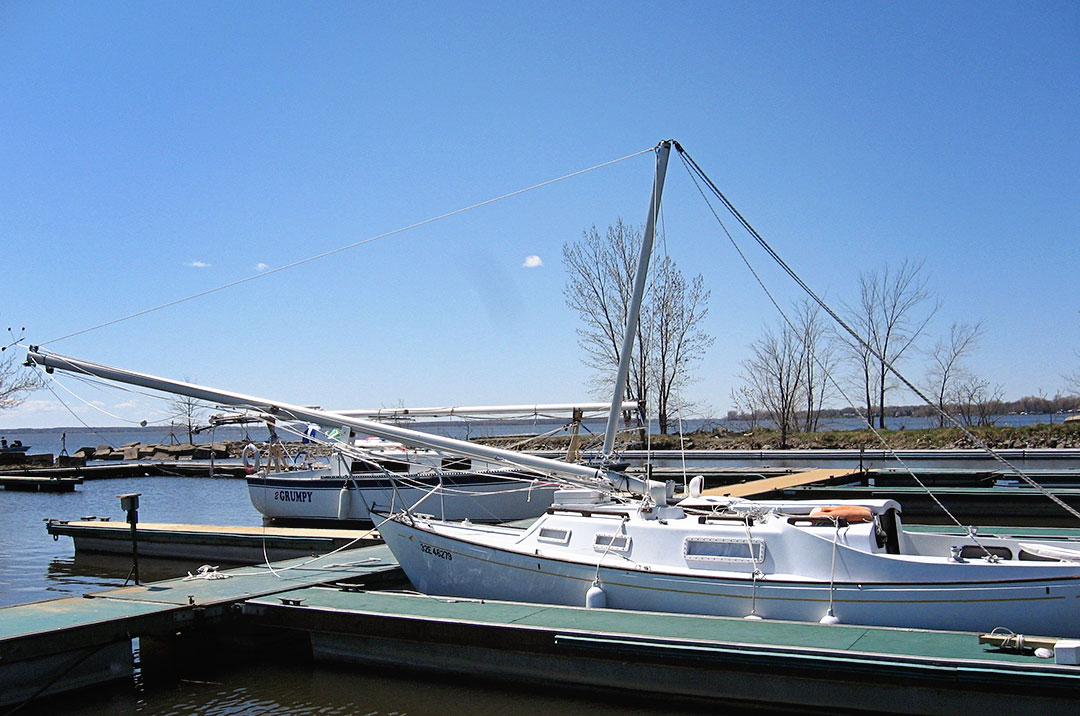
Everything rigged and mast ready to be raised with a tug on the mainsheet.
So, what is required and how do you rig it?
- First, to use my solution, your mast should have a mast base/step or tabernacle on which the mast can pivot. This is common.
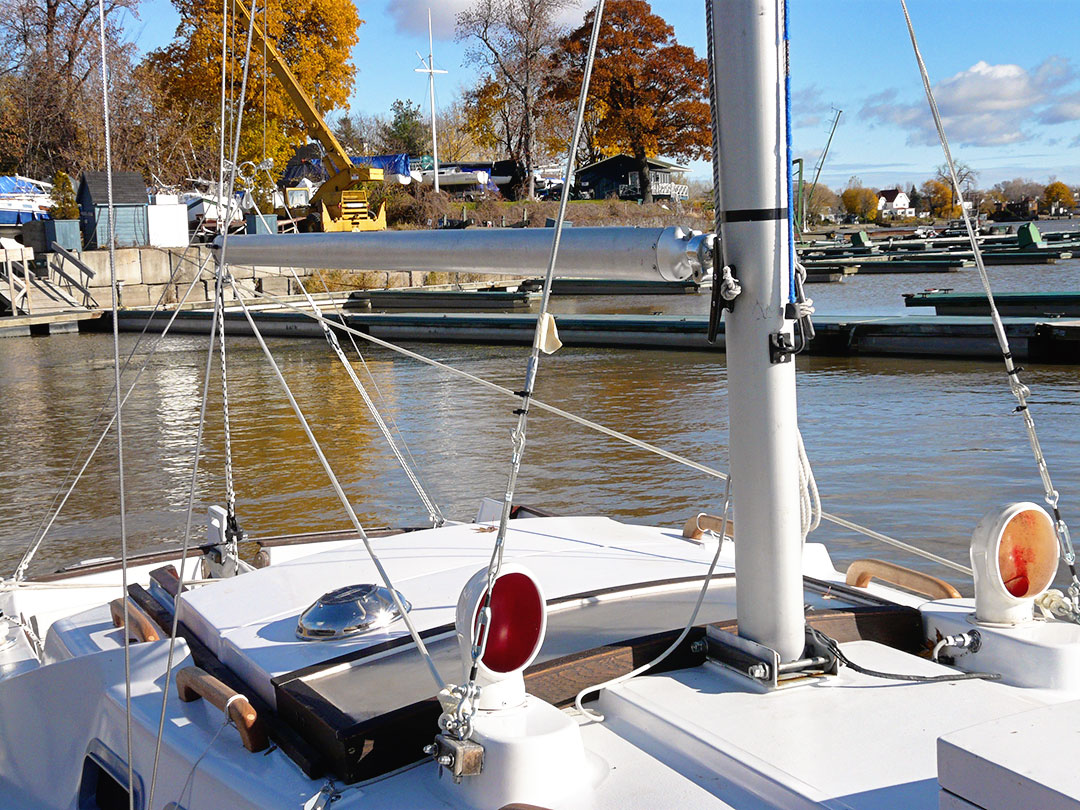
- Next, there will need to be an attachment point on either side of the boat, aligned with the mast pivoting point—athwartships and on the same axis. You might need to get creative here because each boat is different. The two attachment points (eyes are fine) can be permanent (as in this photo), or they can be made using a steel ring and two short lengths of steel wire or chain temporarily attached to an existing hardpoint. The wider these attachment points are spaced, the better, because they serve as hardpoints to attach two sets of temporary shrouds.
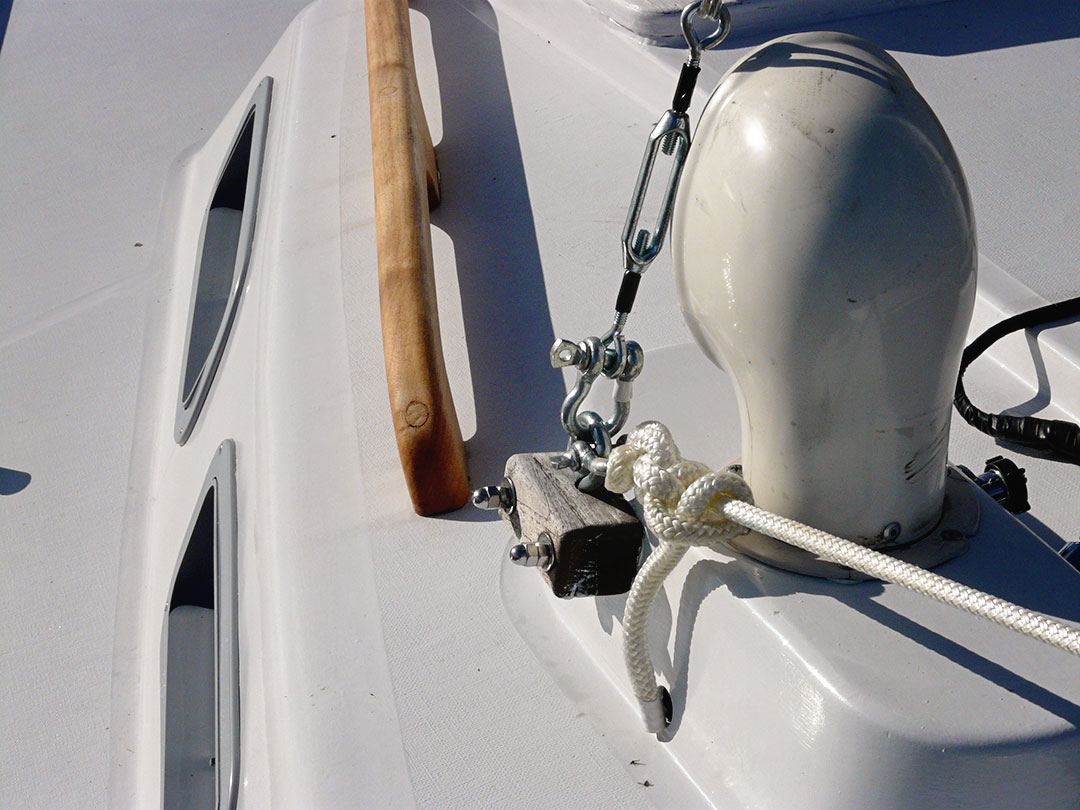
- About seven feet above the mast step (or as high as you can comfortably reach up the mast when it’s vertical) on either side of the mast, there must be tangs or permanent mounts to attach the mast-supporting set of temporary shrouds. I used a length of ¼-inch threaded rod that passes through the mast and through two small hardwood blocks and two small tangs made from mild steel. I install these tangs when needed, using wingnuts. When sailing, there is nothing on the mast to snag halyards, and the two small holes are not something I worry about.
And that is it for boat modifications.
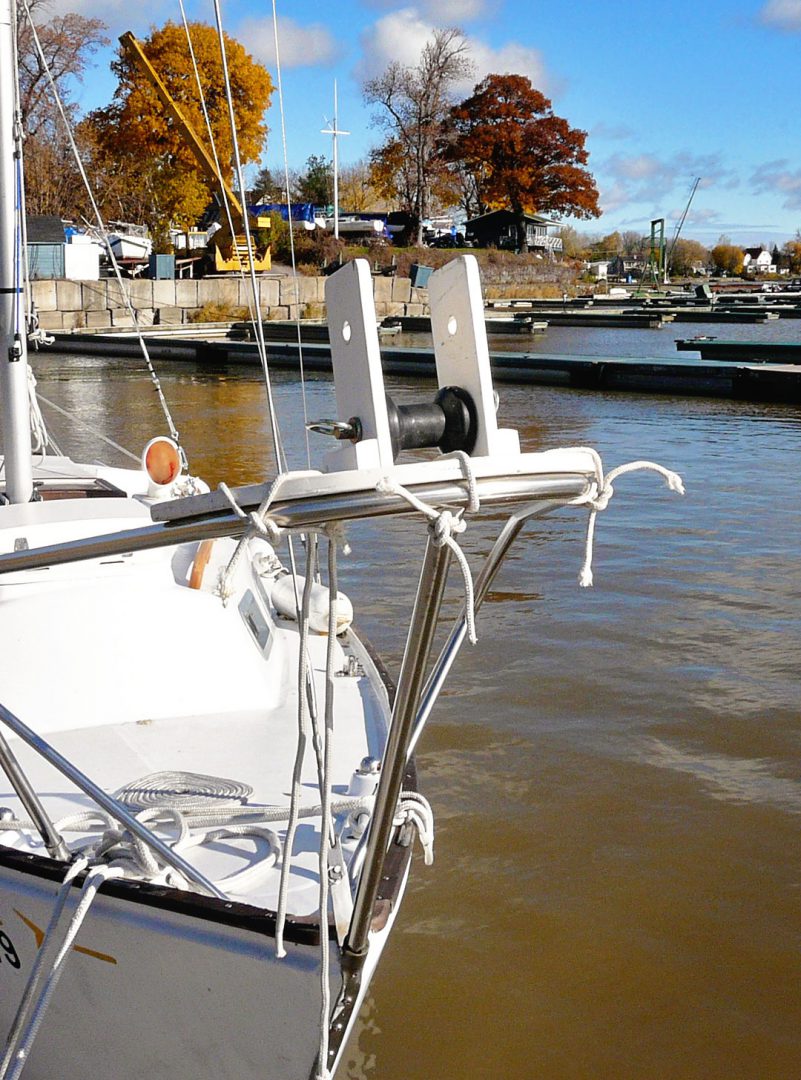
Mast successfully raised, note the athwartships attachment points on the dorade boxes and the two sets of temporary shrouds.
A close-up view of the athwartships attachment points.
To raise and lower the mast, I rig things and operate as follows. In this example, the mast is attached to a pivoting base and stowed lowered onto the bow pulpit.
- Between the athwartships attachment points and the mast tangs, I attach a set of temporary shrouds. These I made from coated wire rope (the same as used for lifelines). These will remain taut for the duration of the mast raising or lowering (because they’re attached on the same axis on which the mast pivots) and serve to prevent the mast from swaying from side to side.
- I attach the boom like I’m ready to sail, 90 degrees to the mast, connected to the gooseneck fitting and with the topping lift and end-of-boom mainsheet rigged. I use the main halyard and boom downhaul to keep the gooseneck fixed (so it cannot slide up or down, if track-mounted).
- Between the athwartships attachment points and the clew end of the boom, I attach a second set of temporary shrouds. These I made from low-stretch braided line and they will also remain taut for the entire mast raising and lowering.
- Once all set, I pull on the mainsheet (rigged with 4:1 block-and-tackle for purchase) to raise the mast. It’s relatively easy and the mast remains in control; I can stop and start at any point in the process if needed.
If my mast was instead pivoted aft and stowed on an aft-rail support, I could still use the same method, but I would have to attach a separate gooseneck fitting on the front of the mast and some separate running rigging to function as the topping lift does.
Happy spring mast raising!
One nice-to-have modification I’ve made is to the pulpit where my mast rests when stowed. I made a wooden mast support mounted on the bow rail. The rubber roller has two positions: the lower position is used for winter mast storage, and the upper position allows for easy mast sliding, fore and aft, when getting it to the exact position in order to install (remove) the pivoting bolt/pin at the mast base or tabernacle. When not in use, I stow this support at the bottom of a sail locker.
About The Author

Zoran Glozinic
Zoran Glozinic is a retired business professional who has been messing around in boats and old cars all his life. He currently lives in Laval, Quebec, where he divides his free time between a good old English bilge-keel boat and a 16-year-old Saab car.
Related Posts

Unlikely Passages: Book Review
July 1, 1999

The Sailing Master Book One: Coming of Age
February 1, 2016

Building your own classic hatch
July 17, 2019

The Dogwatch Mail Buoy – July 2018
July 1, 2018
Now on Newsstands
Join Our Mailing List
Get the best sailing news, boat project how-tos and more delivered to your inbox.
You have Successfully Subscribed!
- Advertising
- Find the Magazine
- Good Jibes Podcast
- Boat In Dining
- Sailboat Charters
- Business News
- Working Waterfront
- Youth Sailing
For raising, only the cap shrouds and the headstay needed to be attached to their respective chainplates. Out of respect for Murphy’s Law, the other wires were secured tightly to the mast to mitigate their inclination to get snagged. Snagged wires like to kink, and whether new or old, it is unsatisfying, not to mention detrimental to their longevity and strength. The turnbuckles were wrapped in rags and secured to the mast, preventing them from scratching and banging into anything (everything.)

The bridle setup was more challenging to organize with the rig down than up. Since I had new wires, I needed to re-seize the stainless steel rings to the cap shrouds. It required holding up the wire to determine the proper pivot points with the mast. Then the opposing force lines to the lower stay chainplates were added, conceptualizing the rigid triangle necessary to maintain the pivot points. With the rig up, it is easier to build and see this. But down, it is a floppy mess. Then, a line was attached to each ring, ready to lead to a bail on the boom. A block and tackle served nicely for this on one side for ease of adjustment. These guylines will provide the opposing forces to keep the boom centered.

After that, I moved the mast to the tabernacle and pinned its base in the ready position. A final review of the halyard and wire leads and spreader orientations was done. A reminder: Always be on the lookout for snagging wires and lines whenever you move the mast.

The boom, as a gin pole, could then be added. When lowering, it was already in position and there was only the matter of attaching the bridle lines. However, with the mast down, the boom would be attached starting in a vertical position, which involved some boat yoga. I shackled the mainsheet and topping lift to its outer end. Lots of slack was fed into those lines, allowing for lifting it straight up. While holding it so, I pinned the mast end to the gooseneck. I picked up the previously-led guylines (the line and the block and tackle) and attached them to the boom bail. I tightened and adjusted the mainsheet, the topping lift, and the guylines until the boom was centered and vertical. The opposing forces held the gin pole in place.
With the correct bridle setup, the mast base in the tabernacle, and the gin pole in place, it was simply a matter of hoisting the mast. On a Flicka 20, the round bar traveler and the four-part mainsheet block and tackle are very accommodating to providing the mechanical advantage necessary for raising and lowering the mast. To a soloist, this advantage was indispensable. It took two hands and a bit of leaning to get it moving, but it became easier as it went higher. An eye was kept on the centerline alignment of the mast and boom, making sure the bridle prep was accurate, and watching that the wires did not snag.

The accompanying video shows the raising from a first-person view and solo. In contrast to lowering the mast, gravity is less of a friend, so the ascent is slower, with a bit more heave-ho. There is no shame in re-lowering the mast to adjust the bridle lines or sort out the wires. It is better to correct them early than to think something will be all right when it is not. Raising and lowering the mast is not rocket science, but 99% of the gig is proper preparation. If something goes wrong, it could be catastrophic, so double- and triple-check. It can be intimidating at first, but it is simple physics and simple tools at work. Remember, keep it safe and prudent, and have a blast.

This is so stressful to watch! I would have never had the courage to do it myself. As always, you have my respect and admiration. Well done!

Rusty, thanks for the kind words, and thanks for reading.

Joshua, Thank you for taking the time for so nicely relaying your experiences on single-hand stepping the mast on your Flicka. I am currently refining this design process for my own boat, and am thus interested in the finer details. My initial questions are two: First, concerning the method and material for seizing the bridle to the cap shrouds: As you state, a properly rigged bridle is key to making the process work. How did you analyze the adequacy of your seizing method and the loads that would be experienced?
Temporary seizing is a good place to start for me, but since I do this spring and fall every year, I have considered incorporating a more permanent nicropress and cable pigtail for the ring attachment (the loads there are not very high). A triangular plate in the top shroud with attachment points for the bridle connection points would be nicer, but more expensive to implement. Either way, it is probably prudent to use a temporary seizing first, to demonstrate dimensional functionality prior to a permanent solution. Second, I am sure you release the cap shrouds to allow the bridle arrangement some up/down movement as a result of the mast butt movement in the tabernacle during stepping. Somehow I must have missed that. Once upon a time I tried raising the mast with very slack uppers (guessing at what was needed instead of graphical analysis or calculations) instead of the bridle approach (all else was like your scenario). Because the slack was inadequate and no bridle, I managed to bend my boom out of alignment. :o(. A good machine shop worked that out. As long as the mast remains vertical through the lift, there isn’t much load on that ring connection, but its job is keeping the mast in a vertical/perpendicular orientation through the lift. But if some kind of unforeseen incident would create shock loading on the seized ring, (say even 2 pounds of lateral movement (force at the truck) that would correlate to about 56 foot-pounds of moment (engineering statics) applied at the ring due to the long lever arm of the mast. If it were 5 pounds force perpendicular at the top of the mast, it would correlate to up to 140 foot pounds. In my view, a shock load of 5 pounds or maybe more, isn’t an unlikely scenario, considering Murphy. I can’t think of a way to analyze the strength of the seizing, and prayer does not work for me. So, how did you analyze the adequacy of your seizing method and what did you use? Wire? In my case, I have been stepping my mast at least annually, on my Lancer 25 for more than 35 years. I usually do it on the hard, or in the water if launching was via travel lift or something else that dictated the mast needed to be down when launched. But in at least one case, years ago, while sailing near Cowichan Bay at Vancouver Island, the jib wire jumped the sheave (a result of rough water and a slack line while dousing the jib) at the truck, and jammed along-side of the sheave when I tried to pull the sail down. I wasn’t sure of the problem at the time, but the sail definitely was not coming down, so I wrapped the jib halyard around the forestay to try to contain the partially-filled sail and considered my options. Luckily, upon checking my depth sounder, and found some shallow 30’ water (unheard of up there) and dropped the hook (probably on a rock bottom) and it held well enough for the task at hand. My mate always helped tail the line connected to the backstay at the winch and through a clam cleat to hold things if I needed a rest. I just loosened and released the rigging as necessary, muscle-dropped the mast and used the dinghy to go forward and sort things out. It was a very high reach, but I was successful. After I got the mast back up it started to rain….. I later drilled a hole in the truck to insert a stainless wire restraint, so the halyard cable could not be thrown off the sheave again. I have toyed with analyzing more mechanical methods for raising the mast now that I am older, less strong, and my first mate has passed on. That is what piqued my interest on your article. The Flicka is ready-made (Bingham designed it in; I am sure) for this raising procedure. The Flicka doesn’t have many complications, since there are double lowers in perfect position for the bridle attachment, and the cap shrouds are neatly centered to the mast. The Lancer is not so nice. It has a single set of lowers, and the chain plate has about 1” between the 2 connections for uppers and lowers. These are also set about 3” aft of mast centerline. The original Lancer design was a tabernacle (not exactly the proper technical term, but we will go with it) with the slot in the tabernacle tabs, and a through bolt for securing the mast. I would say this is the usual case for production trailer sailor boats. I have never been wild about the uneven up-and-down friction-prone mast butt action and the associated movement reflected in the rigging connections during stepping. I do have a strong toe rail to connect the bridle, but the chain-plate bridle connection will not work geometrically. I have purchased a hinged tabernacle plate from Ballinger Spars, which will smooth out the rotational process down there. However, the negative thing it does, is place the pivot point about 3” in front of the mast centerline. The hinge movement is forward of the mast (eccentric) and translates to about 3” up-and-down movement (tensioning or slacking) of the cap shroud/ bridle assembly while stepping the Lancer mast. With the eccentric hinged plate pivot, (while rotating up), the mast butt raises momentarily for about 1/4” (slackening the rigging) and then drops down 3” (requiring an equal amount of rigging slack or things will go into tension, which is no good). The shrouds or bridle assembly must allow a lengthening of 3” during rotation of the mast butt into final position (as determined by graphical analysis). On lowering, the movement is opposite, so the shrouds will slacken throughout rotation without causing any tension problems, and there is plenty of play being created to keep any stresses from developing. I suppose the key in my case is to set the bridle configuration when the mast I up, thus ‘dimensionally building in’ the 3” movement required into the bridle/shroud system. Thoughts? The following is an analysis of the forces on the Lancer rigging dimensions and mast weight: The mast (Kenyon 3550) is 28’ long and weighs in at 62 pounds. I arbitrarily rounded to 70 pounds for these calculations. The moment to initiate lifting the mast is 980 foot pounds. (28’x half the mast length x70 pounds – assume equal weight distribution per foot.). That is to say, if the mast is on the ground and you lift one end, it will take 35 pounds force through a distance of 28 feet (=980 foot pounds of moment acting on the mast to lift one end off of the ground). But in raising the mast, the force is pulling more aft than up (requiring vector analysis which I will get to). I am currently considering a 10’ jibboom mounted at the hinge point and not higher on the mast where the boom lives, which changes the numbers- (no bending forces on the mast – which are not really great enough to mean much to the 3550). Also in the Flicka case, boom length (as with lancer) is probably about 8’. A 10’ jibboom lowers the forces more than an 8’, but using the existing spar is practical. It is probably prudent for me to reconsider and re-calculate using the boom in its usual position. A few years ago, I designed and had a fitting made to connect a jibboom to the mast foot, so I was considering using it. So, running the numbers based on the Lacer backstay distance to the mast and initial lay of the mast, it would take (rounded) 103 pounds of tension in the backstay from the mast truck to the jibboom, and 125 pounds of tension from the jibboom to the backstay connection point. Compression loading in the 10’ boom is 114 pounds. Yes, one can use Eulers equation to analyze buckling forces, but I didn’t do it. Following good engineering practice with a factor of safety of at least 2, these numbers would be double the values shown for design checking of adequacy of rigging and spars. Confirming your experience, as the mast goes up, the center of gravity moves aft, requiring less and less force to raise the mast (and the geometry is changing) to increase efficiency of the forces as the mast goes up. 30degrees=858 ft lbs, 45 degrees=700 ft lbs, 70 degrees=350 ft lbs. 70 degrees into the lift, it would equate to 10 pounds of perpendicular force applied at the top (the center of mast mass has shifted to only 5’ in front of the final mast position). With a 4:1 ratio applied on the backstay, the pull on the line is about 31 pounds force for the Lancer System. The Flicka system is somewhat more (I don’t have the dimensions to analyze it), but from your description it was probably 40 pounds or less to start the raise, and then the tension required reduces as the mast goes up. Since the pull for the lancer scenario calculates in at around 31 pounds, I am planning to run the bitter end of the 4:1 through a block at the stern, to the bow, through a blocks on the bow, and use the anchor windlass to pull the mast up (the windlass maximum has 400 pounds of tension available). So even with friction losses, there should be no issue. I have a windlass switch in the cockpit, and a second hand-held remote at the forward hatch. It is a very convenient setup for going forward and guiding the mast or sorting out issues. Also, after my spouse passed, I put a winch at about 5’ high on the mast, and I ran the raising line there, instead of needing someone tailing at the cockpit. It is easier (almost necessary) to have a helper with me at the mast. I have lowered the mast alone with this manual system by taking wraps on the winch and playing out slack while catching the mast. However, without a jibboom, the forces are tougher to man-handle alone at the end of the lowering process. Comments are appreciated, as there is always something else to be considered or learned. Thanks
Jim, Thanks for reading and taking the time to engage. You have certainly been thinking about this! You get far deeper into the physics than I ever have and I suspect, many readers and sailors. Regarding seizing the rings on, I don’t overthink it. I have some net twine and I wrap and figure-eight it until I am sure it is strong enough. They are not permanent installations but are easy for me to put on as needed. Thoughtful marlinspike would make a nice permanent install. I have seen a different Flicka install that had the cap shroud turnbuckle placed at the pivot point. This removed the need for a seized-on ring and also gave a nice pivot point that does not bend the wire. Kinking the wire is my big concern, but the forces and the pivot point have not been high enough to do this, so without doing the physics calculation, the stress is low. Regarding the extra slack in the cap shrouds to accommodate that extra lift that occurs as the mast tips forward, no, I did not mention it, but it is a thing. I learned of that when I did not have them slack enough on a lowering. I recognized what was happening, so rather than forcing it, I backed off, adjusted, and restarted. Article scope naturally means some things are left out. That is good intel on bending your boom though. I have found on a sailboat, that if something feels like it is not running free, something is wrong. I don’t force it.
Thanks for the reply, Joshua.
I am leaning toward installing a permanent 4-hole triangular plate in the cap shroud at the bridle connection. This would create clear movement for hinge point attachments, and address stresses that can occur there. The rest is just a matter of rigging things up.
Best wishes in the new year.
Leave a Comment Cancel Reply
Notify me via e-mail if anyone answers my comment.
Racing Continues Today Dramatic Collision at SailGP Sydney A collision between Great Britain and Japan took both teams out the race — and out of the remainder of the Sydney SailGP regatta.
TEMPORARILY BOATLESS What Should Chuck Hawley’s Next Boat Be? Chuck Hawley has sold his most recent boat and is hot on the trail for a new one.
Sponsored Post Skippers Wanted: US Coast Guard-Licensed Captains for Charters and Private Lessons For power & sail. Hourly rate from $50 up. Weekend and weekday work available.
Let Your Lights Shine Lighted Boats Continue to Dazzle the Bay The Lighted Boat Parades continue! Tonight, the St. Francis YC’s Decorated Boat Parade in San Francisco will travel between Crissy Field and the Marina Green.
Sponsored Post Stuff Your Stockings with Latitudes The perfect stocking fillers. And they're free!
- Navigating the High Seas: A Comprehensive Guide to Sailboat Masts
Sailboat masts are the unsung heroes of the sailing world, silently supporting the sails and ensuring a smooth journey across the open waters. Whether you're a seasoned sailor or a novice, understanding the intricacies of sailboat masts is essential for a safe and enjoyable voyage. In this comprehensive guide, we will delve into the world of sailboat masts, discussing their types, maintenance, and everything in between.
Types of Sailboat Masts
Sailboat masts come in various configurations, each with its advantages and drawbacks. The two primary types are keel-stepped and deck-stepped masts.
Keel-Stepped Masts
Keel-stepped masts are the most common type, extending through the deck and resting on the boat's keel. They provide excellent stability and are suitable for larger sailboats. However, they require careful maintenance to prevent water intrusion into the boat's cabin.
Deck-Stepped Masts
Deck-stepped masts rest on the deck of the boat, making them easier to install and remove. They are commonly found on smaller sailboats and are more forgiving in terms of maintenance. However, they may offer slightly less stability than keel-stepped masts.
Components of a Sailboat Mast
To understand mast maintenance better, it's essential to know the various components of a sailboat mast. The key parts include the masthead, spreaders, shrouds, and halyard sheaves.
The masthead is the topmost section of the mast, where the halyards are attached to raise and lower the sails. It also often houses instruments such as wind indicators and lights.
Spreaders and Shrouds
Spreaders are horizontal supports attached to the mast to help maintain the proper angle of the shrouds (cables or rods that provide lateral support to the mast). Properly adjusted spreaders and shrouds are crucial for mast stability and sail performance.
Mast Materials: Choosing the Right One
Sailboat masts are typically constructed from three primary materials: aluminum, wood, and carbon fiber. Each material has its unique characteristics and is suited to different sailing preferences.
Aluminum Masts
Aluminum masts are lightweight, durable, and relatively easy to maintain. They are commonly used in modern sailboats due to their cost-effectiveness and longevity.
Wooden Masts
Wooden masts, while classic and beautiful, require more maintenance than other materials. They are best suited for traditional or vintage sailboats, where aesthetics outweigh convenience.
Carbon Fiber Masts
Carbon fiber masts are the pinnacle of mast technology. They are incredibly lightweight and strong, enhancing a sailboat's performance. However, they come at a premium price.
Mast Maintenance
Proper mast maintenance is essential for safety and longevity. Regular cleaning, inspection, and addressing minor issues promptly can prevent costly repairs down the line.
Cleaning and Inspection
Regularly clean your mast to remove salt, dirt, and grime. Inspect it for signs of corrosion, wear, or damage, paying close attention to the masthead, spreaders, and shrouds.
Common Repairs and Their Costs
Common mast repairs include fixing corroded areas, replacing damaged spreaders, or repairing shrouds. The cost of repairs can vary widely, depending on the extent of the damage and the materials used.
Extending the Lifespan of Your Mast
Taking steps to prevent damage is essential. Avoid over-tightening halyards, protect your mast from UV radiation, and keep an eye on corrosion-prone areas.
Read our top notch articles on topics such as sailing , sailing tips and destinations in our Magazine .
Stepping and Unstepping a Mast
Stepping and unstepping a mast is a crucial skill for any sailboat owner. This process involves removing or installing the mast on your boat. Here's a step-by-step guide for safe mast handling.
Step-by-Step Guide for Safe Mast Handling
- Gather the necessary tools and equipment.
- Disconnect all electrical and rigging connections.
- Use a crane or mast-stepping system to safely lower or raise the mast.
- Secure the mast in its proper place.
- Reconnect all electrical and rigging connections.
When and Why to Unstep a Mast
You may need to unstep your mast for various reasons, such as transporting your sailboat or performing extensive maintenance. It's crucial to follow the manufacturer's recommendations and ensure a safe unstepping process.
Sailboat Mast Boot: Protecting Your Mast
A mast boot is a simple yet effective way to protect your mast from water intrusion and damage caused by the elements. Here's what you need to know.
The Purpose of a Mast Boot
A mast boot is a flexible material that wraps around the mast at the deck level. It prevents water from entering the cabin through the mast opening, keeping your boat dry and comfortable.
Installing and Maintaining a Mast Boot
Installing a mast boot is a straightforward DIY task. Regularly inspect and replace it if you notice any signs of wear or damage.
Replacing a Sailboat Mast
Despite your best efforts in maintenance, there may come a time when you need to replace your sailboat mast. Here's what you should consider.
Signs That Your Mast Needs Replacement
Common signs include severe corrosion, structural damage, or fatigue cracks. If your mast is beyond repair, it's essential to invest in a replacement promptly.
The Cost of Mast Replacement
The cost of mast replacement can vary significantly depending on the type of mast, materials, and additional rigging needed. It's advisable to obtain multiple quotes from reputable marine professionals.
Yacht Masts: Sailing in Style
For those looking to take their sailing experience to the next level, upgrading to a yacht mast can be a game-changer.
Differences Between Sailboat and Yacht Masts
Yacht masts are typically taller and offer enhanced sail performance. They are often equipped with advanced rigging systems and technology for a more luxurious sailing experience.
Upgrading to a Yacht Mast
Consult with a marine professional to determine if upgrading to a yacht mast is feasible for your sailboat. It can be a significant investment but can transform your sailing adventures.
Sailboat Mast Steps: Climbing to the Top
Mast steps are handy additions to your mast, allowing easier access to perform maintenance or enjoy panoramic views. Here's how to use them safely.
Using Mast Steps Safely
Always use proper safety equipment when climbing mast steps. Make sure they are securely attached to the mast and regularly inspect them for wear or damage.
The Advantages of Mast Steps
Mast steps provide convenience and accessibility, making sailboat maintenance tasks more manageable. They also offer an elevated vantage point for breathtaking views while at anchor.
Mast Maintenance Tips for Beginners
If you're new to sailboat ownership, these mast maintenance tips will help you get started on the right foot.
Essential Care for First-Time Sailboat Owners
- Establish a regular maintenance schedule.
- Seek advice from experienced sailors.
- Invest in quality cleaning and maintenance products.
Preventing Common Mistakes
Avoid common pitfalls, such as neglecting inspections or using harsh cleaning agents that can damage your mast's finish.
Sailing with a Mast in Top Condition
A well-maintained mast contributes to a safer and more enjoyable sailing experience. It enhances your boat's performance and ensures you can rely on it in various weather conditions.
How a Well-Maintained Mast Improves Performance
A properly maintained mast helps maintain sail shape, reducing drag and improving speed. It also ensures that your rigging remains strong and secure.
Safety Considerations
Never compromise on safety. Regularly inspect your mast, rigging, and all associated components to prevent accidents while at sea.
Sailboat masts are the backbone of any sailing adventure, and understanding their intricacies is crucial for a successful voyage. From choosing the right mast material to proper maintenance and upgrading options, this guide has covered it all. By following these guidelines, you can sail the high seas with confidence, knowing that your mast is in top condition.
So what are you waiting for ? Take a look at our range of charter boats and head to some of our favourite sailing destinations .
ShortyPen.com
- Board Boats
- Day Sailors
- Pocket Cruisers
- Multihull Sailboats
- Contributors
- Shorty Articles
- Contact Shorty
Raising a Sailboat Mast - the EASY way

Basics of Mast Raising
IF you have the luxury of a mast crane, then all it needs is a sturdy rope strop around the mast and under the spreader - typically just above the center of gravity of the mast – and you’re all set. Of course, you need to pre-think the attachment so that you can pull it down from the mast after it’s in place, but that’s not so complicated … even a light line snapped on, can work as long as you’re not wrapped around 2 sets of diamonds! Otherwise you may be climbing the mast before you even go sailing ;-)
But most of us on relatively small boats that are trailed to the launch site, need to get equipped to raise and lower your mast independent of cranes … and often while alone. So here are the basics.
The mast needs a pivot bolt at the mast base , that’s located athwartships, so that the mast cannot rotate on it’s axis, but can pivot down, either fore or aft. Which way you go will depend on the deck arrangement and pivot height. As the distance from mast step to the stern is typically longer than to the bow, lowering aft makes more sense for mast support when down .. but with some boats, the cabin top or hatchway is higher than the pivot and then it’s easier to lower the mast forward, even if it means making a temporary support for the mast either on the ground or on your tow vehicle. Some boats have a raised tabernacle for the pivot in order to clear the cabin, so that’s another solution for lowering aft.
You’ll need a crutch to support the mast when it’s down .. and if you can incorporate a roller on this crutch it’s good to do so, as the mast will almost certainly need to be rolled or slid back over the boat once down, in order to limit the overall length for trailing.
For raising (or lowering) you will need these basics:
A gin pole to give you lifting leverage. This needs to be able to take the compression while lifting (figure on at least double the mast weight) and be not less than 1/4 the mast length. The closer this is mounted to the mast pivot the more effective it is, but a boom mounted on a sturdy gooseneck that’s not too high up the mast still works.

Side guys to keep both the gin pole AND the mast itself, close to the boat centerline. If fixed in length, these lines need to be attached to a pivot as far outboard as practical, and with an eye at the same height as the pivot bolt for the mast foot. Such an attachment can be arranged either with a bracket or raised stanchion that’s temporarily bolted to the boat (or ama in the case of a trimaran), or can also be rigged to an type of bridle at the boat side. Such a bridle needs a strong ring to which the side guy is attached and then have lines forward and aft that are adjustable so that when under tension, the ring is brought to be in line both horizontally and fore & aft with the mast pivot bolt. Setting this up is tricky the first time, but after the attachment points are established and the ropes are marked, one can easily set it up to those marks in future and know that the ring will be well located. Periodically check for line stretch though.
Guys for the mast itself, can sometimes be the actual shrouds, as long as they are not initially too long and that they use adjustable tackles to tension them. Sometimes a mast is equipped with lower shrouds that can be used or even trapeze lines, as IF the mast is kept close to the centerline, the side load will not be high.
Guys for the Gin Pole , can either be dedicated lines that are fixed in length and snapped to a location in line with the mast pivot .. OR they can be a part of the tackle that is used for hauling up the mast itself. Such a system is used by the Dragonfly Boats – rigged with two lifting lines, one port and one starboard. EACH of these lines are fixed to the ama near the aft beam and run up to a block at the end of the gin pole (or boom) and then back down to a block on the centerline at the stern and then forward to a winch. So there will be two blocks at each location ... at the boom/ginpole end, and at the rear of the cockpit. The two lines go around the winch together.
Typically the main halyard is used while raising the mast …, running from the upper end of the gin pole (or boom), through the mast head sheave and down the mast to a sturdy cleat near the mast base, well tied off. From the underside of the gin pole (or boom), the mainsheet is often snapped on to haul the gin pole back to raise the mast .. or if the mast was laying aft and is being raised forward while on a trailer, then the boat winch line can be used, snapped to the underside of the gin pole end (or boom), so that the trailer winch itself can be used to do the raising work.
If the boat is not on a trailer, a multi-part tackle (4,5 or 6 parts may be required) can be attached to the end of a bowsprit to raise the mast. Both these system have successfully been used to raise the wing mast on a W17 trimaran, though using the trailer winch with a dedicated gin pole that pivots on the same pin as the mast, has proven to be the faster method.
Just a word about the crutch for the mast. The preference for a roller has already been mentioned. This crutch needs to be as high as practical as then the starting load to lift the mast is reduced. At the same time the upper-mast-tip still needs to be within local height clearances for trailing .. so generally preferable to stay around 10ft (3m) or so. In the case of the W17, the crutch is dropped into the stern well and slopes aft at about 35-40 deg from the vertical. (The crutch in the photo below, shows it much too low, after the lines slipped during a long trip) . The mast should lower to the crutch with the spreaders forward of it, so that they do not make things difficult to roll the mast forward to the trailing position after the mast is lowered. See also this article on Handling the W17 ashore .
If lowering the mast forward, then a crutch on your towing vehicle can help give good height, or otherwise you may need a temporary stand or tripod on the ground, that has a central support that you can raise by hand and then clamp or pin in place … as the higher this is, the less load you will have on the lifting lines. (I even have an old paddle with a notch in its blade that fits the mast section. A tall crew member can then give the mast a push up at the beginning of the lift to reduce the starting lift load).

In conclusion, there are MANY ways to raise a mast, but unless your whole rig is non-standard, they generally are all variants of what is described above. Check everything twice to see all ropes and parts are well attached and not entangled, and you’ll be fine.
"New articles, comments and references will be added periodically as new questions are answered and other info comes in relative to this subject, so you're invited to revisit and participate." —webmaster
"See the Copyright Information & Legal Disclaimer page for copyright info and use of ANY part of this text or article"
adventures aboard our CS34 sailboat
- Thousand Islands
- Ontario to Bahamas 2023
- Maintenance
- Just Pictures
Raising the mast on a Macgregor 26x
These are my instructions of raising the mast on a Macgregor after having it setup for trailering. These instructions are specific to our 2002 Macgregor 26x, but should apply to other Macgregor sailboats as well.
Tools needed
- Two 9/16″ wrenches
- Two 1/4″ wrenches
- Mast raising pole, with bolt, line and block and tackle pulley system
- Winch handle
Before starting, check the mast for damage and ensure the pulleys at the top of the mast for the jib and main halyard are not tangled. Confirm the VHF antenna is not damaged and securely connected. Check all the spreaders and stays to ensure they are not tangled or caught on anything.
Tip: Close the sliding hatch now and keep it closed. This will provide you with more standing area on the deck.
Tip: If you haven’t done it in a while, use a Teflon spray for the sail channel in the mast. This will make raising and lower the sail easier.
These instructions use the mast raising system. You can do this without the system, the mast isn’t all that heavy. But I find with all the things that can snag and catch the mast as it’s going up it is much easier to use the mast raising system because it can safely hold the mast in place while you fix the tangle.
Step 1 – Unsecure mast from mast carrier and front rail
Using the two 9/16″ wrenches, undo the bolt from the front rail.

Using the two 9/16″ wrenches, remove the bolt from the mast carrier.

Step 2 – Secure the base of the mast to the mast hinge
Holding the base of the mast, slowly slide the mast toward the stern of the boat, taking care of the stays. The mast should slide along the mast carrier pulley on top of the steering pedestal with minimal effort. If it doesn’t it means it’s caught up. Stop and look.
With the base of the mast pushed back toward the mast hinge, use the bolt you just removed from the bow of the boat to attach the mast. Don’t over-tighten the bolt, it should be snug but doesn’t need to compress on the mast.

Step 3 – Setup mast raising system
Start with attaching the mast raising pole to the mast hinge. Make sure the block and tackle are facing toward the deck.

Attach the block and tackle to the deck.

Attach the jib halyard, extending from the top of the mast to the top of the mast raising pole.

The jib halyard should run from the mast raising system to the top of the mast, down the mast and secured to the cleat on the side of the mast. You want to adjust the length of this so that the mast raising pole is at 90 degrees. This will give you plenty of room in the block and tackle to pull that mast raising bar down to the deck of the boat.
The mast raising block and tackle should have a line extending back to the cockpit and wrapped three times around one of the winches.
Step 4 – Prepare to raise the mast
Before you start pulling on the mast raising system, take a breather. It’s extremely important you make sure everything is ready before you start hauling up the mast. If something’s wrong or something slips, it will cause a lot of damage.
- Mast raising system and lines secure. Line wrapped around winch properly and not tangled in anything. Winch handle attached.
- Jib halyard line adjusted to right length and secure
- Side shrouds (or side support wires) properly attached. 1/2″ of play while mast is down.
- Mast shrouds properly attached (this is what will keep the mast from falling over sideways when you lift)
- Rear stay untangled and block opened up to extend the length
- Mast stays are on top and clear of life lines
- Only two people on the boat, can be done with one, but better with two. More than two is too crowded.
Step 5 – Raise the mast
Have one person at the winch and a second person standing on top of closed hatch cover. The mast is heaviest when lying flat. You could get the winch to do all the work, but it’s much easier to have the second person lift the mast at the same time. Once it’s at 45 degrees, it’s much easier to winch and the second person doesn’t have to lift anymore.
Start lifting the mast. Always check the shrouds and spreaders, they like to get caught up. Stop at points, lock in the line leading to the mast raising system to hold the mast in place and take a moment to double check that nothing is tangled up.
Check the side shrouds to make sure they are not too tight. If you’ve adjusted while the mast is down there’s a good chance they are too tight and would pull right out of the deck. The outer shrouds, the ones near the outer railing of the boat will be doing most of the work once the mast is up. These should become like a really loose bass guitar string.
The second person will have three jobs. Lift the mast for the first bit. Check and free up any tangles. Grabbing the foresail furler and slowly walking it to the bow of the boat. Otherwise the furler is going to flop about and drag across the deck.
Step 6 – Attach the furler to the forestay connection
This is the point where you will quickly be able to tell if you don’t have any tangled lines. The furler should be very close to the chain plate on the bow of the deck.

Attach the furling jib to the top foremost opening in the forestay connection. You need to use clevis pin. Make sure brackets in the furling jib are parallel and not bent in, or out. This connection seems a bit suspicious to me, I think I would feel better having spacers, maybe bolts, on either side to prevent the connection from sliding slightly.
Step 7 – Tighten backstay and double check everything.
Now the jib is firmly attached, you can slowly release the pressure on the mast raising system. Give it a few inches of slack, but don’t completely remove it yet.
Pull the lever over on the tightening block on the backstay to tighten up the system.
All the support wires should be tight. The mast should have a slight bend in it. It should look like a bow facing forward. Or the middle of the mast should be about 2″ forward of a straight line.
Secure all the clevis pins and rings (all chainplates / shrouds).
Don’t forget to attach the VHF antenna and the steaming light wire from the base of the mast to the deck.
Step 8 – Attach boom and main sail
Use the 1/4″ wrenches to attach the boom to the mast make sure the open channel for the sail is facing up.

Attach the Boomkicker, it connects base of the mast to the deck of the boat. This will help hold up the mast while you complete the rest of the steps. You can also take the main halyard and attach it to the end of the boom to hold it up.
Connect the mainsheet. First, make sure it the line is threaded correctly through the blocks.

The lower end is attached to the top of the steering pedestal.

The top end is attached to the ring on the boom.

Now you can feed the mainsail into the mast and boom. This can be a bit tricky on a windy day which is why I think feeding up the mast first could be easier, the sail will flap but won’t try to power the boat.
Attach the head of the sail (top), it has an aluminum plate attached to it, to the main halyard. Start feeding the sail into the mast and have a second person use one of the winches to slowly pull the main halyard as you feed the sail into the mast. As it approaches the top, you want to align the eyelet in the sail lines up with the bolt. Use this to attach the bottom corner of the sail to the mast.
If it’s windy, release your mainsheet so your boom can swing away from the wind. You can also try lowering the sail most of the way down. Feed the base of the sail into the boom and attach the outhaul to the end of the sail and tighten to the cleat on the starboard side of the boom.

Now you can fold the sail onto the boom. Pull the sail as far up as you feel safe to do in current wind conditions. Then as one person slowly lowers the sail, the second stands in front of the mast and reaches around on either side and folds the sail to either side of the boom. Use the sail ties to secure the sail to the boom.
Step 9 – Prepare the jib sheet
I’m assuming the jib is already wrapped nicely around the CDI Jib furler. If not, then you’ll need to hoist and furl the jib. I need to create separate instructions for this.
The middle of the jib sheet is attached to the jib.

These sheets then go down both sides of the boat and feeds through the jib sheet blocks attached to the top of the cabin.

Make sure the sheet is fed through the lifelines so it won’t get tangled when the jib is out. You can adjust the block forward or backward depending on the conditions and how much you are pointing to wind.
Some advice from the owner’s manual: “When you turn the boat into the wind, if the top portion of the jib collapses and loses its shape before the bottom part of the sail, move the blocks forward. If the bottom half of the sail collapses first, move the blocks to the rear.”
Note: Photos taken from the Macgregor manual and reproduced here without permission. If anyone has an issue with this, please let me know and I will promptly remove them.
Lazy Jacks (Optional)
I removed these from the rigging right after we bought it. I had enough ropes and gear that I needed to figure out first. They help fold the sail over the boom, very useful for single handing or if your crew doesn’t like to get up on deck.

If you decide to install, check out the user manual here: http://www.harken.com/uploadedfiles/Product_Support/PDF/4058.pdf
The connectors are already attached to the mast and the boom. You just need to re-attach the two wires with pulleys to the mast. Run the control lines around the boom through the pulleys. And then attach bungee cords to the side stays to pull the two wires outward away from the mast.
If you just want to temporarily lower and raise the mast to get under a bridge or to move the boat on the trailer a short distance then the steps are much simpler. You just need the mast raising system setup and then you follow the instructions to release or attach the forestay. The boom and sails stay on for this.
Related Posts:

12 Comments

August 7, 2019 at 1:27 am
Wow, it’s been a long time since I’ve looked at these instructions. I’ve updated with a few minor corrections. But it reminds me how much we’ve learned over the years. This process seemed so scary and complicated when we first bought the boat and now it seems so simple and easy.
Let me know if you have any questions, or alternate suggestions for raising/lowering the mast on your Macgregor!

March 16, 2021 at 10:38 pm
Hi My Macgregor 26x- just bought it lol has the back stay attached only to the starboard side of the stern
Is it supposed to be like that ? Or am I missing another wire that should come from the mast and attach to the port side of the stern ??
March 17, 2021 at 12:05 am
Congrats on the purchase!
Sounds like the same as what we had. The backstay went to the starboard side of the rear transom and was a bit lopsided. I guess they did this since the center is blocked by the rear seat flipping up and didn’t think it needed a second backstay to the port side.

May 26, 2021 at 5:55 pm
Thanks Shane, very helpful. Just bought a used 26x and reading up on all the tips & tricks. This was great. One question I can’t find an answer to yet is the mini-stays that attach ~1/3 way up mast and to the topside directly between the mast and the side stays. Are. These just for stabilizing while mast-raising, and to be removed after the mast is up? Or do they stay on permanently? They really restrict movement to foredeck, are secured at the hull with a slipthru L-bracket and a bolt that sticks up and doesn’t go into the deck. I’d like to remove them, but most pics and videos I find show these mini-stays in place while sailing. Any recommendations? Thanks again. Best, Max
May 27, 2021 at 11:12 am
Great question Max. Yes those two side shrouds are definitely helpful keeping the mast on center while raising and lowering the mast. Once raised, you are correct they don’t appear to be doing much as they remain pretty slack. And agree, movement on the deck is difficult. However, we always kept ours attached, just in case. Maybe others can chime in on their thoughts for these.

August 12, 2021 at 8:26 am
Hi Shane, yes the two mini-shrouds are just for raising and lowering. If you remove the raising pole they come off with it. Matt

August 18, 2021 at 2:36 pm
Does the aft end of the boom connect to the top of the mast to hold it up? Or does the aft end connect to the middle of the mast wire backstay ? Confused lol . Or does it even need to be held up?
August 18, 2021 at 3:17 pm
Good question Rab, it’s confusing at first!
We had a boom kicker at the front of our boom that was like a springboard pushing up on the boom. It’s a nice addition to make.
If you don’t have that, then most people would use the main halyard to extend from the top of the mast and attach to the aft end boom to keep it up. The boom will flop down when you first move this halyard over to the top of your main sail. But the boom will lift back up as you lift the main. Or some will run a second line up the mast to the top and then to the end of the boom (“Topping Lift”).
Lots of options, but o not attach it to the backstay. That will cause issues.

September 23, 2021 at 7:32 pm
Do you run the two jib lines that go back to the cockpit outside the two shrouds outside? Thanks
September 23, 2021 at 10:23 pm
Yes you do. You will quickly realize why this is important if you don’t do this.

October 18, 2021 at 12:53 pm
Thanks for uploading this. Just bought a 2002 Mac 26x for day sailing and overnighting in Florida. Looking over your instructions has broken it down much better. I’ve just got to learn all of these new words. 🙁 Thanks so much though!
October 18, 2021 at 3:33 pm
Glad my instructions are helping you Christopher. And agree, there’s a lot of new and strange terminology used on a sailboat that takes time to learn. And it is useful to learn when you have others on the boat or when you are trying to quickly explain to someone else an issue on the boat. Much easier to say, “the main halyard”, rather than, “that rope thingy that goes over there then up to the top of the mast attached to that big white cloth thing that makes the boat go forward in the wind”. 🙂
Here’s a good reference. Print something like this out and put it on your fridge. https://www.discoverboating.ca/boating/sailing/parts.aspx
2 Pingbacks
- Sailing blog user stats – Foghorn Lullaby
- Rigging a Macgregor 26x – the first time – Foghorn Lullaby
Leave a Reply Cancel reply
Your email address will not be published. Required fields are marked *
Save my name, email, and website in this browser for the next time I comment.
Yes, please add me to your mailing list
Subscribe to Our Newsletter
You will receive a maximum of one email per week with links to the latest stories published here (only for the type of stories you selected above). We do not share this list with anyone and you will not receive any spam from us.
Thank you! Check your inbox or spam folder to confirm your subscription.
Recent Comments
- Crystal Liimatta on Week 9: Around Cape Fear, NC to Beaufort, SC
- Patricia Latimer Martin on Week 9: Around Cape Fear, NC to Beaufort, SC
- Kevin on Week 8: Belhaven, NC to (almost) Southport, NC
- Linda Grimm on Week 8: Belhaven, NC to (almost) Southport, NC
- Glenda Liimatta on Week 8: Belhaven, NC to (almost) Southport, NC
Learn more about our Canadian Sailcraft CS34 Sailboat
Lake Ontario Weather
Various topics
© 2024 Foghorn Lullaby — Powered by WordPress
Theme by Anders Noren — Up ↑
Mast Stepped: A Comprehensive Guide to Properly Installing and Maintaining Your Sailboat’s Mast
by Emma Sullivan | Jul 17, 2023 | Sailboat Gear and Equipment
Short answer mast stepped: Mast stepped refers to the position where a sailing boat’s mast is supported and secured on deck. It commonly involves attaching the base of the mast to a step or partners, ensuring proper rigidity and stability for sailing operations.
What does it mean for a mast to be stepped on a sailboat?
Blog Title: Navigating the Seas: Demystifying Mast Stepping on a Sailboat
Introduction: Sailing is often associated with a sense of freedom and adventure, as you glide through the serene waters powered only by the wind. However, behind every majestic sailboat lies a complex set of components working in synchrony. One such crucial element is the mast, which plays an integral role in allowing your vessel to conquer the seas. In this blog post, we will delve into what it truly means for a mast to be stepped on a sailboat and explore its significance in sailing.
What is Mast Stepping? When we refer to “stepping” the mast on a sailboat, we are essentially describing the process of erecting or installing it onto the boat’s deck. Picture this: just like erecting a tent requires setting up poles, attaching beams, and securing them firmly in place – stepping the mast follows similar principles but with much more complexity.
The Role of Mast: To comprehend why this process holds vital importance for sailors, understanding the role of a mast itself is paramount. The mast serves as an essential vertical spar that supports and secures all standing rigging – encompassing shrouds and stays – which ensures that your sails remain taut amidst ever-changing weather conditions. Additionally, it houses various components necessary for smooth navigation, including halyards (ropes used to raise and lower sails), sheaves (pulleys facilitating rope movement), and even instrumentation like wind sensors or radar systems.
Now that we have established why masts are pivotal in sailing, let’s explore the different types of masts commonly found on sailboats:
1. Keel-Stepped Mast: In modern sailboats, keel-stepped masts are prevalent. These masts rest securely in support at their base within or directly on top of the keel (the large fin-like structure underwater). This design enhances structural integrity and stability while also allowing for easy maintenance.
2. Deck-Stepped Mast: Alternatively, some sailboats feature deck-stepped masts. These masts are secured on the boat’s deck itself, with a lower support or compression post transmitting the mast’s loads to the keel. Deck-stepped masts offer advantages like simplified installation and removal, making them particularly favorable for smaller boats or those frequently transported by trailer.
The Process of Stepping the Mast: Now that you grasp the significance of the mast and understand its types let’s explore how this intricate process is executed:
1. Preparation: Before embarking on mast stepping, it is crucial to ensure that all necessary rigging hardware, lines, hoisting equipment (such as a crane or gin pole), and safety gear are readily available. Thoroughly inspecting all components for wear and tear is equally important to avoid any mishaps during installation.
2. Alignment & Integrity Check: Next comes aligning the mast properly at its designated step point on the boat’s deck or within/upon the keel structure (depending on mast type). Checking for proper alignment prevents undue stress on both the boat and mast while ensuring efficient sailing performance.
3. Hoisting & Securing: With preparation complete and alignment precise, it’s time to gently hoist the mast using an appropriate force measurement technique to prevent overloading any connection points or causing damage. Adequately securing the mast at its step point is paramount – utilizing sturdy stainless steel bolts, shackles, or other suitable fixtures ensures a robust connection.
4. Rigging Installation: Once your mast stands tall and firm, it’s time to attach various standing rigging elements such as shrouds, stays, halyards – each with their specific task in supporting sail control systems aboard your vessel. This requires careful attention to detail – adjusting tensions correctly according to manufacturer guidelines guarantees optimal sail performance across different wind conditions.
Conclusion: Stepping the mast on a sailboat is a critical procedure that sets the foundation for successful and safe sailing adventures. A well-adjusted mast brings stability, facilitates efficient control, and allows your sails to harness the power of the wind, propelling you towards new horizons. So, next time you embark on an aquatic journey, appreciate the skill and craftsmanship behind this process – knowing that every smooth glide owes its gratitude to a perfectly stepped mast.
How is a mast stepped on a sailboat? A step-by-step guide.
Stepping the mast on a sailboat is a fundamental process that marks the beginning of every sailing adventure. It involves raising and securing the mast into its proper position, allowing for the attachment of sails and rigging, ultimately enabling the boat to harness the power of wind and embark on exciting voyages. In this step-by-step guide, we will explore the intricacies of stepping a mast, providing you with all the necessary knowledge to do so successfully.
Step 1: Preparation Before stepping your mast, it is important to ensure that all preceding preparations have been completed. This includes assembling all necessary tools and equipment such as shackles, halyards, or winches. Additionally, inspecting both your boat’s standing rigging and mast itself for any signs of damage or wear is crucial for safety and optimal performance during future sailing endeavors.
Step 2: Clearing obstructions In order to safely step your mast onto your sailboat’s deck, make sure that all potential obstructions are removed. Check for any lines or fittings that may hinder the smooth process of raising the mast. A clutter-free workspace will significantly reduce stress and allow for seamless progress throughout this procedure.
Step 3: Proper positioning You now need to position your sailboat in an ideal location from where you can safely step the mast. Find a spot protected from strong winds or currents that might make this task more challenging. Ideally, choose an area with ample space around you to maneuver freely without risking damage to your vessel or nearby objects.
Step 4: Assemble assistance team Without doubt, stepping a mast is rarely a one-person job. Recruiting assistance from fellow sailors or friends will not only make this process less physically demanding but also contribute to safer execution overall. Ensure everyone involved understands their assigned roles and responsibilities before proceeding further.
Step 5: Attach standing rigging Begin the process of stepping the mast by attaching and adjusting the standing rigging. This includes securing your forestay, backstay, shrouds, and any other supporting cables or wires. Follow manufacturer guidelines and best practices to ensure proper tension and alignment. It is vital to double-check all connections, as loose or improperly attached rigging can compromise the stability and performance of your sailboat.
Step 6: Hoisting the mast Here comes the exciting part – raising the mast! Depending on your boat’s design, this step might require a crane or a simple manual lifting mechanism. Communicate clearly with your team and follow a synchronized approach while hoisting the mast to avoid any accidents or setbacks.
Step 7: Aligning and securing Once your mast is in an upright position, carefully align it with its designated base partner (known as a step) on deck. Any misalignment at this stage can result in unwanted stress on fittings or potentially damage critical components of your sailboat’s rigging system. Use shims if necessary to level out any minor discrepancies.
Step 8: Stabilizing and tightening Now that your mast is properly aligned, securely fasten it using nuts, bolts, or pins provided by its design specifications. Pay close attention to recommended torque values to avoid under- or over-tightening. This step ensures that even under significant wind forces, your mast remains steadfastly anchored.
Step 9: Check for secure fit Before celebrating the successful completion of stepping your sailboat’s mast, conduct a final inspection to ensure everything is secure. Inspect all attachments points thoroughly, checking for signs of movement or looseness. Shake the mast gently from various angles to identify any wobbling that may indicate insufficient tightening.
By following these nine steps meticulously, you will have successfully stepped the mast on your sailboat like a pro! Properly stepping a mast ensures both safety and optimal performance, granting you the freedom to set sail and explore new horizons with confidence. Remember, if you ever feel unsure or uncomfortable during any stage of this process, consult your boat’s manufacturer or seek professional assistance for guidance. Happy sailing!
Mast Stepped: Frequently Asked Questions (FAQ)
At Mast Stepped, we understand that many boat owners have questions about the mast-stepping process. To help alleviate any concerns or confusion, we’ve compiled a list of frequently asked questions (FAQ) below. Read on to discover detailed professional answers to these queries.
1. What is mast stepping, and why is it important? Mast stepping refers to the process of raising a boat’s mast into its designated position. This task is crucial because it enables your boat to properly harness wind power for sailing or cruising. A well-aligned and secured mast ensures better performance and stability on the water.
2. When should I step my mast? Mast stepping is typically done during spring commissioning, when boats are taken out of winter storage and prepared for the upcoming season. However, it can also be necessary if you’re re-rigging your mast or performing maintenance on your rigging system.
3. Can I step my mast by myself? Stepping a mast requires careful planning, preparation, and coordination. While some experienced sailors may be able to do it alone, it’s generally recommended to have at least one other person assisting you. Moreover, enlisting professionals who specialize in mast stepping can provide extra peace of mind and ensure a smooth process.
4. How much does professional mast stepping cost? The cost of professional mast stepping services varies depending on factors such as the size and complexity of your boat’s rigging system, location, and additional services required. It’s best to request quotes from reputable marine service providers who can assess your specific needs accurately.
5. What steps are involved in the mast-stepping process? Mast stepping involves several key steps:
– Preparation: Ensure all rigging lines are securely attached with no tangles or snags. – Support: Use sturdy supports such as a crane or gin pole to temporarily hold your mast in place during the raising process. – Alignment: Carefully align the mast with the boat’s keel, making sure it is perpendicular to the waterline. – Attachment: Securely attach the mast to its base (deck or keel) using appropriate hardware and fasteners. – Rigging: Reconnect all necessary lines, cables, and electrical connections according to your boat’s specific rigging configuration.
6. Are there any safety precautions I should take during mast stepping? Safety is paramount when dealing with a tall structure like a mast. It’s essential to follow best practices such as wearing proper protective gear (e.g., harnesses), using secure lifting equipment, and conducting a thorough inspection of all rigging materials beforehand. Additionally, be cautious of overhead powerlines that may pose a hazard during the mast raising process.
7. How often should I inspect my mast and rigging system? Regular inspections are crucial for detecting any signs of wear, corrosion, or damage that could compromise your boat’s safety while at sea. Ideally, you should visually inspect your rigging system yearly and perform more detailed examinations every three to five years or as recommended by professionals.
8. Can Mast Stepped assist me in selecting the right rigging components? Absolutely! Our team of experts can provide guidance on selecting appropriate rigging components tailored to your boat’s specifications and sailing needs. From wire ropes to turnbuckles and fittings, we’ll help you choose durable and reliable equipment from trusted manufacturers.
9. What are some common indicators that my mast needs attention? Signs that your mast may require attention include loose shrouds or stays, clanging noises while under sail, excessive movement or swaying of the mast when underway, leaks around deck penetrations connected to your mast (e.g., halyard exits), visible cracks or deformation on any part of the structure. If you notice any of these issues, it’s best to have them inspected promptly by professionals.
10. Can Mast Stepped assist with unstepping a mast too? Absolutely! Just as we specialize in mast stepping, our services also encompass unstepping masts. Whether you’re preparing for winter storage or need to address rigging maintenance, we have the expertise and equipment to safely handle the de-rigging process.
In conclusion, at Mast Stepped, we understand that proper mast stepping is essential for optimal sailing performance and safety. By addressing frequently asked questions about this process, we aim to empower boat owners with knowledge and resources to ensure their rigs are ready for every adventure on the water. Whether you decide to tackle mast stepping yourself or seek professional assistance, don’t overlook this crucial aspect of boat maintenance – your sailing experience will thank you!
The importance of proper mast stepping for sailboat performance.
Title: Elevating Sailboat Performance: Unveiling the Crucial Role of Proper Mast Stepping
Introduction: Ah, the allure of sailing! The mere thought of gliding through azure waters on a sailboat evokes a sense of freedom and adventure. Yet, behind every successful seafaring expedition lies an often overlooked factor that can make or break a sailor’s experience – proper mast stepping. In this blog, we delve deeper into the importance of ensuring your sailboat’s mast is securely and skillfully stepped, unlocking the secrets behind achieving optimal performance on the high seas.
1. Stability in Every Gust: Imagine navigating a turbulent sea only to find yourself at the mercy of every gusty squall. The trunk-like stability of proper mast stepping is precisely what separates sublime sailing from unbridled chaos. By meticulously aligning and securing your boat’s mast, you establish a foundation that resists excessive movement when encountering powerful wind currents. This stability not only enhances safety but also allows you to maintain better control over your vessel, optimizing performance even in challenging conditions.
2. Maintaining Alignment: Taming Sail Power: A crucial aspect of proper mast stepping lies in maintaining perfect alignment between your sails and rigging components. Just as an orchestra conductor ensures each musician produces harmonious melodies, correctly aligning your mast orchestrates collaboration between sail power and hull dynamics – key factors influencing boat speed and responsiveness. Through careful adjustment and tuning during mast stepping, optimum alignment can be achieved, maximizing propulsion efficiency while minimizing unnecessary strain on vital components.
3. Mastering Balance for Speed: Speed aficionados know that reducing drag is paramount to capturing those elusive knots on open waters. Correctly stepped masts enable boats to strike an equilibrium where dynamic forces align symmetrically with hydrodynamic profiles beneath the waterline—less drag equals more speed! Aligning the center of effort (where sails produce force) with the centerboard or keel down below ensures enhanced balance and a streamlined course through the waves, transforming your boat into a true speed demon.
4. The Symphonic Rigging Ensemble: Proper mast stepping unifies all elements of your sailboat’s rigging system into a harmonious symphony. Whether sails, sheaves, halyards, or shrouds – each element has its part to play in creating the perfect melody that propels you forward. By ensuring precise mast alignment during stepping, you unleash the full potential of each component to work together seamlessly, unlocking enhanced efficiency and promoting optimal performance on every seafaring escapade.
5. Defying Cataclysm: Durability and Safety: A sailboat is only as strong as its weakest link, and improper mast stepping can undermine not just performance but also safety at sea. The consequences of neglecting this critical aspect can range from sagging masts to compromised connections that give way when challenged by harsh weather or sudden jolts. Skillful mast stepping eliminates vulnerability by guaranteeing robust connections, significantly reducing the risk of structural failure or catastrophic dismasting when navigating choppy waters.
Conclusion: From beginners embarking on their maiden voyage to seasoned sailors seeking to optimize their craft’s performance, proper mast stepping remains an indispensable factor deserving meticulous attention. When done skillfully, it unveils a world where stability meets agility, harmony merges with power, and durability fuses with safety—all seamlessly working together to elevate your sailboat’s performance above all expectations. So next time you set sail, don’t overlook the importance of proper mast stepping – let it be the wind in your sails!
Common challenges and troubleshooting when stepping a mast.
Stepping a mast can often be a daunting task, especially for novice sailors or boat owners who are new to the process. It is important to approach it with caution and follow proper techniques to ensure a successful outcome. In this blog post, we will discuss some of the common challenges that you may encounter when stepping a mast and provide effective troubleshooting tips to overcome them.
1. Aligning the Mast: One of the primary challenges is aligning the mast properly during installation. Improper alignment can lead to structural issues or difficulty in raising and lowering the sails smoothly. To tackle this challenge, utilize a mast-stepping partner if available or seek assistance from crew members. Communicate clearly and establish guidelines to ensure everyone understands their roles in aligning the mast correctly.
2. Clearing Obstacles: Another challenge involves clearing any potential obstacles such as rigging lines, electrical wires, or deformed deck hardware that might hinder the smooth stepping of the mast. Conduct a thorough inspection of your boat’s setup beforehand and anticipate these obstacles in advance. If possible, reroute or temporarily remove any obstructions before beginning the process.
3. Dealing with Underneath Services: Boats often have various services passing through their decks, including plumbing lines, wiring conduits, or even fuel lines. Ensuring that these services are adequately protected during mast stepping is crucial to prevent damage while also ensuring they don’t impede the process. Consider using protective covers such as pipe insulation or duct tape where necessary.
4. Adjusting Tension: Proper tension adjustment for shrouds and stays plays an essential role in maintaining structural integrity and sail performance after stepping the mast. However, achieving optimum tension can be challenging due to factors such as limited visibility or excessive friction on turnbuckles when adjusting rigging lines under pressure. Utilize proper tools like turnbuckle wrenches or lubricants specifically designed for marine applications to ease tension adjustments effectively.
5. Securing the Mast: Once the mast is stepped and correctly aligned, it is crucial to secure it firmly while also avoiding excessive compression or stress points. Common methods include tensioning support lines (also known as “baby stays”) or using strap systems directly connected to the mast base. Ensure that these securing measures are evenly distributed on both sides of the mast and properly tensioned to maintain its stability.
6. Rigging Tuning: After successfully stepping the mast, you may need to fine-tune your boat’s rigging for optimal sailing performance. This can involve adjusting shroud tensions, forestay length, or mast rake depending on wind conditions and desired sail shape. Consult your boat’s manual or seek advice from experienced sailors to ensure proper tuning techniques specific to your vessel.
Stepping a mast requires patience, attention to detail, and a methodical approach. By understanding and addressing potential challenges in advance, you will be well-prepared to troubleshoot any problems that arise during this critical process. Remember, seeking guidance from seasoned sailors or professional riggers can greatly assist you in overcoming these challenges effectively and maintaining a safe sailing experience.
Mastering the art of mast stepping: Tips and techniques for sailboat owners.
Mastering the Art of Mast Stepping: Tips and Techniques for Sailboat Owners
Are you a proud sailboat owner? If so, then you already know that becoming an expert at mast stepping is a critical skill to possess. The process of stepping the mast might seem daunting at first, but with the right knowledge and technique, it can be mastered in no time. In this blog post, we will delve into the intricacies of mastering this art form, offering you valuable tips and techniques that will make raising your sailboat’s mast a breeze.
1. Safety First – Before even attempting to step your boat’s mast, ensure that safety is at the forefront of your mind. Taking precautions such as wearing appropriate safety gear (including a sturdy helmet), having a spotter to assist you, and checking all equipment thoroughly will minimize potential risks.
2. Plan Ahead – Planning plays a pivotal role in any successful endeavor, and stepping your boat’s mast is no exception. Familiarize yourself with the manufacturer’s instructions specific to your sailboat model. Understanding the exact procedure beforehand will prevent unnecessary confusion or errors during the process.
3. Gather Your Tools – To execute this task seamlessly, prepare by gathering all necessary tools and equipment beforehand. Common tools required include a tape measure, wrenches or socket sets (size determined by fasteners), shackles or pins for connecting stays/drill booms/Bob Stay/etc., halyards (mainly used for aligning fixtures), lubricants for easier installation, grease or anti-seize compound for preventing corrosion in stainless steel fittings.
4. Proper Alignment – Aligning your sailboat’s mast correctly is crucial to avoid damage when stepping it. Start by positioning the keel amidships while ensuring that fore/aft alignment rails are straightened in line with deck plates and web frames below decks using various measurements provided within manufacturers’ guidelines.
5. Calling on Friends – Family or friends come in handy during mast stepping. Having an extra pair of hands to assist you significantly reduces stress and increases efficiency. Assigning roles helps delegation, such as someone holding the base of the mast while another person secures the stays or shrouds.
6. Slow and Steady – While eagerness may prompt a desire to rush through this process, taking it slow and steady is key. Moving too quickly can lead to mistakes, mishaps, or even accidents. Patience and attention to detail are your allies throughout mast stepping.
7. The Power of Technology – Modern technology offers various tools that simplify mast-stepping tasks. Using a block-and-tackle system or an electric winch will reduce physical strain when raising your boat’s mast, allowing for smoother operations.
8. Avoiding Snags – Ensure that all lines, halyards, and anything else that could snag on surrounding objects are cleared away before starting the mast-stepping process. This prevents unnecessary snags and potential damage to your sailboat or surrounding structures.
9. The Perfect Alignment – Achieving perfect alignment involves using halyards or temporary stays to adjust for lateral movement once the spar is raised partially but not fully secured yet – don’t be afraid to make minor tweaks until satisfied with the outcome.
10.Preventing Corrosion – Regularly inspecting fittings for corrosion is essential in maintaining your sailboat’s overall integrity. Consider using anti-seize compound or grease on stainless steel fasteners during reassembly to mitigate future corrosion risks.
Mastering the art of mast stepping requires patience, practice, and attention to detail – but with these tips and techniques under your belt, you’ll soon become a pro at this vital skill for every sailboat owner! Remember always to prioritize safety first and enjoy many successful ventures out on the open water!
Recent Posts

- Sailboat Gear and Equipment
- Sailboat Lifestyle
- Sailboat Maintenance
- Sailboat Racing
- Sailboat Tips and Tricks
- Sailboat Types
- Sailing Adventures
- Sailing Destinations
- Sailing Safety
- Sailing Techniques
How To Raise the Boom on a Sailboat in 5 Easy Steps
There are a plethora of reasons why you might want to raise the boom on your sailboat, ranging from creating more space to performance adjustments. This article will show you how to do that in five simple steps.
So how to raise the boom on your sailboat?
- Drill new holes for repositioning the gooseneck
- Fill the old holes so that the mast strength is not compromised
- Shorten the sail
- Make sure the boom doesn't interfere with the backstay
- Check the new position's functionality and compatibility with all the other components
Now let's go over these steps in more detail. We will also have a look at some of the reasons for raising a boom on a sailboat. Who knows, maybe we'll inspire you and tomorrow you'll be on your boat with a toolbox by your side.
But I feel it might be quite the opposite - as you'll soon find out, raising a boom is no joke. However, there may be a good alternative.

On this page:
Why would you want to raise your boom, how to in five steps, what if i am now discouraged, in conclusion.
You might ask why even go down this path. After all, sailboats are made by experts who know what they are doing, and a boom is precisely where it is for a good reason.
Well, not so fast. Say your sailboat doesn't have a boom vang because it is more of a leisure cruiser. But you have adventurous blood coursing through your veins, and you want to add that boom vang to your vessel. So you do your research, you do all the measurements, and oops, the boom is too low for a standard vang.
This specifically is why quite a number of 30-foot C&C owners were looking precisely into this topic.
Or say you want to add a bimini to the cockpit for that extra shade and comfort, but the low placed boom doesn't allow for this.
Or what if safety is your concern? Especially on smaller sailboats, the boom can be placed so low and extend so far into the cockpit that chances of somebody's head getting injured when the boom swings are high.
All in all, there are reasons to look into it. As is the case with any other vehicle, although they do come from the store ready to rock'n'roll, there are often ways to tinker your way to improvement in case the product doesn't fit your needs. The car tuning scene could write a book on the topic.
Firstly, let's talk about how to go about raising the boom. Though the oftentimes confusing sailing terminology glossary is a thick book already, we have to introduce yet another new term - gooseneck. It is a bunch of parts that connect the boom to the mast.
1. Drilling New Holes
The gooseneck is attached to the mast with rivets or screws, so it is possible to change its position by simply drilling new holes in the desired height. Do this carefully though. There are incredible forces exerted on a mast when under sail and you don't want to compromise its rigidity.
Easy, right? This main part is not that tricky, and anyone with enough prudence and diligence can do it without the need to even use any specialized equipment. Unfortunately, you're not even halfway done.
2. Filling The Old Holes
Let's get back to the rigidity issue. You have drilled your holes, maybe even repositioned the mast already. Now there are a few extra holes in your mast, which is not good news for its strength. You have to fill them to make sure the mast can still take the load, which is easily done with short rivets or something of that sort.
So again, nothing technically difficult with a bit of love and care. But it is a step you don't want to overlook as if you do, your mast will be more likely to snap in half when the wind hits the sails.
3. Shortening The Sail
Now come the tricky steps. The precise position of a boom is not a standalone matter, rather it is influenced by and influences quite a few other aspects and parts on your boat.
One of these is your sail size. As you might have expected, raising a boom changes the sail area of your mainsail, so you need to resize it. Regardless of if your sail twists inside of your boom, mast or simply rests on the boom, this needs to be done.
Unfortunately, unlike the previous steps, this is not a DIY project for most. You can't simply cut off the extra part, because, for instance, the seams have a specific curvature. If you ignore this, your performance will decrease significantly as you will mess up the sail shape. This won't be that noticeable when you go downwind, but when sailing upwind you will notice the difference. Which means you might need to leave this in the hands of a professional sailmaker.
Also, because you will most likely be cutting the sail at the bottom, you will need to redo the two corner reinforcements too. And since the prudent thing to do here would be cutting the sail from the bottom as well as the back so that the shape is maintained, in case you have battens in your sail, you will need to adjust them and the pockets they sit in.
It sounds like a lot, I know. This is why you might conclude that getting an entirely new mainsail might be less of a hassle and cheaper than redoing your old one, especially if it has been used for a while already.
4. Making Sure The Boom Doesn't Interfere With The Backstay
Another of the parts that might be influenced by your tinkering is the backstay . Since it goes from the back of the boat to the top of the mast, if you put your boom up, its backside might collide with it.
Repositioning the backstay is unrealistic, and so you might find yourself having to shorten the boom too. I know we are getting quite far from the original simple task of just raising the boom, but rigging parts are in a delicate unison and tweaking one tends to require you to tweak the others too.
Gosh, I sure hope you read this whole thing before drilling the holes.
5. Checking The New Position's Functionality And Compatibility
I don't mean to discourage you from raising your booms, but I have yet another bit of news that might make some of you turn back on this project.
As expressed above, many things on a sailboat are intertwined. So even if you successfully raised the boom, reshaped your sail, or ordered a new one and made sure the boom doesn't collide with the backstay, you still gotta check if everything else works as it should.
One such thing might be the boom vang - as it is directly attached to the boom, you might need to swap it for a different sized one and also adjust the line length.
The same goes for all the other lines - if the boom is now set higher, better make sure you have enough ropes to work with. This probably won't be an issue since the change is not that drastic but better safe than sorry.
All in all, make sure you test the rigging properly, simulate various potential situations so that you are sure the new boom position doesn't interfere with stuff it shouldn't interfere with.
Great question. If you expected a reliable how-to guide, but instead this article stabbed your tinkering enthusiasm in the back with a long list of all the inevitable negatives, consider this mighty plan B.
If the goal is to get the boom out of the cockpit (and in most instances, this will be the case), there is a possible alternative that requires little in terms of effort, at least compared to the original plan. And you won't even need a screwdriver.
Here is what you can do - simply raise the end of the boom enough to have it be well above the cockpit area. Yes, that means raising it a lot - enough to require altering the sail shape. But that will be the only demanding thing you will have to do, regardless of whether you want to try to reshape the sail yourself (not recommended) or buy a new one.
Cost of Replacing Sails To get a quick grasp on whether the light is worth the candle, you can check the cost of replacing sails here .
You can try this safely by tightening your topping lift as much as needed to achieve your desired angle, and you will see if it is enough to get you the desired result.
I apologize. I try to encourage sailing-related ideas and figuring out how to realize them, but contrary to what this might seem like at first glance, raising a boom is no simple task since you have to consider the sensitivity of the rigging orchestra. That being said, even though it is not a DIY project and takes more than a weekend of work, it can be done. So if you are up for it, go for it.
Leave a comment
You may also like, sailboat parts explained: illustrated guide (with diagrams).
When you first get into sailing, there are a lot of sailboat parts to learn. Scouting for a good guide to all the parts, I couldn't find any, so I wrote one myself.

How Much Do New Sails Cost?

How To Use Your Mainsheet Traveler (The Right Way)
Own your first boat within a year on any budget.
A sailboat doesn't have to be expensive if you know what you're doing. If you want to learn how to make your sailing dream reality within a year, leave your email and I'll send you free updates . I don't like spam - I will only send helpful content.
Ready to Own Your First Boat?
Just tell us the best email address to send your tips to:
- Forums New posts Unanswered threads Register Top Posts Email
- What's new New posts New Posts (legacy) Latest activity New media
- Media New media New comments
- Boat Info Downloads Weekly Quiz Topic FAQ 10000boatnames.com
- Classifieds Sell Your Boat Used Gear for Sale
- Parts General Marine Parts Hunter Beneteau Catalina MacGregor Oday
- Help Terms of Use Monday Mail Subscribe Monday Mail Unsubscribe

Lateral stability when raising or lowering the mast? A-frame?
- Thread starter ScubaGuy2
- Start date Jun 24, 2020
- Catalina Owner Forums
- Catalina 22

Straycat22296

I did something similar, but I used chain and SS carbiners instead of tubing. On my boat (Mac 26S), I was able to run a piece of SS tubing between two stanchions at the height of the mast pivot and then attach a swivel mechanism to each tube. That stays permanently on the boat. The chain baby stays run from those swivels to eye fittings on the mast. The chains stay attached when the mast is down, ready for the next raising, but come off and get stowed with the anchor when the rigging is up. One of the nice things about using chains is easy adjustability. I've attached the eye fittings on the mast so that they're free to rotate. That way, the chains can be a little long, to make them easier to attach and then, once attached, I just rotate the assembly to take up the slack. My mast comes down so cleanly that it usually drops strait into the crutch even in fairly wavy conditions.

Leeward Rail
ScubaGuy2 said: This seems to be greatly exaggerated by our roller furler and any movement of people in the boat. Click to expand
Straycat22296 said: Check out this site: Click to expand

Baby stays was all I used in my Mac26S. I raised and lowered by myself. We know wind in Kansas!

Leeward Rail said: Not a bad idea. (Except the huge arch on the back of that small boat) Click to expand

ShotgunSlim
For what it's worth, I've raised the mast nearly every time by myself with just a home made wooden gin pole and the main sheet. With it's 4:1 rigging and a suitable mast crutch installed in the rudder gudgeons, there's not much effort at all providing you carefully lay out all the standing rigging so nothing snags on the way up. I just stand on the cabin top, put the mast on my shoulder/side of my neck for stability and slowly pull it up. Is it easier with two people? Absolutely!! However, in my world, if I want to do anything, I better be prepared to do it alone because people are notoriously unreliable about showing up for the events they plan with you.

- This site uses cookies to help personalise content, tailor your experience and to keep you logged in if you register. By continuing to use this site, you are consenting to our use of cookies. Accept Learn more…
How to Tune a Sailboat Mast
Here are some general guidelines for tuning your mast’s standing rigging . please see our blog on how to properly adjust a turnbuckle before you begin. as always we recommend seeking the advice of a professional rigger for more specific tips and tricks regarding tuning your boat’s rigging..
Your boat must be in the water. Begin by just slacking off all of the side shrouds as evenly as possible, so that all stays can be adjusted by hand. Once loose, try and adjust all turnbuckles so that they are pretty much equally open (or closed) from port to starboard respectfully. Also go ahead and line up the cotter pin holes (if present) in the studs so that they are in a pin-able position. Now is also the time to balance out the threads, between the upper and lower studs of the turnbuckle, IF they are not even. Do this by unpinning the turnbuckle from the chainplate – BE CAREFUL HERE – to ensure the mast is secure before unpinning any one stay. Lastly, loosen all halyards or anything that may pull the mast to port, starboard, forward or aft.
1. Check by sighting up the backside of the mast to see how straight your spar is side to side. You can take a masthead halyard from side to side to ensure that the masthead is on center. Do this by placing a wrap of tape 3′ up from the upper chainplate pin hole on each upper shroud. Cleat the halyard and pull it to the tape mark on one side, mark the halyard where it intersects the tape on the shroud. Now do this to the other side, the mark on the halyard should also intersect the tape similarly. Please note: when the mast is equipped with port and starboard sheaves, instead of just one center-line sheave, it will appear slightly off to one side. Just keep this in mind……
2. Using the upper shrouds as controls, center the masthead as much as possible using hand tension only. Some masts are just crooked. If yours is(are) crooked, it will reveal itself when you loosen all of the stays and halyards initially and sight up the mast. Although you should use hand tension only, you can use a wrench to hold the standing portion (the stay portion) of the turnbuckle. If for some reason the shroud is totally slack and you still can’t turn the turnbuckle by hand then the turnbuckle may need to be serviced, inspected, and maybe replaced.
3. Tune the mast from the top shroud on-down, making sure the mast is in column. Remember: as you tension one shroud by adjusting the turnbuckle, to loosen the opposing shroud the same amount.

4. Once the mast is fairly straight from side to side, tighten the shrouds all evenly using tools for tensioning. Typically, for proper tension, the shrouds should be tightened using these guidelines; uppers are the tightest, and then fwd. lowers, then the aft lowers and intermediates should be hand tight plus just a turn or two. ~ With an in-mast furler it is recommended to tension the aft lower a bit more to promote a straighter spar (fore and aft) for better furling.
5. Now you can tension the aft most backstay (s). If the backstay has an adjuster it should be set at a base setting (500-1000 lbs). If the backstay simply has a turnbuckle then it should be tightened well. After this has been done, in either situation (adjustable or static backstay), one should site up the mast from a-beam and notice that the masthead has a ‘slight’ aft bias. If there is no aft bias, too much, or the mast is inverted (leaning forward), then the forward most forestay (s) will most likely need to be adjusted to correct this. If a furler is present then seek the council of a professional rigger or refer to your furler’s manual for instructions on how to access the turnbuckle if there is one present.
6. Finally, sight up the mast one last time and make any necessary adjustments.
7. MAKE SURE ALL TURNBUCKLES AND PINS HAVE COTTER PINS AND ARE TAPED NEATLY TO PREVENT CHAFE!
Read HERE for how to use a LOOS & Co. Tension Gauge!
Here is a little vid from our friend Scott at Selden Masts (click the link then hints and advice for more info) on rig tune…..
[youtube http://www.youtube.com/watch?v=rcCALZ4x6R4&w=420&h=315]
Is your mast fractionally rigged, only has a single set of lowers or is just plain different? Be sure to leave any questions or comments below.
Similar Posts
The end is near….
The Vendee Globe challengers are approaching the end, which may come as early as this weekend. However, the drama has not stopped. Jean-Pierre Dick (still in third but surely to be passed soon), has broken his keel, but is puttering along at a measly 11 knots. The skipper of Virbac -Paprec 3 has yet to…
It’s Just Money
Check out this incredible broach! Last Saturday, Team Spindrift of the MOD 70 racing fleet take a pretty bad spill near the start line, off of the coast of Dublin – Dùn Laoghaire. Only one crew member was hurt, suffering a pelvis fracture. He was the one being immediately air lifted. Nice work by the…
The JP54 Performance Ocean Cruiser
Now that we are discovering fixed wing sails and hydrofoils, the world is starting to accept canting keels as standard equipment. Super accomplished sailor, Jean Pierre Dick’s new yacht building company designs us a blue-water cruiser with an ocean-racer soul. Not only does the JP 54 claim sea worthiness to circumnavigate the globe, but it…
Single Handed Around The World 2011
Just a quick look at one of the epic moments of Thomas Coville’s voyage around the globe! [youtube http://www.youtube.com/watch?v=85mIDnNRptg&w=560&h=315]
Views From Aloft
It is the end of the sailing season here and quite possibly the last ‘Views From Aloft’ for 2013. Any guesses where this might be? This was about 1 month ago. Mild weather days like this one are getting harder and harder to come by. Ranger 30, a slick little old school ride. Long live…
First AC 72
Well, Team New Zealand did it. Check out the footage of the new AC 72 revealed and christened in the city of sails Auckland, NZ. Man, those things are going to be fast. It’s okay to fast forward as I did to cut to the chase. Do they really expect us to sit through 15 minutes…
Leave a Reply Cancel reply
Your email address will not be published. Required fields are marked *
Save my name, email, and website in this browser for the next time I comment.
54 Comments
I have a 1965 Alberg 30. On a starboard tack the boat has more weather helm than on a port tack. I have not been able to achieve a balanced helm on either tack. New full batten main, new 150 roller furl genoa.
Other than the boat being evenly ballasted from port to starboard, e.g. holding tanks, fuel tanks, below deck furnishings, and storage items, I would check the rig from side to side. A crooked mast or poor static tune can result in the boat sailing differently on both tacks. A good way to test this is either sighting up the mast at the dock to ensure that the mast is relatively straight side to side and in column. You can also see that when beating (aka hard on the wind), you have to make adjustment’s to the mainsail sheet tension (NOTE: the traveler will likely need to be adjusted to mirror the same setting as on the previous tack). If notice that with the traveler in the same position on each respective tack that the sail is bubbling or flogging more on one tack than on the other, it is likely necessary to re-tune the mast. This can be done at the dock by following the guidelines in the article once the everything has been appropriately loosened to tension.
Let us know if this helps.
Any Hints, tips for tuning a 1977 Whitby 27 sloop 1/4 ton rig?
Nothing special that I can think of. Just follow the guidelines in the article. From what I can gather there are only a single set of lowers correct? Are the spreaders aft swept at all or just straight out? If it is single lowers and no sweep to the spreaders you’ll need to set the rake using the forestay adjustment to set the rake and the backstay to control the forestay tension. If you are interested in optimizing sail tuning, like in racing situations: higher wind sailing conditions will desire more tension on the shrouds, a bit more tension on the lower than the upper, but only slightly; and in lighter winds loosen them up a bit, a tad looser on the lower than the upper.
Hope that helps, and good luck.
How do I tune /2 in rigging. Neither of the loos gaug s are large enough?
Thanks for the question. Yes, I think the Loos gauges only go up to 3/8″ wire. First let me say that a tension gauge is not a must for proper tuning, more for tension recording and also not exceeding max tension which is typically hard to achieve without additional fulcrums or wrench extensions. Having said that, if you know that you need one simply search google for cable tensioning gauges. There are a few others like this one https://www.checkline.com/product/136-3E , pricing is not easily apparent and may be excessive for your needs.
My recommendation is that if you have a good local rigger have them do a static dock-side tune and perhaps sail-tune in the boat’s ideal conditions. Perhaps they can provide a tutorial on their process for you to be able to make rigging adjustments over time.
Hope that helps.
Hi. Nice article. I have a Mirage 27 (the Bob Perry design). It’s a masthead rig with single spreaders and the shrouds on each side come to the same chainplate. I have been tuning so that tension on the lower and uppers is the same and trying to set them so that (as you say) the leeward shrouds are just slightly slack. But how do I induce mast rake? I have a split backstay with a 6:1 purchase on the adjuster; should the mast have rake even with the adjuster off? or do I just haul on it? or should the tension on the inners and outers be different?
HI Michael,
You will need to lengthen the headstay and shorten the backstay. This can be done a few ways either with turnbuckle adjustment or actually shortening and lengthening cables, sometimes you can add or remove toggles also.
Hope that helps!
- Pingback: Buying a second-hand luxury yacht? Here’s what you need to look for - Phuketimes news
I recently purchased a 1988 Catalina S&S 38 and experienced my first launch this season, including stepping the mast and tuning the rig. As we prepared, we found that the Cap Shroud and Intermediate Shroud were clamped together at the four spreader ends. The folks at the yard had never seen that, and I certainly didn’t know why it was there … possibly to keep the spreader ends and shrouds consistent? Anyway, as I am learning how to tune my rig, it seems to me that these clamps would prevent me from tuning the cap shroud and intermediate separately and correctly Thoughts? Should I remove them and re-tune the rig?
So it is a double spreader rig I take it? The upper shroud wire should run freely through the first spreader, or the closest one to the deck, and be clamped at the top spreader. The intermediate shroud wire should be clamped at the lower spreader.
Before stepping, if this was done correctly, both upper spreader and lower spreader should be clamped equal distance from the mast attachment point, when looking at the mast from port and starboard.
In other words, you should measure the distance from where the upper shroud attaches to the mast to the end of the upper spreader and it should be the same distance on the other side, port to starboard. Then the same goes for the intermediate shroud and the lower spreader. The upper shroud should run freely through the lower spreader although it is covered by the clamp, but not actually clamped at the lower spreader, j ust the top one.
If all 4 spreaders are clamped equally port to starboard. You should be good to tune from there. The spreaders should show a slight up angle, to be specific slightly more up at the upper spreader than at the lower, but all of them should be just ever so slightly pointing up. You even want to think about clamping them slightly higher than that before tensioning, as this will pull them down and into their preferred angle, just slightly up. Specific angles are really only determined on the spar builders drawing and vary for manufacturer to manufacturer. Generally it is pretty clear where they want to sit. With the shrouds loose if you find that angle that appears to be the right one, and push them up slightly from there then clamp. This will allow them to be pulled down slightly once tensioned.
Kind of a tricky thing to explain in writing but hopefully it helps.
Have further questions? Give us a call 443-847-1004, or email us [email protected]
I have a Catalina 275 fractional rig with single swept back spreaders and an adjustable backstay. My questions are: how much rake, tension on cap and lower shrouds and on chain plate should cap shroud be forward and lower aft. I am racing and want the best performance. Thanks for any help. Bill
If the two shrouds are on the same plate, right next to each other, and the pin holes are the same diameter, and the plate is configured in a fore and aft configuration, I would choose the aft hole for the lower shroud and the forward one for the upper shroud.
In terms of specific rake, you will need to look towards the maker of your sails and or the boat manufacturer. I discuss how to measure rake in the preceding comments.
“You can measure rake by hanging a small mushroom anchor from the main halyard, with the boat floating on its lines, if you wish”
For racing I would start off with a good static tune at the dock by following the points in the article. If you know it’s going to be light day, start off with light rig tension. Be sure to use either Velcro wrap style cotter pins or simply lash the upper and lower shroud turnbuckles together to secure them. This will give you access to removing the pins or lashing while sailing and adjusting the stays.
From there you will need to sail tune for that days specific conditions, your shrouds will tell you what needs to be tighter and looser. I have answered how to do this a few times already in the comments below, please take your time to peruse the comments section to see what sail tuning entails. Doing this will always ensure that the cable tensions are set up ideally for the conditions and the boat can be sailed at maximum potential.
“For racing, ideally once the static tune at the dock (the part we just talked about) is done, go out and sail tune. Do this by going hard on the wind and checking to see if the leeward shrouds are just starting to dance, this is ideal. If they are swaying about they are too loose for the current conditions. If the leeward shrouds are tight, they may be a touch to tight. Tension and loosen as needed; count what you did and to what shroud, then tack and do the same to the other side.
ALWAYS secure the turnbuckles when you are finished adjusting them.”
Just hit ‘Ctrl F’ and search the page for “sail tune” and “rake”
I am trying to tune a Hallberg Rassy HR36 masthead rig. The rig has two in-line spreaders. The cap shroud is 3/8 inch and terminates at the lower spreader. From the lower spreader, the cable transitions to a 5/16 inch cable passing over the upper spreader to the masthead. A second 9/32 inch cable runs from the lower spreader to the mast (just below the upper spreader). The Selden rigging suggests that the “upper shroud” be at 15 percent of the breaking strength of the cable. In this situation, is it 15 percent of the 3/8 inch lower portion? If so, how should the upper 5/16 inch and 9/32 inch cables be tensioned?
Thanks for your help.
Hi Bryant, good question. Once proper alignment and centering of the spar has happened (static tune), and you are perhaps a hair tighter than hand tight on all shrouds, you can begin to tension things to a percentage of breaking strength. Do this by using the cables at the deck and use their diameters to determine the tensioning amount.
The V1 (aka cap shroud) in your case is a 3/8″ cable which supports the two cables above ii, hence its large diameter. The 5/16 V2,D3 and the 9/32 D2 total 19/32. So if 15% of the 3/8 cable is achieved you will below that threshold for the cables aloft. Does that make any sense?
With that in mind there is a range of acceptable tension from light air to heavy air. 15% sounds like a good middle of the road tension. Generally you do not want to exceed 30%. Sail tuning in ideal conditions is generally the best way to determine the right tension, but 15% of breaking strength sounds like a good place to start.
Don’t forget your cotter pins and tape, especially aloft.
Hope that helps and thanks for the question.
T.R.C. Thanks you for the clarification regarding the V2,D3 and D2 load distribution. When I set the V1 tension to 15%, the tension on the V2,D3 was at 8 %. I then tensioned the forward shroud to 12 % and the aft shroud to 10 %. Then I tensioned the backstay to 14 %. After doing this, I measured the tension on the V1 to be 10 %. The only information I could find regarding tension on the D2 was that is did not have to be tensioned much. I tensioned it to 5%. The mast sights straight and I used a bossen seat on a halyard to measure to the lower part of the V1, which also indicated that the mast was straight. Did I overtension the fore and aft stays? Is the tension in the D2 too much or too little? Again, I appreciate your advice.
When you tighten the backstay it usually induces a bit of aft bend in the mast which will soften the upper shroud (V1) a bit. You can just take up on it again to get it back to 15% if you like. As I said there is a acceptable range for all of the stays, which you are well within. Everything else sounds like you did a pretty good job. Next up sail tune and see if there is excessive waggling on the leeward side, but in moderate breeze. The shrouds will begin to sway as the breeze builds, this could be a telltale to either reduce sail a bit or you can add some tension to the shrouds all the way around.
Should be all good as they say.
Cheers, ~T.R.C.
T.R.C., your advice has been invaluable. I took her out in 12-15 knots and was very happy with the sail luff and stiffness of the rig. Thanks for you help!😁⚓️
Hi , can you provide any tuning guides for a Swan 38 Tall mast single spreader rig with baby stay, I am keen to set the rig up for new North sails and race her competitively. The mast is an exact Nautor factory replacement in 1998. She shall not have furling sails.
Hi Peter and thanks for the comment.
Unfortunately we do not have a guide for that boat. I would ask the sailmaker however to see what info he or she might have. Alternatively you can always start with a good static tune and then sail tune the boat as I describe in some of the comments below. This is the best way. I may use a Swan 45 Tuning guide as the template and then just fill in my own numbers over time. This is ideal, but infidelity start with asking the sailmaker you are working with, he should have some good info.
This may seem like a silly question, but it has me perplexed. How long should my cotter pins be? Long enough to ‘jam’ against the surrounding body, to prevent rotation? Otherwise, I don’t see how they’ll prevent my stays from loosening.
The length should be the minimum amount to just be able to bend the legs. Too long and they get caught up on things, too short and you can’t adequately bend the legs to keep the pin in place. The head of the pin is a actually providing the security.
Does that help?
Great article to get me started, thanks! I just have a few questions…
I originally owned a Tanzer 7.5. Her mast was rigid and simple to tune with a LOOS and an eyeball. I however now own a Mirage 33 (1982) and things are a bit more complex (but not too much). When I bought her the mast was already stepped and the owners said they replaced the forestay (inside the furler) 1 season ago. I went about the boat tuning the rig as best I could but I started second guessing the rake. I found noticeable rake in the mast with virtually no backstay tension on. So I think my forestay stretched (being “new”) and I need to bring it forward.
How do I measure how much rake (at rest on the tensioner) is enough? With my rig as is I felt worried that if I pulled down on the backstay tensioner I might buckle my mast by bending it too far. It seems to me it’s ALOT of downward pressure on the column when you pull down on her especially if the mast was already raked or maybe in my case leaned too far back to start? She has a babystay too, I wasn’t sure how far to tension that other than to assist adding bend\rake but since I had too much already I just lightly tightened it and hoped for the best!
Thanks for the question. With the backstay tensioner completely off, you should be able to adjust the static/ base tension of the backstay with a turnbuckle (s). Loosen the Baby Stay so that it is completely loose, sloppy, to take it out of the equation. Then mark furling line spool direction and remove the line. Next, open the furler up to gain access to the turnbuckle inside, if present. Remove all cotter pins or locking nuts to free the turnbuckles on the headstay and the backstay. You should then loosen things so that the headstay and the backstay can be adjusted by hand. Close the headstay turnbuckle and open the backstay turnbuckle to reduce rake, and vice versa if wanting to add rake.
You can measure rake by hanging a small mushroom anchor from the main halyard, with the boat floating on its lines, if you wish. Then once you achieve the desired mast rake go ahead and tension the forestay and backstay a few turns equally with tools; not too tight, but a good base light air setting, or as loose as you can imagine the headstay ever needing to be. Lastly, tension the baby stay a bit until it just starts to tug on the mast, helping induce bend. From here the backstay tensioner will do the rest: wind it on and it will tension the headstay and induce mast bend via the baby stay. You may have to take the boat sailing and adjust things as you find out how it performs at various degrees of rake and bend.
I hope that’s not too wordy, but helps explain it all a bit. Feel free to email or call with further questions.
Regards, ~T.R.C.
Can you provide some specific information regarding rig for 1980 C&C 32. Looking to purchase new main and want to get the most from it for Wednesday nights. Boat currently does not have a pony stay, it has been removed. Can replace that track/car. What should initial bend look like, keel step is fixed so assume I need to some chock aft of mast at deck? Have rod rigging but no Loos gauge for same, should I acquire one? Love this site, very helpful RayK
Thanks for the compliment. This may be less technical than you might expect. I would start with the basic guidelines given in the article to ensure a good base, static tune setting. A Loos gauge is good but not needed. If you focus on getting the spar straight, side to side, with a slight aft bias and then the tension is set so that it feels fairly tight. I know that sounds vague, but keep this in mind: if you are anticipating heavier wind make things a bit tighter, and loosen things up if less windy. The order of tension, in regards to the which shroud (upper vs intermediate vs lower) is important; more so than the amount of tension. Make sure nothing is so loose it is just flapping about.
The headstay should have some good slack to it with the backstay adjuster totally off. Adjust the backstay and headstay turnbuckles, with them in the slack position until the masthead is favoring a slight aft lean or rake, but only slight. From there, tension the backstay adjuster very tight and see what the headstay tension feels like, should be very tight.
PLEASE NOTE: if the backstay adjustment is totally bottomed out at this point, the backstay needs to be shortened a bit. Just pay attention to how this affects the rake. …
This part is where the pony stay or the baby stay will play a critical part, for mast bend. You may even find the pony stay to be good for mast pumping in light air and waves. Making this baby stay removable is a good idea, as well as, we’ve found that Dynema rope is the best choice here.
So… a centered mast head, side to side. A straight, in column mast from the top on down. A slight aft rake to start with…and as you begin to wind on the backstay and the baby stay you will add some rake but also a good bit more bend.
Take this set up for a few test sails and see how things act, in different conditions. After that you can make some adjustments here and there as needed: weather helm, shroud tension, mast rake, pre bend, etc…Moving chocks and using a Loos gauge.
ADDT’L TIP: Chocks and mast step position affect bend and rake properties. Want more rake? Chock mast aft in collar and move step forward. Want more bend? Chock mast forward in collar and move mast aft. As all things, there is more to it than that, but that’s the gist of the whole chocks and mast step thing…
“Sail Tuning” is a blog we are in the works of, but the punchline is that if hard on the breeze, and the leeward shrouds are excessively loose, and you are sure you aren’t over canvased…then go ahead and take turns on the leeward side until they just stop waggling, count what you’ve done, tack and mirror the turns on the other side.
Once the boat is set up for that specific condition, and you return to the dock, you should take your loose gauge and record these settings…creating a tension gauge setting for various conditions.
Hi, Thanks for your information. I have a Dehler 34. 1986… How much mast prebend and rake is recommended? The boat is new to me in March. Raced ok but I want to get a new main and want it to fit a well tuned mast. What do you think of a 2 degree rake and 4″ prebend at the speaders? Also, I have a Harken furler, How do you measure the forestay tension? Thanks, Duke
The answer, this boat is pretty sporty so it should show some rake. The spreaders are swept slightly aft so this will produce some natural bend just to tension the headstay.
Head-stays are always tough to measure with any sort of gauge, there are some class specific tricks for using a gauge in funky ways in order to get data, but they aren’t really reliable in my opinion. If you live in a typically windy area, go for bit more shroud tension, headstay tension and mast bend, and see how the boat feels. This will take some trial and error. If the forestay feels too stiff, slot too tight, loosen the uppers a bit, thus reducing bend and slackening the headstay.
Once the boat is sailing well in the ideal conditions, record that bend and those tensions. This is where I would leave things set, record it, and then just adjust shroud tension to affect bend and headstay in order to compliment different wind strengths and sea states. It takes quite a bit of back and forth, and documentation to get it right. One designers have already worked all of this out and then they share it for others…..very helpful. The rest of us will have to be the trailblazers for this type of information for other boat owners with the same (similar) boats to benefit.
Hope that helps, thanks for the kind words, and good luck. Once you figure things out post a link here for others with the same boat…..would be helpful.
Hello, Thanks for all of this great info. I just purchased a 37′ boat with a 3/4 fractional rig and a tapered mast. I was wondering if there were any special considerations when tuning the fractional rig? Currently the stays and shrouds are a little loose and can be wiggled (borderline flopping) by hand although the mast stands and is visually centered. (We are in SW Florida and the boat went through a direct hit by hurricane Irma like this and still stands tall!) Also is it advisable to increase shroud tension in small increments first on one side and then do the same on the opposing side? Thanks so much for any info
Hi Nathan. There are some thoughts, so fractional masts are usually fitted with aft swept shrouds and spreaders. If so, this means that the uppers also tension the headstay and create mast bend. The lowers then also act to reduce mast bend, so the tighter you make them you are actually reducing mast curve, thus powering the mainsail up. So be conscious of these two thoughts when tensioning the shrouds. The rest is fundamentally the same as the guide suggests. Loose or wiggling shrouds (excluding the scenario where we are talking about the leeward shrouds under sail), should be tightened. Doing things in increments is definitely a good idea.
Hope that helps. Thanks for the questions.
Thanks!! Now that you say that about the swept spreaders helping create mast bend it makes perfect sense. I had an ‘oh duh’ moment. I’ll probably err on the side of looser lower shrouds knowing if we need more power we can always tighten them up. Thank you again this helped immensely!
I want to buy a tension gage. Most familiar with Loos. But do I need Pt 1 or 2? (Pretty sure I don’t need 3 or Pro.) I have two rigs to tune: a 1972 Morgan 27 and a Catalina 22, I think 73 or thereabouts. The Morgan 27 is mine, fresh water for life, and 99.9% most likely factory wire. The Catalina 22 is a borrower in the Gulf, but pretty sure the owner has never tuned it. My problem is I can’t find the gage of wire for either standing rigging anywhere! Any help?
I think this one will do… https://sep.yimg.com/ca/I/yhst-70220623433298_2270_120385950 . The Morgan is likely 3/16″ wire and the Catalina is likely 5/32″, that’s an educated guess. Hope that helps.
I just purchased a 1980 C&C 40. I was told that I need to replace the rod rigging as it is “too old”. The mast is down and the rod rigging seems ok but I have not done any penetration testing. Does rod rigging need to be replaced due to age? Thanks Rigging Co.
Not replaced, but re-headed. This can mean that some stays need to be replaced as a whole, but not typically not the whole set. There are instances where you’ve almost replaced all of it anyways, so full replacement just makes sense. Other than those scenarios, full replacement is due after a certain mileage with rod…60,000 NM. Please keep in mind these standards are very general recommendations. It sounds like in your case, you should send in the rod, tangs, and chainplates for service and inspection. once we receive everything we will make a quote for the recommended services and/or replacement.
Hope that helps and give us an email for more info.
I have had a problem with securing the spreaders to the shrouds, resulting in the spreaders dropping. I am using stainless wire to seize them but still having a problem. Any tips on how to do this properly?
Seizing the wire onto spreaders with hinged spreaders is a bit of a trick of the trade that requires some practice. We use the X’s and O’s method. The end result should be something that looks like this… https://theriggingcompany.files.wordpress.com/2011/11/2012-06-07_14-26-09_899.jpg?w=900 . A trick to make the wire bite into the spreader end a bit more is to wedge a small piece of leather between the spreader and the wire before seizing. Also parceling and serving the wire where it intersects the spreader will help create more bite too. Lastly, and I don’t like this method but you can install a bull dog cable clamp beneath the spreader, nuts facing in, to keep it from dropping when slack.
I hope that helps a little. Thanks for commenting.
I am struggling to get enough rake into my mast. 33 foot Charger 33 keel stepped. Have loosened forestay and moved mast foot forward by about 10 mm. Should the chocks in the collar be adjusted? Runners and 2 spreaders, and check spreader. Spreaders do not have much aft angle. Move mast step more forward? Outers are tight with inners looser. Thoughts?
Hey Bernard,
Yeah, it sounds like chocks are the last thing. Maybe remove the chocks with the rigging slack and see if you can get the mast to sit where you like it with just hand tension. Then chock it where it wants to sit. It sounds like you are on the right track everywhere else, perhaps add a toggle into the headstay and shorten the backstay is next. Good luck and I hope that helps somewhat.
Hi, We have a Lagoon Catamaran with fractional rig, upper and lower shrouds, fore stay and upper and lower diamonds. No back stay. The mast has a degree of pre-bend. I do not plan to drop the mast.
I may have to do some work on the port side upper diamond. Is it as easy as just undoing the turnbuckle? Or do I need to loosen the starboard one at the same time. If it needs replacement should I also replace the starboard one even if in good condition?
As a further question, what happens if a diamond breaks, does it result in mast failure?
You would need to loosen the other counterpart to that stay for sure. It is just good practice, will keep the mast straight, and also make your life easier for removal install. Now, do you replace both? I don’t know. How old is the standing rigging? Why are you replacing the one? If it is not all due for replacement and you are just replacing due to damage, just do the one, but loosen both sides to do this.
Hope that helps and thanks for the visit.
Hello! I recently purchased a keel-stepped 1982 Goman Express 30 which came with an Alado Furler. I have been sailing it since May of this year. My question is this: Despite relocating mast wedges at the cabin roof to bias the lower mast aft about 2″, I still have a pronounced backward bend (10 degrees or so) just above the highest spreader. When sailing on jib alone, most wave action causes the mast to pump right at the bend point. I have a split backstay that is as un-tensioned as possible and the forestay only has another inch of adjustment left. There is no baby stay.
How can I get the bend out of the mast? How concerned should I be that the mast might break at that point?
Thanks in advance for your reply!
Eric Hassam – Delta Flyer
Thanks for taking the time to comment on our site. It sounds like you are on the right track. So one other adjustment that you have is the mast step position. This greatly affects mast bend on keel stepped masts. For a stronger bend and less rake, move the mast butt aft. For more rake and less bend (probably what you need to try), move the mast step forward a bit. If neither of these help, you may be off to have your headstay shortened and this means it is too long. This is likely not the case, but it is a possibility.
Keep in mind….A mast should have a slight aft rake bias along with a small amount of mast bend. This is quite normal. You can send us a picture if you’d like a second opinion on if it is over-bent. Having said all of that, even if you remove all of the mast bend, the mast may still pump. This is a design flaw in many spar designs that lots of end users have experienced. This can be remedied by redesigning the stay lay out. Is there a place for a staysail stay and/ or runner backstays? If so add them. Is there a place for a baby stay? If not, that may be a consideration.
Thanks again and I hope that helps.
Hi, I have a 48 foot yawl with a 7/8 fractional rig, is the tuning procedure the same as a masthead rig? I seem to have trouble getting aft rake and proper headstay tension. Also, is there a particular tension number the upper shrouds should have? many thanks in advance
Hi Bill, thanks for taking the time. 7/8 is very close and I would treat it like a masthead rig, especially if the none of the spreaders are aft swept. Tesnsion the headstay using the backstay(s). This should pull the top of the mast aft. If there are any other forward stays, i.e. stay sail stay, forward lowers, or anything else that could be holding the mast forward, go ahead and loosen those completely. You then may need to tighten the Tri-attic (the stay that connects the top of the mizzen and top of the main) if present. OR if the mizzen needs more rake too, then lossen all forward stays and pull it back using the available aft stays for this as well.
Hope this helps and please email us and send some pictures if you need more help.
I have a 1972 Morgan 27, which has both forward and after lower shrouds. I wish to remove the forward lowers so I can trim a 110% jib inside the stays. I see a lot of boats without forward lowers and think this will work OK, but wonder if I should increase the size of the aft lowers and beef up the chain plates. Any suggestions?
THANKS FOR YOUR INPUT. I AM GOING TO REMOVE THEM ANYWAY AND SEE WHAT HAPPENS. “HOLD MY BEER, WATCH THIS….” FAMOUS LAST WORDS.
Lol! Good luck. Call us if you need assistance.
I have rod rigging on my Beneteau 32s5
Any other guidance on tuning them vs wire rigging
Hi and thanks for commenting.
Just follow the guidelines in the write up. The over all goal is that the mast needs to be straight and in-column when looking at it from side to side.
Fore and aft, the mast should show a very slight lean aft. Depending on whether or not the spreaders are in-line or aft swept; you should also see some slight bend if there is any aft sweep to the spreaders just from the tension of the uppers.
A Rod stay tends to run a bit tighter than wire, so keep that in mind.
For racing, ideally once the static tune at the dock (the part we just talked about) is done, go out and sail tune. Do this by going hard on the wind and checking to see if the leeward shrouds are just starting to dance, this is ideal. If they are swaying about they are too loose for the current conditions. If the leeward shrouds are tight, they may be a touch to tight. Tension and loosen as needed; count what you did and to what shroud, then tack and do the same to the other side.
ALWAYS secure the turnbuckles when you are finished adjusting them.
- Pingback: Tuning a Sailboat Mast | ChesapeakeLiving.com
- Pingback: Rig Tuned | middlebaysailing
Wow, I would hate to be charged by her for three trips up the rig and forget the screw driver the rubber plugs that are sacraficial and replaced everytime removed just to clean the stainless 1×19 rigging.
Username or Email Address
Remember Me
Lost your password?
Review Cart
No products in the cart.
- Privacy Overview
- Strictly Necessary Cookies
This website uses cookies so that we can provide you with the best user experience possible. Cookie information is stored in your browser and performs functions such as recognising you when you return to our website and helping our team to understand which sections of the website you find most interesting and useful.
Strictly Necessary Cookie should be enabled at all times so that we can save your preferences for cookie settings.
If you disable this cookie, we will not be able to save your preferences. This means that every time you visit this website you will need to enable or disable cookies again.
Suggested Searches
- Climate Change
- Expedition 64
- Mars perseverance
- SpaceX Crew-2
- International Space Station
- View All Topics A-Z
Humans in Space
Earth & climate, the solar system, the universe, aeronautics, learning resources, news & events.

NASA’s PACE Data on Ocean, Atmosphere, Climate Now Available

Altitude Chamber Gets Upgrade for Artemis II, Spacecraft Testing Begins

NASA Next-Generation Solar Sail Boom Technology Ready for Launch
- Search All NASA Missions
- A to Z List of Missions
- Upcoming Launches and Landings
- Spaceships and Rockets
- Communicating with Missions
- James Webb Space Telescope
- Hubble Space Telescope
- Why Go to Space
- Astronauts Home
- Commercial Space
- Destinations
- Living in Space
- Explore Earth Science
- Earth, Our Planet
- Earth Science in Action
- Earth Multimedia
- Earth Science Researchers
- Pluto & Dwarf Planets
- Asteroids, Comets & Meteors
- The Kuiper Belt
- The Oort Cloud
- Skywatching
- The Search for Life in the Universe
- Black Holes
- The Big Bang
- Dark Energy & Dark Matter
- Earth Science
- Planetary Science
- Astrophysics & Space Science
- The Sun & Heliophysics
- Biological & Physical Sciences
- Lunar Science
- Citizen Science
- Astromaterials
- Aeronautics Research
- Human Space Travel Research
- Science in the Air
- NASA Aircraft
- Flight Innovation
- Supersonic Flight
- Air Traffic Solutions
- Green Aviation Tech
- Drones & You
- Technology Transfer & Spinoffs
- Space Travel Technology
- Technology Living in Space
- Manufacturing and Materials
- Science Instruments
- For Kids and Students
- For Educators
- For Colleges and Universities
- For Professionals
- Science for Everyone
- Requests for Exhibits, Artifacts, or Speakers
- STEM Engagement at NASA
- NASA's Impacts
- Centers and Facilities
- Directorates
- Organizations
- People of NASA
- Internships
- Our History
- Doing Business with NASA
- Get Involved
- Aeronáutica
- Ciencias Terrestres
- Sistema Solar
- All NASA News
- Video Series on NASA+
- Newsletters
- Social Media
- Media Resources
- Upcoming Launches & Landings
- Virtual Events
- Sounds and Ringtones
- Interactives
- STEM Multimedia

The April 8 Total Solar Eclipse: Through the Eyes of NASA
NASA’s Boeing Crew Flight Test Mission Overview

Hubble Spots a Galaxy Hidden in a Dark Cloud

NASA Shares Medical Expertise with New Space Station Partners

From NASA’s First Astronaut Class to Artemis II: The Importance of Military Jet Pilot Experience

The Ocean Touches Everything: Celebrate Earth Day with NASA

Earth Day Poster 2024

Media Get Close-Up of NASA’s Jupiter-Bound Europa Clipper

More Than 36,000 Volunteers Helped Do NASA Eclipse Science

NASA’s TESS Temporarily Pauses Science Observations

NASA Names Finalists of the Power to Explore Challenge
Earth Day 2024: Posters and Virtual Backgrounds

NASA Langley Team to Study Weather During Eclipse Using Uncrewed Vehicles

ARMD Solicitations

NASA Noise Prediction Tool Supports Users in Air Taxi Industry

Tech Today: Folding NASA Experience into an Origami Toolkit

NASA’s SERT II: ‘A Genuine Space Success Story’

NASA Partnerships Bring 2024 Total Solar Eclipse to Everyone

Shawnta M. Ball Turns Obstacles into Opportunities in Goddard’s Education Office

A Langley Intern Traveled 1,340 Miles to View a Total Solar Eclipse. Here’s What She Saw.

La presentación del X-59 de la NASA personifica la tradición aeronáutica

Tara Friesen
Nasa’s new lightweight sailor , enabling future solar sails.
Sailing through space might sound like something out of science fiction, but the concept is no longer limited to books or the big screen. In April, a next-generation solar sail technology – known as the Advanced Composite Solar Sail System – will launch aboard Rocket Lab’s Electron rocket from the company’s Launch Complex 1 in Māhia, New Zealand. The technology could advance future space travel and expand our understanding of our Sun and solar system.
Solar sails use the pressure of sunlight for propulsion, angling toward or away from the Sun so that photons bounce off the reflective sail to push a spacecraft. This eliminates heavy propulsion systems and could enable longer duration and lower-cost missions. Although mass is reduced, solar sails have been limited by the material and structure of the booms, which act much like a sailboat’s mast. But NASA is about to change the sailing game for the future.
The Advanced Composite Solar Sail System demonstration uses a twelve-unit (12U) CubeSat built by NanoAvionics to test a new composite boom made from flexible polymer and carbon fiber materials that are stiffer and lighter than previous boom designs. The mission’s primary objective is to successfully demonstrate new boom deployment, but once deployed, the team also hopes to prove the sail’s performance.
Like a sailboat turning to capture the wind, the solar sail can adjust its orbit by angling its sail. After evaluating the boom deployment, the mission will test a series of maneuvers to change the spacecraft’s orbit and gather data for potential future missions with even larger sails.
“Booms have tended to be either heavy and metallic or made of lightweight composite with a bulky design – neither of which work well for today’s small spacecraft. Solar sails need very large, stable, and lightweight booms that can fold down compactly,” said Keats Wilkie, the mission’s principal investigator at NASA’s Langley Research Center in Hampton, Virginia. “This sail’s booms are tube-shaped and can be squashed flat and rolled like a tape measure into a small package while offering all the advantages of composite materials, like less bending and flexing during temperature changes.”

After reaching its Sun-synchronous orbit, about 600 miles (1,000 kilometers) above Earth, the spacecraft will begin unrolling its composite booms, which span the diagonals of the polymer sail. After approximately 25 minutes the solar sail will fully deploy, measuring about 860 square feet (80 square meters) – about the size of six parking spots. Spacecraft-mounted cameras will capture the sail’s big moment, monitoring its shape and symmetry during deployment.
With its large sail, the spacecraft may be visible from Earth if the lighting conditions are just right. Once fully expanded and at the proper orientation, the sail’s reflective material will be as bright as Sirius, the brightest star in the night sky.
“Seven meters of the deployable booms can roll up into a shape that fits in your hand,” said Alan Rhodes, the mission’s lead systems engineer at NASA’s Ames Research Center in California’s Silicon Valley. “The hope is that the new technologies verified on this spacecraft will inspire others to use them in ways we haven’t even considered.”

Through NASA’s Small Spacecraft Technology program , successful deployment and operation of the solar sail’s lightweight composite booms will prove the capability and open the door to larger scale missions to the Moon, Mars, and beyond.
This boom design could potentially support future solar sails as large as 5,400 square feet (500 square meters), about the size of a basketball court, and technology resulting from the mission’s success could support sails of up to 21,500 square feet (2,000 square meters) – about half a soccer field.
“The Sun will continue burning for billions of years, so we have a limitless source of propulsion. Instead of launching massive fuel tanks for future missions, we can launch larger sails that use “fuel” already available,” said Rhodes. “We will demonstrate a system that uses this abundant resource to take those next giant steps in exploration and science.”
Because the sails use the power of the Sun, they can provide constant thrust to support missions that require unique vantage points, such as those that seek to understand our Sun and its impact on Earth. Solar sails have long been a desired capability for missions that could carry early warning systems for monitoring solar weather. Solar storms and coronal mass ejections can cause considerable damage on Earth, overloading power grids, disrupting radio communications, and affecting aircraft and spacecraft.
Composite booms might also have a future beyond solar sailing: the lightweight design and compact packing system could make them the perfect material for constructing habitats on the Moon and Mars, acting as framing structures for buildings or compact antenna poles to create a communications relay for astronauts exploring the lunar surface.
“This technology sparks the imagination, reimagining the whole idea of sailing and applying it to space travel,” said Rudy Aquilina, project manager of the solar sail mission at NASA Ames. “Demonstrating the abilities of solar sails and lightweight, composite booms is the next step in using this technology to inspire future missions.”
NASA Ames manages the Advanced Composite Solar Sail System project and designed and built the onboard camera diagnostic system. NASA Langley designed and built the deployable composite booms and solar sail system. NASA’s Small Spacecraft Technology (SST) program office based at NASA Ames and led by the agency’s Space Technology Mission Directorate (STMD), funds and manages the mission. NASA STMD’s Game Changing Development program developed the deployable composite boom technology. Rocket Lab USA, Inc of Long Beach, California is providing launch services. NanoAvionics is providing the spacecraft bus.
Related Terms
Ames Research Center
- Langley Research Center
- Small Spacecraft Technology Program
Space Technology Mission Directorate
Explore More
The nrp post.
Dive into the captivating history of the NASA Research Park (NRP) and its industry partners…

Math for designing lasers becomes artist’s key to creating complex crease patterns

Discover More Topics From NASA

STMD Small Spacecraft Technology
Game Changing Development
IMAGES
VIDEO
COMMENTS
To raise and lower the mast, I rig things and operate as follows. In this example, the mast is attached to a pivoting base and stowed lowered onto the bow pulpit. Between the athwartships attachment points and the mast tangs, I attach a set of temporary shrouds. These I made from coated wire rope (the same as used for lifelines).
After a rig refit, the mast of Sampaguita, a Pacific Seacraft Flicka 20, was ready to be raised. Still in her Port Townsend slip, the process was, generally, the opposite of lowering, presented in 'Lectronic Latitude on June 16, 2021 — Lowering the Mast on a Small Sailboat with The Resourceful Sailor. It required the same bridle setup.
Today I try and develop a mast raising system for my Macgregor sailboat.Please consider becoming a patron: https://www.patreon.com/SailingFreeStyleOr gratuit...
Using Gin Pole Mast Raising System On A Hunter 19-2
This is a 30' mast on an O'Day 26, and the gin pole was m... Andrew Price explains how to use a gin pole and assemble tackle to raise and lower a sailboat mast.
Step a mast refers to the process of lowering or raising a sailboat's mast. It involves carefully following the proper steps to ensure the safety and stability of the vessel. This procedure is typically carried out to facilitate transportation, storage, repairs, or any other reason that may require the temporary removal of the mast. ...
Short answer stepping a mast: Stepping a mast refers to the process of installing or raising a sailboat's mast. It involves carefully aligning and securing the mast on the boat's deck, while ensuring proper tension and stability. Various techniques and equipment can be used for this task, depending on the boat's design and size.
To understand mast maintenance better, it's essential to know the various components of a sailboat mast. The key parts include the masthead, spreaders, shrouds, and halyard sheaves. Masthead. The masthead is the topmost section of the mast, where the halyards are attached to raise and lower the sails. It also often houses instruments such as ...
A sailboat mast is a vertical pole or spar that supports the sails of a sailboat. It provides structural stability and allows for adjustment of the sail position to effectively harness wind power. Typically made of aluminum or carbon fiber, mast design varies based on boat size, sailing conditions, and intended use.
8. hunter 23 wyoming. Sep 5, 2018. #1. I have a Hunter 23 and have tried several mast raising systems over the years and have finally found one that is superior to all others. It is fast, easy and safe, I found it on youtube under "mast raising tool". I made mine for under $50 and it works great.
Mast Up Sailboat Mast Raising System is an easy mast stepping device and supports your mast while trailering or storing. Now just 2 people can raise any mast. Ideal for short handed mast raising. Fits virtually any boat with an outboard rudder (see the Mast Up Cockpit version for through-hull rudder boats). Mast Up telescopes to 9-1/2 feet.
This video was made to show how we raise and lower the mast on our Ericson 26 sailboat without using a crane. We've added a hinged mast-step and also tempora...
Raising a Sailboat Mast - the EASY way Masts that are 26 feet or smaller are very easy to raise. The following is the technique I use, and most of the time I can have the boat ready to launch within 10 minutes of arriving at the ramp. Stuff Needed: 1 - A mast step that has some kind of hinge or cross bolt so you can attach the bottom of the ...
Step 4 - Prepare to Raise. Now you must get the mast in position to be raised. With the assistance of your partner, place the mast on top of the sailboat. Next, place the base of the mast close to the mast step on top of the cabin. Put the top end of the mast in the aft mass carrier.
For raising (or lowering) you will need these basics: A gin pole to give you lifting leverage. This needs to be able to take the compression while lifting (figure on at least double the mast weight) and be not less than 1/4 the mast length. The closer this is mounted to the mast pivot the more effective it is, but a boom mounted on a sturdy ...
These instructions are specific to our 2002 Macgregor 26x, but should apply to other Macgregor sailboats as well. Tools needed. Two 9/16″ wrenches. Two 1/4″ wrenches. Mast raising pole, with bolt, line and block and tackle pulley system. Winch handle. Before starting, check the mast for damage and ensure the pulleys at the top of the mast ...
Here comes the exciting part - raising the mast! Depending on your boat's design, this step might require a crane or a simple manual lifting mechanism. Communicate clearly with your team and follow a synchronized approach while hoisting the mast to avoid any accidents or setbacks. Step 7: Aligning and securing
1. Drilling New Holes. The gooseneck is attached to the mast with rivets or screws, so it is possible to change its position by simply drilling new holes in the desired height. Do this carefully though. There are incredible forces exerted on a mast when under sail and you don't want to compromise its rigidity.
A slightly different, easily rigged and portable solution for raising and lowering a heavy mast on a sailboat. Thanks for the inspiration Steve Hock!https://...
That stays permanently on the boat. The chain baby stays run from those swivels to eye fittings on the mast. The chains stay attached when the mast is down, ready for the next raising, but come off and get stowed with the anchor when the rigging is up. One of the nice things about using chains is easy adjustability.
1. Check by sighting up the backside of the mast to see how straight your spar is side to side. You can take a masthead halyard from side to side to ensure that the masthead is on center. Do this by placing a wrap of tape 3′ up from the upper chainplate pin hole on each upper shroud. Cleat the halyard and pull it to the tape mark on one side ...
I made a simple and effective gin pole for raising the mast on my 23' O'day Sailboat. It is simple and quick, and a solo sailor can put it up in about 10 mi...
Sailing through space might sound like something out of science fiction, but the concept is no longer limited to books or the big screen. In April, a next-generation solar sail technology - known as the Advanced Composite Solar Sail System - will launch aboard Rocket Lab's Electron rocket from the company's Launch Complex 1 in Māhia ...
Jim and Tony raise the mast of Bootstrap, a Catalina 22, sailboat using an A-frame gin pole and the trailer winch. A little slow, but not fuss--no muss.Jim'...