~ Back to Sailboat Hardware Main Page ~
INTEGRITY MARINE CORPORATION
REPRESENTING BARBOUR PLASTICS

Boat Toe Rail And Spray Rails For Boats
Toe Rail Sailboat and boat spray rails are most often used on commercial boats and are produced in a rigid material. Toe Rails are installed on the deck of the boat adjacent to the rub rail. S pray rails for boats are mounted on the side of the hull to not only keep the boat dry but also can act as a lifting strake in promoting quicker planing and fuel savings.
These products must ship via truck . Prices below are listed per foot.
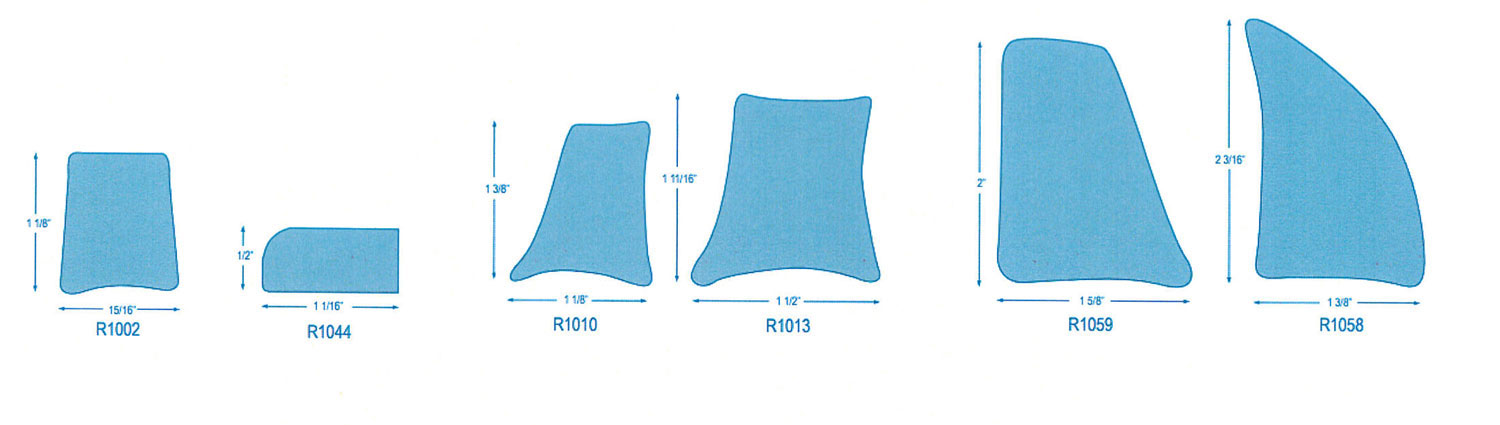
For further help identifying your profile, view or print our catalog for true-to-size dimensions.
Here you can compare a piece of your rub rail to our life size image.

R1002 Rigid Toe Rail

R1010 Rigid Toe Rail

R1013 Rigid Toe Rail

R1058 Rigid Spray Rail

R1059 Rigid Spray Rail
Description for Third Slide, this is Third Slide.
Third Slide Title
Toe rails and spray rails.
CONTACT US TODAY
440-255-1500 "No Voice Mail - Just Real People"

CREST ALUMINUM PRODUCTS CO, INC
Marine toe rail & t-track, replacement aluminum toe rail & t-track, when it comes to replacing old or damaged toe rail, crest aluminum stocks several direct replacement toe rails and many other toe rails that can be easily adapted to fit your application. we currently stock exact replacements for several models of tartan, c&c, & hunter marine, as well as a few others. these toe rails are in stock and are typically available to ship within 3-5 business days. if we don't have the exact rail you are looking for, re-creating or duplicating obsolete or discontinued toe rails is one of our specialties., crest is the worldwide leader for c&c, hunter, o'day, bavaria, cape north, olson, wauquiez pretorien & more sailboat toe rails, our toe rail and t-track inventory is steadily growing with every new inquiry we receive. we now offer several different styles of toe rail which are being used for many different applications throughout the world. from the united states and canada, to europe and the caribbean, crest aluminum has supplied quality new & replacement toe rails to a wide range of customers. our toe rail and t-track is sold through marine distributors and boat yards. call us today and let us know how we can help with your next project., in stock toe rail.
Exact replacement toe rails for Tartan, C&C, Hunter Marine, and other sailboat manufacturers are in stock and ready to ship. If you don't see what you need, we specialize in reproducing discontinued or obsolete toe rails and t-track.
T Track & End Stops
1" and 1¼" T Track offered in two different anodized finishes give you the flexibility to fit many applications. Genoa car adjustment holes are spaced on 4" centers for maximum control. Track end stops are available for both tracks preventing cars from sliding off the ends as well as fairing the ends of the rail to help prevent line fouling.
Custom Toe Rail Fabrication
With the large number of boat manufacturers today and the constant tweaking and updating of designs, replacement parts for older model sailboats can sometimes be hard to find. Duplicating discontinued toe rails has become one of our specialties. With short lead times, returning your boat back to its original working condition is as simple as sending us a small section of the rail. Contact us today
Custom Teak Boat Toe Rail Replacements
SYNTHETIC TEAK BOAT TOE RAILS
Weight: Varies Part #: M-TRTOERL
- toe-cap-replacement-custom
- plasteak-custom-toe-rail
- custom-boat-toe-rail-replacement
Product Information
Take off that old rotten teak!
Many boats have toe rails that are special in one way or another and we can match your exact specs. If you don’t have existing toe rails, we can start from scratch.
The warm look of teak adds charm and a classic look to any boat. Yours can be beautiful ALL of the time without the work. The next time you have them off, send them in for duplication and be done with maintaining them.
Custom PlasTEAK Installation Guide
Purchase Direct
This item is only available by contacting PlasDECK. Call us at 330-668-2587 or email us .
Select a Language

- Sails & Canvas
- Hull & Structure
- Maintenance
- Sailing Stories
- Sailing Tips
- Boat Reviews
- Book Reviews
- Boats for Sale
- Post a Boat for Sale
- The Dogwatch
- Subscriptions
- Back Issues
- Article Collections
- Free for Sailors
Select Page
A New Toe Rail For an Old Warhorse
Posted by Hugh Owens | Hull & Structure , Projects

Beefing up a retired racer with aluminum
My mate, Karlene, and I looked long and hard for a sailboat suitable for world cruising that we could afford. I’ve become convinced that boat speed is an important component of voyaging safety, so a major goal in our search was to find a good old fast boat! In Tampa, Fla., we found a neglected Cal 48 yawl.
This boat had been raced hard and put away wet for too many years, and Karlene and I had our doubts as we motored out into Tampa Bay for our sea trials. We hoisted the baggy, tattered, but fully battened, main in a warm, 13-knot breeze, and off she skipped at 7 knots. We unfurled the jib and were stunned as she heeled gently and roared off at more than 9 knots. What fun! Concealing our excitement, we made an appropriate offer that eventually was accepted. In time, our Cal 48, renamed Koho, landed in Pocatello, Idaho, where we started the refit.
If you examine enough old classic plastic, you will find recurrent flaws and problems that span a range of manufacturers. Our Cal 48 was no different. She was plagued with stanchion and hull-to-deck leaks, as well as untabbed and broken bulkheads, which are especially prevalent in older racers like Koho. Nevertheless, we felt that our time and money would be better spent restoring a swift, old, racing sailboat than a slower, more traditional, cruiser. We hoped the payoff would be in sparkling noon-to-noon runs. The refit of Koho has been total, but I’d like to focus on the structural solutions changes that we made to the toerail and hull-to-deck joint.
Sealed holes
We stripped every piece of hardware off the hull and deck and sealed all the holes with epoxy. Nevertheless, steady rains revealed persistent leaks from one end of the boat to the other that were coming from the toerail. Our toerail was an attractive piece of teak, 1 1/4 inches by 2 1/2 inches, laid on edge and secured every 4 to 6 inches with 5/16-inch stainless steel machine screws covered with teak bungs. The teak toerail also covered the hull-to-deck lap joint. A first-generation mystery sealant bedded the joint.
Near the cockpit, a genoa track was bolted to the top of the toerail and secured by nuts and washers below deck. Under the genoa track, virtually every bolt leaked because of the substantial loads on the track from the huge sail. Reluctantly we took the Sawzall to our beautiful toerail. We made attempts to save the 4-inch stainless steel bolts, but most of them were severely corroded in the anoxic environment of the leaky toerail. We then lifted the deck off the hull, using dozens of wedges. Most of the bulkheads released the deck with minimal fuss.
Once the joint was free and the deck was lifted up a few inches, we could clean and blow out the gap and apply 3M 5200 marine adhesive sealant, rebolt the hull to the deck, and reattach the bulkheads with multiple layers of biaxial cloth and epoxy resin on both sides of the bulkhead. Critical, highly stressed bulkheads – such as the main bulkhead near the cap shrouds and the ones under the lowers – were given additional layers of fiberglass and epoxy.

Some of the brackets used
Overkill, perhaps
On the main bulkhead, a laminated deckbeam was epoxied and bolted to the upper face of the bulkhead and epoxied to the underside of the deck. Stainless steel carriage bolts from the top of the deck were then fastened through this laminated beam. Strong? You betcha! Overkill? Perhaps, but I used this technique on a 39-foot boat I built some years ago. During a bad blow that boat was thrown sideways off a large wave and landed with a shattering crash on her port side and sustained no structural damage. The only downside to this technique is the time it takes.

Clamping up prior to final mounting
The critical bulkheads also received additional aluminum angle reinforcement where they contacted the hull/deck joint, and bolts with backing plates and/or washers were placed around the perimeter of the bulkhead to mechanically reinforce the joint.
We next turned our attention to strengthening and sealing the hull-to-deck joint. The upper hull and decks on these Cals are thinly constructed, in keeping with their racing heritage. We concluded that the only feasible fix was to fiberglass the joint from the outside. To do this, the watertight but rough-appearing hull/deck joint was faired with filled epoxy and sanded, then multiple overlapping layers of biaxial cloth and mat were laid over the hull and deck joint to a thickness of nearly a quarter-inch. More fairing, compounding, and sanding was done to ease the transition between old and new glass.
Prohibitive cost
The next task was to design and build a new toerail. We looked at many options. Commercial aluminum toerail was feasible but the cost was prohibitive and what about all those holes every few inches in our now watertight deck? Hal and Margaret Roth, on Whisper, used a clever method detailed in their book After 50,000 Miles. They brazed Everdur (silicon bronze) plates to the outside of the stanchion bases and then attached a 1-inch by 4-inch teak toerail outside the stanchions to the Everdur plates. They raised the teak 3/4 inch off the deck for water drainage. This seemed like a good idea. Reapplying a wood toerail or bulwark remained an option, but I wanted to avoid the leaks and maintenance associated with wood.
Years ago I worked on commercial salmon boats in Alaska. I remembered how the aluminum gillnetters used 1/2-inch by 2-inch flat bar stock as a toerail. It was welded edge-up to an angle extrusion at the deck edge to stiffen that vulnerable area from impacts with tenders and rough docks. I have long believed that aluminum is the best material for cruising boats, but we were unable to find a suitable aluminum boat that we could afford, and I began to wonder if aluminum and fiberglass could be married during Koho’s refit, thereby gaining the advantages of both materials.
We considered having aluminum angle bent to match the outside curve of our hull and deck. We had different angle extrusions bent at a local fabrication shop, but the differing and constantly changing angles of the hull and deck made this idea unworkable. We rejected welding as well.

Screwed and bolted
Eventually we settled on overlapping flat bar stock screwed and bolted together. In some areas, the aluminum was prepped and epoxied together, but the bulk of the construction used 3M 5200, 1/4-inch screws, and stainless steel bolts attaching the plates to each other and to the hull. The most useful and crucial part of the design is the 1/2-inch by 2-inch flat bar stock that becomes the toerail. The sections are 12 feet long with 1/8-inch gaps on the ends for expansion in the severe climatic changes we experience in the Rockies. The toerail is stiffened at the joints where these flat bar sections meet with brackets made from 1/4-inch aluminum angle, bandsawed and sanded to a pleasing shape, and bolted to the toerail and deck using oversized holes.
Holes are drilled in this flatbar in key areas in a manner similar to the commercially available perforated aluminum toerail. The toerail is supported at about 3-foot intervals by the support brackets. Every other support bracket has a stanchion base. Bolts fasten through the stanchion base, toerail bracket, and the deck to aluminum backing plates beneath. Once bolted or tapped and fastened together with machine screws and 5200, the whole assembly is astonishingly stiff and robust.
After installing the toerail, we attached a 1/4-inch by 4-inch aluminum plate to the hull so that it fit directly under the toerail and in contact with it. This served to cover the fiberglass overlap and strengthen the joint. We called this piece the “hull plate.”
Rigid structure
A final 1/4-inch by 2-inch flat plate was tapped and screwed to the toerail above and the 1/4-inch by 4-inch hull plate below. This effectively joined the toerail to the hull plate, making a very rigid structure that could not have been cold formed in place if it had been a single piece.
A 3/4-inch by 2-inch section of white UHMW (ultra-high molecular weight) polyethylene was fastened with flat-head machine screws into tapped holes in this bar to form a rubbing strake.
Tapping the aluminum allows replacement or repair of the UHMW in the future. I considered wood, aluminum, and PVC. We felt that UHMW offered a durable material that was a more friendly surface against the tender topsides of fellow yachties. I have high regard for UHMW. I’ve used it wherever friction needs to be reduced. For example, I lined a chute with UHMW to feed our anchor chain into the chain locker. The anchor chain glides into the locker as if sliding on Teflon. We also used it in front of our deck cleats in lieu of deck chocks to reduce chafe on the lines.
The aluminum bar stock and extruded angles that I used were alloy 6061, which is the normally available alloy for extrusions. This 6061 is commonly used in aluminum yacht and workboat construction, but it is best used in above-water applications. It has less corrosion resistance than the true saltwater alloys such as the 5000 series. We plan to paint the aluminum for the sake of an improved appearance.

Plastic spacers
We took great care to make sure no copper containing alloys came in contact with the aluminum. Our stanchion bases are made of either bronze or 316 stainless steel. They were made locally and they have a thin plastic (UHMW) spacer isolating the stanchion bases from the aluminum bracket beneath. The aluminum was painted with epoxy and linear polyurethane paint, and while that is probably sufficient isolation from stainless, it’s not that much more work to put in a little polyethylene spacer. We attached the genoa track to a 2-inch by 2-inch by 1/4-inch length of aluminum angle bolted to the inside of our aluminum toerail. This tactic alone saved almost 100 holes through the deck. The aluminum angle was bent using a plywood template by a local steel shop to conform exactly to the curvature of the deck. The track angle is braced additionally every 4 feet with aluminum angle bolted to the deck and glued with 5200. The finished track seems sturdy and superior to what it replaced.
In our most heavily loaded bulkheads I placed the toerail aluminum angle brackets over the interior structural bulkheads. Additional aluminum angle pieces were bolted to the bulkheads and fastened to the angle toerail brackets above to tie all these components together. The oversized deck cleats were bolted over the bulkheads to the aluminum angles below. This is considerably stronger than just using conventional backing plates.
The majority of vessels I’d examined weren’t husky enough to cope with the boisterous high-latitude offshore sailing conditions we expect Koho to encounter. I think that aluminum construction is superior to all other boatbuilding methods if you want to wed lightness and strength. My concept during this refit was to use this superb material to strengthen and stiffen an older fiberglass sailboat, utilizing one of the most abundant elements in the earth’s crust.
Article from Good Old Boat magazine, May/June 2001.
About The Author

Hugh, an anesthesiologist in Idaho, is completing a total refit of Koho, a 1966 Cal 48. He and his wife, Karlene, formerly lived and sailed in Alaska on their 40-foot home-built sailboat, Endurance. They are preparing Koho for a voyage to Antarctica and New Zealand.
Related Posts

Impeller Install Hack
January 15, 2021
Fuel and Water Filters: Simple Insurance Policies
July 17, 2019

Taking It from the Top, Part 1
January 1, 2019

A Slick Slot for Sail Slugs
January 1, 2016
Now on Newsstands
Join Our Mailing List
Get the best sailing news, boat project how-tos and more delivered to your inbox.
You have Successfully Subscribed!
Toe Rail to Bulwark Conversion
Posted: november 17, 2020, in: avocet how-to's | blog | haul out | projects.
When we bought Avocet in 2018 we knew right away there were a number of issues that needed to be addressed. Although well-loved by her previous owners, John and Robin, she had been sitting for a time and it showed primarily in her moldy lockers and tired varnish. Before moving aboard, Chris, his mom, and his brother took on the job to clean and prepare her for our full move aboard after our college graduation in Tahoe. Even though I hated being stuck in classes while Chris was in Southern California, I can’t say I truly missed out on removing the mold mites and maggots from under our stove (ew!)
Living on a boat, there is generally an “acceptable” amount of moisture in the cabin, however, Avocet was clearly living up to the “Cheoy Leaky” stereotype and we worked hard to abolish that nickname once and for all. One of the first projects we ever did was replacing three of her original seven chainplates from 1979 with newly fabricated 316L stainless steel chainplates and properly bedded them with Sikaflex, making sure we could access all seven easily. We started with the two cap shrouds and backstay as well as removing the stem piece and inspected it. Chris’s brother said this was the bare minimum in order to make the boat safe to sail in the short term. I’m glad we did that because almost all of the chainplates we replaced had hairline cracks. Following that major replacement and repair, we realized our toe rail was actually a significant source of our leaks. Unable to address the situation right away (partially due to monetary reasons, and partially due to us wanting to use the boat) we decided to put a “band-aid” on the issue by sealing the seam of where the toe rail met the deck and hull with a bead of TDS which mitigated the issue, for two years until we were able to fully dive into the project.

Avocet, Summer 2018.

Dissimilar metal corrosion between the stanchion and base, featuring the exposed deck to hull joint to the right
We worked diligently in our slip preparing for our March 2020 haul out to ensure that our time in the yard would be devoted to projects that couldn’t be handled in the water. With that said, while in our slip we removed what was left of all 180+ “stainless” bolts that connected our toe rail and genoa tracks, many of them crumbling in my hands making it clear where the water had found voids to creep below deck. Back in the 1970s, when Avocet was built, Cheoy Lee Shipyard in Hong Kong was known for their strong fiberglass construction. Unfortunately, they were also known for their poor quality stainless. Although our deck to hull joint was glassed over beautifully on the inside (which is uncommon amongst other ship builds) the galvanically corroded stainless bolts and bronze nuts that connected the toe rail to the deck compromised the otherwise solid structural integrity in addition to being prone to leaking.
Our deck to hull joint on Avocet was actually constructed quite brilliantly. In the boat mold itself, Cheoy Lee glassed in a “shelf” where the deck would sit in and on the hull. As the deck was dropped into place a generous amount of sealant was applied in the joint, and the two pieces were glassed from the inside. The 41′ x 1.25” x 4” toe rail was bent into place, drilled every 12 inches down through the wood, the deck, and the hull-shelf before finally being bolted in place. Had the bolts not failed, this design would have created sufficient support for the deck and hull and we would have had no reason to remove the toe rail. With the fastener holes filled, we had a fresh canvas and two options moving forward: repair the damage and install a new toe rail, or implement a completely new design and install a bulwark.

Looking vulnerable
Legendary sailor, author, and teacher John Krechmer notes that when choosing an offshore cruising boat you should consider a vessel with a “deck-to-hull-joint that does not rely on bolts, screws, rivets or adhesive for strength or water tightness. The joint is heavily glassed on the inside, the entire way around the boat, and solid stainless steel rods [are used] for mounting stanchions [that] are recessed into the bulwark thus eliminating potential leaks [that are] so common when stanchion bases are thru-bolted.” With this idea in mind, we began to further explore how we could implement a strong bulwark and increase Avocet’s already bluewater standard.

Overhead view, exposed deck to hull joint in the yard. Chris conversing below.
Choosing the bulwark option we had the ability to glass a seamless deck to hull joint which would reinforce the interior glass as well as reconcile the damage left by the bolt holes, further eliminating the need to re-bolt. The reason our deck to hull joint was not initially glassed externally was that this was not only labor-intensive but also expensive. Avocet’s era of boats were primarily built in Hong Kong and Taiwan because of the cheap labor and readily available sought after materials, making boat production quick, reliable, and most importantly, economical. To glass over a deck to hull joint would have added many hours of glassing and fairing, it would also mean re-gelcoating that whole area and blending and wet sanding it to match the topsides and deck. Whereas the quicker approach is to construct a toe rail and through bolt it, which is a tried and true technique used across many designs, as long as your hardware is not corroding. Of course, this need for a raised bulwark is not necessary if you have a boat like a Hans Christian 33 that has an integral bulwark, and with that begs the question: what is a bulwark versus a toe rail?
In the most basic way explained to us by various boat designers, a toe rail is a piece of wood, aluminum, or fiberglass that usually does not exceed more than 3 inches tall and is bolted, every few inches, through the deck. Anything bigger, which typically is bolted to the stanchions to support it, will be called a bulwark. While researching our design Chris came across a blog called Far Reach Voyages where they created and installed bulwarks on their Cape Dory 36 using a Lyle Hess Bristol Channel Cutter design. Their extremely detailed blog is what inspired our project, and gave us the first push in the right direction.

Once the deck and hull both had a 6″ wide 1/4″ deep recession on either side of the deck to hull joint, Chris did one last round of sanding with 60 grit before rounding over the sharp edge from the deck to the hull with a 1/2 inch round-over bit with the r outer , which would allow the glass to adhere to the area since fiberglass does not like to conform to hard bends. Since we had anticipated laying up 2 layers of 1708 fiberglass we had made the rounded edge deep enough for the glass to be inlaid with enough room on top for the fairing compound to act as a barrier when the sanding that soon followed began.

Two layers of 1708 on the transom
With the surface prepped we were finally ready to glass! Chris decided to start with the transom because of the small size, then later working on the starboard and port side rails. He first applied a thin layer of thin epoxy using US Composites medium hardener to the working surface. Working in six foot sections, gave Chris just enough time to lay the fiberglass down on the rail and work each piece into the edge with a fin roller to remove all the air bubbles, and be ready for the next layer to be put on as soon as I was done wetting out the next section. Using a nifty work table we had set up in the yard, I cut the glass and wet it out using a fin roller and squeegee before passing the glass off to Chris. By using this method we preserved our epoxy supply and upped our efficiency by working as a team- I cut the glass, wet it, passed it off to Chris who then laid the glass and the cycle continued all 88 feet over the course of two days, three hours per side.

We kept our hands busy with various other projects while we waited another 24 hours for the barrier paint to dry, and slowly our Avocet had begun to look a bit less derelict with the grey barrier paint hiding her once-fairing-compound-pink deck to hull joint and various splotches showing where the imperfections in the hull were. Chris rolled the awlgrip primer late the following night after waiting out a rainstorm. Two hours later, Avocet was completely off-white and only had to be sanded one more time before being ready for paint, but first Chris had to prepare for the later installation of our bulwark bases.

Unlike the toe rail, our bulwark design would provide the wooden plank a vertical mounting surface at every stanchion base, further preventing the need to redrill unnecessary holes into our freshly sealed and leak-free deck. After careful consideration on how to retrofit our existing stanchion bases (which are 3.5 inches in diameter) Chris concluded that the best bulwark base design would be an “L” bracket. This design meant we would be able to keep our existing stanchion bases and we wouldn’t need to weld the two pieces together which would have been very costly.
After running our bulwark plan by boatwrights, engineers, fabricators and of course big brother Jon we concluded that this design was solid so we went ahead and purchased nine 24” x 4″ x .25″ thick 316L stainless steel bars which we then cut in half, because it was cheaper to buy them at twice the length than it was to buy them at the actual length needed. Once cut into 12″ sections, Chris used an angle grinder with a 150 grit floppy disk to remove the matt finish leftover from being cold-rolled in the manufacturing process. At this point the stainless was ready to be turned over to the capable hands at Garhauer Marine for some fabricating and bending.

It’s all coming together!
Using a prototype “L” bracket that we had made as a template, Chris began to recess the bulwark bases down into the deck so they would sit flush when mounted with the stanchion base on top, giving off a more “factory” appearance. Since the prototype was a durable brass, Chris placed it at every stanchion base on the deck as a guide and used a router to cut the 1/4” deep pockets into the deck. Once this process of cutting holes in our so carefully faired deck was finished, the topside painting could be done and our time in the yard could finally come to an end.
Back in the water we measure the degrees for each “L” bracket to be bent (since each one is different, given the curvature of the deck) and sent the measurements to a local fabricator, Garhaur Marine. To obtain precise measurements, Chris used 2 straight pieces of timber that were about 16” long and placed one on the deck and along the hull and then measured the bisecting point. This measurement would ensure that the bulwark would be following the same sheer line of the hull itself, so Avocet’s lines would not be interfered with.
With the dimensions of the “L” Bracket bends in hand and the assistance of Doug at Garhaur, a hydraulic press was used to bend all 16 bases in a quick and effortless manor, subliminally mocking our less-than-gracefull attempt to bend our brass “L” bracket template (spoiler: we used map gas, a crow bar, and a whole lot of endurance). The hydraulic press was an amazing feat because actually dialing in the degrees on a 1/4” piece of stainless all comes down to the skill of the operator. Luckily, Doug had over 1 million “hits” with this press, so we knew our metal was in good, experienced hands.

Once the bases were bent we brought them home to Avocet and began drilling holes for the stanchion bases. Before leaving Garhaur, Doug educated Chris on the proper technique for drilling through hard and thick material like what we had. Chris learned that it all comes down to using the proper tools to get the job done, which seems simple in theory but not everyone can keep a drill press onboard their boat for projects here and there . With Doug’s advice in mind and our wonderful friend allowing us to borrow his drill press, the bulwark bases were complete and ready to be installed on deck, officially.
With the “L” bracket bases sparkling on deck like freshly whitened teeth, we were eagerly awaiting the arrival of our wood for the hardware to “bite” into. The wood we used to construct our Bulwarks was a hot topic in our boathold for weeks. We first wanted to use teak again, but our wallets did not agree with that idea so we researched alternative rot-resistant hardwoods. There were many great options like white oak, purpleheart, black acacia, and mahogany but after consulting with Chris’s brother-in-law Jason he pointed us in the direction of Cumaru, known as the Brazilian Teak. Having a decision for our bulwark wood kicked Chris into high gear searching for a local reseller, finally finding one that was reasonably close with an agreeable material price and quality. We ordered 100′ of 20′ x 6” x 1″ boards from Advantage Lumber and after 3 months of eagerly awaiting the shipment to be delivered from Brazil, we finally had the Cumaru in our hands and could finish the installation!
Chris spent days prior to the arrival of the wood studying various scarf joints to choose the best method to join the 3 sections of wood together into one single 42′ board. After cross-checking sources he settled on a mechanically fastened plated scarf joint which would be 32” long. Before making the initial cuts, hours went into mathematical equations sketched out on his signature yellow legal pad to ensure the cuts would be precise, since we only had one shot at getting this right or else we would have to order new wood… and who knows how long that would have taken to be delivered! Once the sketches were transferred to the wood, Chris used an accurate combo square , circular saw, Japanese hand saw, sharp chisels, an assorted amount of drill bits, 316 stainless hardware, and marine glue to construct the bulwark plank.

With the help of our friends, we carefully maneuvered the heavy, long, and bendy Cumaru plank to the “L” brackets where I was quick to secure the wood using C-clamps. Now dry fit in place, we stood back and admired how nicely this project had come together. We were thrilled to learn that we would not have to steam the wood to conform to its unique shape, which was ultimately a relief despite our elaborate plan to create a steam “bag” using a thick plastic bag and a turkey fryer for steam. We could finally see the light at the end of the tunnel, but there was still work to be done so Chris picked up his trusty Makita drill and began fitting the fasteners.
Sixty-four 316 stainless steel fasteners later we had bulwarks! The wood completed Avocet’s newly improved look, adding a hint of timeless design to her somewhat more modern construct, an admirational nod to one of Chris’s favorite yacht designers, Lyle Hess. The final pieces to be installed were the hawseholes which would take the place of our prior fairleads which we felt did not do the overall hull design justice. Our cast bronze hawse holes completed the design after Chris had sanded and polished them, leaving them sparkling before we had installed them into the bulwarks together. When the last hawsehole was in place we broke free of the dock lines that had seemingly weighed us down like shackles, and made a mad dash to the Channel Islands so we could enjoy our boat the way she was intended.

The water splashed the deck, washing overboard immediately under the bulwark through the slim gap. It was perfect. The height of the bulwark made it easy to store jerry cans, fenders, lines, and even the dinghy safely with a non-cluttered appearance. This conversion was a long process but overall we are pleased with the outcome and hope that it can inspire others who are interested in a project like this of their own! As Avocet’s pre-cruising project list is growing shorter by the day, we look forward to the improvements to come and overall sailing off into the sunset together with a boat we are proud of. In the words of John Kretchemer “No other man-made object blends design, craftsmanship, passion, and pure optimism the way a sailboat does. With a good sailboat, anything is possible.”

To watch the video recap of this project, visit our YouTube Channel Sailing Avocet
Like This Post!
Tags: boatprojects | bulwark | diy | project | toe rail.

You May Also Like…

Punta Pulpito
Mar 16, 2024
After a lovely sail from Chivato, we arrived at Punta Pulpito and set our hook alongside crew-less Kessel. Her tender,...
👁 328 ❤ 2

Punta Chivato
Feb 27, 2024
There should be no surprise when I tell you that cruising fosters a special community. We cross paths with so many...
👁 1351 ❤ 9

Santa Rosalia, Baja California Sur
Feb 20, 2024
After an exhilarating 150-nautical-mile sail from Refugio, the sight of Santa Rosalia's breakwater felt like a beacon...
👁 1755 ❤ 6

Thank you for providing this excellent essay! You have given me a superb answer to the still-hypothetical question: what if someday our toerail needs to be replaced? I only hope I can still find your article if that day comes.

Happy to help! 🙂

Amazing…this is going on the list for my offshore 38. Did you use the original lifeline stanchion bases or replace them?
Thanks love to follow along
Greg 1979 CL Offshore 38
Hey Greg! We used the same stanchion base design but replaced the cast bronze with stainless steel to accompany our already ss stanchions. Thanks for following along!

So happy to find your blog after finding you both on YouTube! We clicked follow (and are excited to read your new posts) but I confess we are totally here now in search of answers about where you both are from, how you met, how you got into sailing, what made you want to get your own boat, how your kitty likes the seas, and (of course) if you plan to come to the East Coast because that’s where we are haha Cannot wait to see and read more! L (and Andy) with Soul of a Seeker
Submit a Comment Cancel reply
Your email address will not be published. Required fields are marked *
Save my name, email, and website in this browser for the next time I comment.
Notify me of follow-up comments by email.
Notify me of new posts by email.
Submit Comment

- Forum Listing
- Marketplace
- Advanced Search
- All Topics Sailing
- Skills & Seamanship
- Seamanship & Navigation
- SailNet is a forum community dedicated to Sailing enthusiasts. Come join the discussion about sailing, modifications, classifieds, troubleshooting, repairs, reviews, maintenance, and more!
use of toe rail..
- Add to quote
I have a Yamaha 30C sailboat and the deck is surrounded by a ring of toe rails. I am fairly new to sailing. What do people usually use the toe rails for? There a lots of holes where I can tie things. I am wondering how much strain the toerail can take. Would it be safe to tie a docking line to the toe rail in the middle of the boat and use it like a mid-ship cleat?
Toe Rails Toe rails are used to keep you in the boat. The holes are for drainage and should not bear any strain or pull.
Bump said: Toe rails are used to keep you in the boat. The holes are for drainage and should not bear any strain or pull. Click to expand...
Unless some engineer tells you it's okay, I'd stay away from any heavy loads on it, such as genoa blocks. But I've seen it done, like on some of the C&C boats with the sturdy (say about 1/4-inch thick) aluminum toerail with the holes every couple of inches. I just don't know it that's advised in 'the manual'. Many folks use them to hang fenders from, and for lighter-load blocks from a smaller sail, like a staysail. Just as a rough rule of thumb, maybe keep your lines smaller than around 3/8-inch, and you would probably be okay. But I'd really have to see it first. Trust me, I was an English major ;-)
Alu toerails on most (all?) boats are, should be, pretty tuff. On many boats they are the default location for genoa and spinnaker blocks so you can expect them to carry hundreds to thousands of pounds of pressure, depending on boat size. Dock lines should be no problem at all.

The only caution with tying a dock line to the toerail is chafing. The edges of the holes are sometimes a little sharp.

I don't think that is the only caution. I'd use my cleats for most dock lines, all if possible. The constant loading and unloading of pressure a dock line can develop in bad weather could help pull your toe rail out or damage the hull/deck joint, if the rope didn't chafe through on the rail first. For a quick tie up then sure, use the toe rail as well if you like. As Jeff_H and others have suggested these toe rails were intended to be used for attaching working loads in the running rigging of the boat (the sails).

Mine are teak and are through bolted the deck/hull flange every 4"....My genoa track and cars are mounted on mine...Probably stouter then most of my deck hardware. Personally I tie mid-ship spring lines to them with out so much a thought ...but would not use them for fore or aft main dock line aplications.

Back when the Yamaha was built, punched toerails were intended as mounting points for sheet lead blocks but not usually for the primary genoa or working jib. Typically lead blocks for the spinnaker guys (twings) were lead to snatch blocks on the toerails. Similarly, preventers and 'short sheets' for the jibs were lead to the punched toerail. That was the norm. The downside is that the aluminum rails (and sometimes the adjacent topsides) get pretty beat up using them with snatchblocks Now then, upwind, for the most part, on boats that size, genoa sheets were lead to deck mounted tracks and blocks, and then back to the winches. Jeff

you can use it for tying the bottom of the netting down, used to keep kids, pets and sails in the boat.
The toe rails are typically very storng and could easily withstand the loads you may impose with a midship mooring line. The issue you may face is the proper form of attachment. You could use a snatch block on the toe rail and lead it to a strong point like a proper size cleat, or a winch. There are cleats available that are designed to go into toe rails, but they seem pretty flimsy to me.
Agreed: Wish I had a camera today. I was at the dock today and came upon a 40 something boat that has 3/4" headed SS carriage bolts every 5" holding down the toe rail going through the deck to hull joint...Id bet my bottom dollar you could pick that boat up by its to rail if you attached to enough areas no problem as all.
Wichard makes a good but pricey solution to the chafing problem wichard toe rail pad eyes

My genoa blocks are attached to the toe rail so I agree that the rail can take considerable lateral and horizontal forces. For mooring, I bought stainless steel caribiners to attach the spring lines to. I just leave them hanging from the toe rail and attach the lines just prior to docking. Makes it easy to change their locations depending on the dock cleat locations.
- ?
- 173.8K members
Top Contributors this Month

At WikiMotors, we're committed to delivering accurate, trustworthy information. Our expert-authored content is rigorously fact-checked and sourced from credible authorities. Discover how we uphold the highest standards in providing you with reliable knowledge.
Learn more...
What is a Toe-Rail?
A toe-rail or toerail is a narrow strip which runs along the edges of a boat's deck. The toe-rail serves several functions, and can be made from a variety of materials, depending on the boat. Most boat yards have the ability to repair, replace, or refurbish a toe-rail which has been damaged through wear and tear. Some sailors also make their own repairs, if they enjoy the experience of working on their boats. While the toe-rail may be small, it is an important part of the boat, improving safety for everyone on deck.
The toe-rail is at roughly foot height. One important function of this rail is to prevent feet from sliding overboard when people work close to the edges of the deck. While a toe-rail will not keep someone from falling overboard, it will increase safety along the edge of the deck by catching a sailor's shoe if it starts to slide off the deck, as might happen when the deck is slippery or a sailor is focused on a particular task and is not aware of how close she or he is to the edge of the deck. This can help the sailor correct a slide off deck before it turns into a fall.
Toe-rails also save tools which might otherwise slide overboard. While leaving things loose on deck is not generally encouraged or acceptable, while someone is actively working on deck, several tools may be present and left on the deck to make them easy to reach. If the boat pitches and the tools start to slide down the deck, they will bump against the toe-rail before going overboard.
On some boats, the toe-rail is a point of attachment for various equipment. On others, the equipment is fastened to the deck. The rail is also usually perforated or designed with gaps so that water can flow freely through it. This ensures that standing water is not left on deck, where it can pose a hazard in addition to potentially damaging the deck in the long term.
Among woods used for toe-rails, teak is a popular choice because it is hard and somewhat resistant to the elements. Teak has also historically been used in decking for the same reason. Aluminum on modern boats is popular, as it is durable and requires little in the way of maintenance beyond a periodic check to make sure it's firmly attached. Fiberglass and plastics can also be used, in which case the toe-rail may be molded or extruded.
Ever since she began contributing to the site several years ago, Mary has embraced the exciting challenge of being a WikiMotors researcher and writer. Mary has a liberal arts degree from Goddard College and spends her free time reading, cooking, and exploring the great outdoors.
AS FEATURED ON:
Related Articles
- How Do I Choose the Best Deck Railing?
- What Are the Best Tips for Repairing Aluminum Boats?
- What is a Check Rail?
- What is a Jolly Boat?
- What is Boat Capsizing?
- What is a Cigarette Boat?
- How Should I Name a Boat?
Discussion Comments
Post your comments.
- Woman posing

Your shopping cart is empty!
Boarding Step

- Description
- Reviews (3)
When are you too old to cruise? When you can’t jump four feet off a moving boat onto a dock! With this in mind, we designed a step that can be attached to most sailboat toe-rails , using the hole spacing as the height adjustment – wider spacing of the hooks, higher step. This is not a static dock boarding step to fit under a lifeline gate – but it will serve that function too.
We can provide customized webbing “luggage tags” or soft shackles for boats without toe rails.
You can have your boats name engraved in the nonskid plank. Prices start at $60CDN ($50US) Contact Apropos Marine for details
Write a review
- Product Code: BS
- Availability: In Stock
3 reviews / Write a review
- Forums New posts Unanswered threads Register Top Posts Email
- What's new New posts New Posts (legacy) Latest activity New media
- Media New media New comments
- Boat Info Downloads Weekly Quiz Topic FAQ 10000boatnames.com
- Classifieds Sell Your Boat Used Gear for Sale
- Parts General Marine Parts Hunter Beneteau Catalina MacGregor Oday
- Help Terms of Use Monday Mail Subscribe Monday Mail Unsubscribe
Painting? anodized aluminum toerail
- Thread starter Bob Tucker
- Start date May 16, 2004
- Hunter Owner Forums
- Smaller Boats
I have recently removed the toe rails on my 1974 H25 in order to rebed them. They got a little beat up in the process of removing the bolts, and so we ground down around the holes. Now I have bare aluminum showing in spots. Is there a product that will match the anodized finish that i can use to touch up? If not, what kind of paint would work? Tried painting all with Interlux Brightside, but it didn't take at all. Bob Tucker Ta
Traveler track anodized Just had my 4ft traveler anodized at local shop. Cost $10. Looks great and holding up well. May do toe rails if I ever get them off, but as an experiment I did spray paint a 6 ft section of toe rail with Krylon exterior matte black paint last year. With just a light hosing after every sail, seems to be holding up well. It's not a long term solution, but it jazzed up the 23 yr old rails. Consider it a duct tape in a can solution. Good luck
- This site uses cookies to help personalise content, tailor your experience and to keep you logged in if you register. By continuing to use this site, you are consenting to our use of cookies. Accept Learn more…
IMAGES
VIDEO
COMMENTS
A Brand New die to produce the same toe rail used on many older big boats such as the T-41 and others. An exact replacement for the Tartan 41's produced in the 70s-80's. .440" Square Mounting holes are spaced 5.0" on center and are .75" OC in from outboard end. Rail has .875" x 2.00" oval slots with a .4375 radius also on 5.0 ...
Developed by Cape Dory Yachts for use with Merriman 7400 Toerail, unit is also compatible with some other Toerails. Closed Chock has large 4 3/4" x 1 1/8" opening. Clear anodized, cast aluminum Chock bolts through Toerail vertical surface with (4) 1/4" screws. Unit is (maximum) 8 5/8" long x 2" high x 1 1/4" thick (at deck) and requires cut-out ...
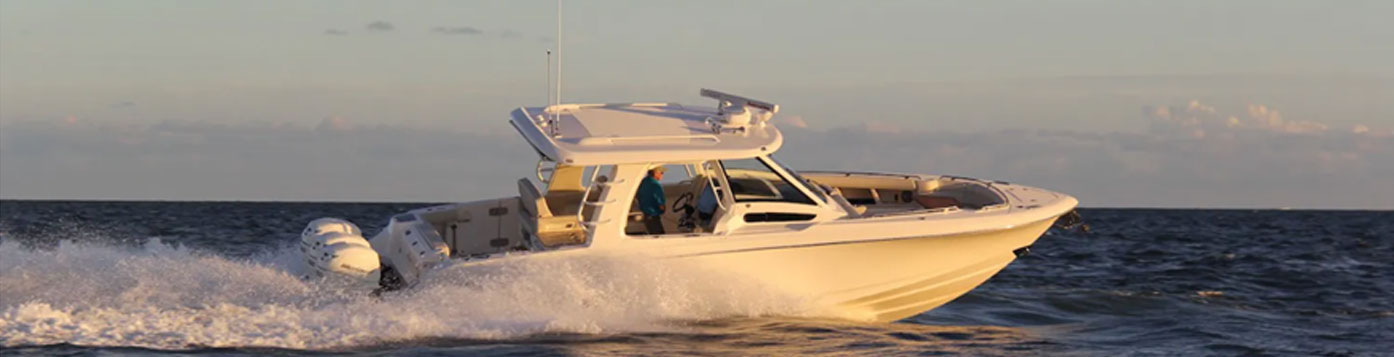
Elevate your boat with Toe Rail and Boat Spray Rails at Integrity Marine. Your trusted source for premium aftermarket marine solutions.
For boats with shrouds inboard of the toe rail, it does not offer a good place for sheet blocks when going upwind, but off the wind they can be a very effective mounting for a snatch block. All in all, I strongly prefer some type of toe rail for security. As long as it it is there, one might as well make it a useful attachment place for a snap ...
Toe Rails and Spray Rails. OEM BOAT BUILDERS. Contact our Marine Sales department for further profile selections or for a quotation on a specific design: Kathy Foley 508-897-8371 or Michael Casey 508-897-8370. AFTERMARKET CUSTOMERS.
Crest is the worldwide leader for C&C, Hunter, O'Day, Bavaria, Cape North, Olson, Wauquiez Pretorien & More Sailboat Toe Rails. Our toe rail and t-track inventory is steadily growing with every new inquiry we receive. We now offer several different styles of toe rail which are being used for many different applications throughout the world.
The quicker, tried-and-true approach was to construct a toerail and through-bolt it on top of the joint; on Avocet, the 41-foot-long, 1¼-inch by 4-inch toerail was bent into place and drilled every 12 inches down through the wood, the deck, and the hull shelf before finally being bolted in place. And in that final step—bolting—lay the rub.
Still, wooden rails give a sailboat an admirably classic look, even when left unfinished to weather naturally, and can be a lot less work to maintain than people realize. Repairing wooden rubrails and toerails is also very simple, requiring nothing more than a couple of hand tools—as I learned when I repaired some sections of rail on my long ...
Many boats have toe rails that are special in one way or another and we can match your exact specs. If you don't have existing toe rails, we can start from scratch. The warm look of teak adds charm and a classic look to any boat. Yours can be beautiful ALL of the time without the work. The next time you have them off, send them in for ...
Thanks for watching!Consider supporting on https://www.patreon.com/sailbrosFollow us on Instagram: http://instagram.com/sailbros/Like us on Facebook: https:/...
Nevertheless, steady rains revealed persistent leaks from one end of the boat to the other that were coming from the toerail. Our toerail was an attractive piece of teak, 1 1/4 inches by 2 1/2 inches, laid on edge and secured every 4 to 6 inches with 5/16-inch stainless steel machine screws covered with teak bungs.
In the most basic way explained to us by various boat designers, a toe rail is a piece of wood, aluminum, or fiberglass that usually does not exceed more than 3 inches tall and is bolted, every few inches, through the deck. Anything bigger, which typically is bolted to the stanchions to support it, will be called a bulwark.
Bump said: Toe rails are used to keep you in the boat. The holes are for drainage and should not bear any strain or pull. Maybe for teak toe rails, but not true at all for perforated aluminum toe rails that the OP was talking about. These became common in the early days of the IOR rule.
What is a Toe-Rail? A toe-rail or toerail is a narrow strip which runs along the edges of a boat's deck. The toe-rail serves several functions, and can be made from a variety of materials, depending on the boat. Most boat yards have the ability to repair, replace, or refurbish a toe-rail which has been damaged through wear and tear.
A boat rub rail, also known as marine rub rail, is a protective strip installed along the sheerline (the point where the hull meets the deck) of your boat. It serves two important purposes: Protection: Rub rails shield the topsides of your boat from scratches, bumps, and dings during docking, launching, and trailering.
The Step is attached to rope like a swing -simple and self-adjusting. The loops at each end have snap shackles that are attached with heavy-duty shackles (included) to the toe-rails. When away from the dock, the Step can be pulled up on deck or detached and stowed. We can provide customized webbing "luggage tags" or soft shackles for ...
73. Oday 22 Milwaukee. Sep 19, 2017. #5. Hi - As I have an 1973 O'Day 22 and have done this - first off - they are screws not bolts - the deck is solid fiberglass where they are screwed in - I took all the toerails off - then drilled out the holes - potted them with epoxy - then positioned the toe rails and re-drilled pilot holes for the screws.
Thanks for watching!Consider supporting on https://www.patreon.com/sailbrosFollow us on Instagram: http://instagram.com/sailbros/Like us on Facebook: https:/...
Ed. May 17, 2004. #2. Traveler track anodized. Just had my 4ft traveler anodized at local shop. Cost $10. Looks great and holding up well. May do toe rails if I ever get them off, but as an experiment I did spray paint a 6 ft section of toe rail with Krylon exterior matte black paint last year. With just a light hosing after every sail, seems ...