Free Shipping On All Orders!
- Epoxy Resins
- Polyester Resin
- Urethane Resins
- Epoxy Project Supplies
- Antifouling Paints
- Topside Paints
- Thinners & Solvents
- Paint Supplies
- Wood Oils & Finishes
- Wood Finishing Supplies
- Cleaning & Polishing
- Accessories


Table Top Epoxy

Clear High Performance Epoxy Kits

5:1 Traditional Epoxy Resin Kits
- Thinners & Solvents

Wet Edge Topside Paint

Premium Marine Topside Primer

Spartan Multi-Season Antifouling Paint
- Wood Finishes
- Wood Oils & Finishes

Gleam 2.0 Marine Spar Varnish

Lust Rapid Recoat Marine Spar Varnish

Halcyon Water-Based Marine Varnish

TotalBuff Rubbing Compound

TotalShine Finishing Compound

White Knight Fiberglass Stain Remover
- TotalBoat Gear

FlexFit Fitted Mesh Back Baseball Cap

Men’s Long Sleeve T-Shirt Hoodie

Women’s Long Sleeve T-Shirt Hoodie
FREE SHIPPING with a minimum puchase of $1,200.00 You are $10.00 away from your free shipping!
Shipping, taxes, and dicount codes calculated at checkout.

PREVENTS OSMOTIC BLISTERS
EASY TO APPLY, DRIES FAST
PREVENTS CORROSION ON UNDERWATER METALS
COMPATIBLE WITH ALL ANTIFOULING PAINTS
TotalProtect Epoxy Barrier Coat Primer
Couldn't load pickup availability
- Description
- Frequently Bought Together
- Product In Action
- Specifications
- You May Also Like
Tough, flexible protection from osmotic blistering
A barrier coat seals a fiberglass hull, blocking water entry and inhibiting blister formation in underwater gelcoat and fiberglass. If your boat has a fiberglass hull, you should protect it with a barrier coat beneath your bottom paint. Just 8-12 dry mils of TotalProtect is all it takes to establish an aggressive barrier coat. Water can’t get in to do damage. TotalProtect is also flexible and can take the tough pounding and movement a hull undergoes without cracking or lifting.
Prevents corrosion on all metals above and below the waterline
When we say TotalProtect is a 'universal' primer, we mean it. Besides being an effective, impermeable barrier coating on fiberglass hulls, TotalProtect has great adhesion and corrosion-protection benefits as an epoxy primer on all metal substrates. Use one, two, or three coats depending on your application. It blankets the metal so oxygen can’t reach it and corrosion can’t start — either above the waterline or underwater.
3 to 1 ratio is easy to mix accurately for best results
To prevent waste, mix whatever amount of TotalProtect you think you can use before it kicks, which is 5 hours — a long time compared to competing brands. It’s easy to mix and use, but if you’re new at this, you may want to start with a test batch to hone your technique. Three parts base with one part curing agent in a paint pot will do it. For example, use a graduated cup to measure 12 ounces of base to 4 ounces of hardener. Mix well. Accurate measuring is easy to do, and it’s important because with smaller amounts of base and curing agent, slight deviations in the mix ratio are greatly magnified. It’s just something to be aware, rather than afraid of. Otherwise it’s easy to mix the entire batch at once. Just dump the curing agent into the can of base. We made sure there’s enough room in there. No need to grab a separate container for mixing.
Your thumb will tell you when it’s time to recoat or overcoat
Timing is everything when applying antifouling bottom paint over TotalProtect. Once you’ve laid down the final coat of TotalProtect, the right time to overcoat with antifouling paint is when the surface is thumbprint tacky. That means your thumbprint is visible on the surface, but there’s no epoxy stuck to your thumb. If there’s epoxy on your thumb, it’s too soon. If you can’t see your thumbprint on the surface at all, you’ve missed the overcoat window and need to sand with 80-grit paper or apply another coat of TotalProtect. Wait for thumbprint tackiness, then overcoat with antifouling. Also use the thumbprint tacky test for recoating TotalProtect on itself. TotalProtect gives you more time between coats as you’re building up the barrier coating. After 60 days, if you miss the overcoat window, sand with 80-grit paper to make the surface toothy enough for the next coat.
Not meant to fill larger surface imperfections
TotalProtect will fill in tiny scratches due to its high-build capabilities, but it’s not a filler. For scratches, dings, and dents 1⁄16” deep or greater, use TotalFair epoxy fairing putty first, then sand smooth and overcoat.
TotalProtect Barrier Coat Primer Details
- Durable, flexible, high-build epoxy primer for above and below the waterline.
- Barrier coat prevents water migration and absorption in fiberglass hulls.
- Compatible with all antifouling paints.
- Bonus : Each Gallon order includes a paint roller frame, 3/16″ nap solvent-safe roller cover, metal tray, 10-in. stir stick, XL paint suit, 2-in. chip brush, a Scotch-Brite™ pad, and 1 roll of 1-in. painter’s tape.
- Fast-drying, two-part epoxy primer features easy 3:1 mix ratio.
- Flows well and dries smoothly and evenly. No tedious sanding required.
- Apply to fiberglass, steel, stainless steel, lead, bronze, and cast iron.
- Provides excellent corrosion protection on underwater metals such as keels, props, shafts, trim tabs, and thru hulls.
- TotalProtect is easy to apply by brushing, rolling, or spraying; if rolling, use a 3/16" roller cover, for best results.
- Thinning: Only use TotalBoat Epoxy Primer Thinner 200 (up to 10%) for thinning, to improve workability and flow.
- Colors: Available in White and Gray
- Size: Quart Kit includes ¾ quart Part A Base and ½ pint Part B Activator
- Size: Gallon Kit includes ¾ gallon Part A Base and 1 quart Part B Activator
Important Safety Information
Wear protective gloves, clothing protection, eye/face protection, and a proper respirator when applying or sanding TotalBoat TotalProtect.
FREQUENTLY BOUGHT TOGETHER

Epoxy Primer Thinner 200

Dewaxer & Surface Prep Solvent

TotalFair Epoxy Fairing Compound

Krypton Copper-Free Antifouling Bottom Paint

JD Select Water-Based Bottom Paint
SEE HOW EASY IT IS TO USE TOTALPROTECT
TECHNICAL DATA
- Application Method: Brush, roll (with 3/16″ (recommended) to 3/8″ nap or foam solvent-safe roller cover), spray (airless, conventional, or HVLP)
- Application Temperature/RH: 50-95°F, relative humidity 0-85%
- Number of Coats: 2-3 (minimum), when using a 3/8″ roller cover; 3-4 coats, when using a 1/4″ roller cover; 4-5 coats, when using a 3/16″ roller cover. It’s more important to ensure 8-12 mils dry film thickness than focus on a certain number of coats.
- Film Thickness (per Coat): 4 mils dry (7 mils wet, when using a 3/8" roller cover) 3 mils dry (5.5-6 mils wet, when using a 1/4" roller cover) 2.5 mils dry (4-5 mils wet, when using 3/16" roller cover)
- Dry Time to Recoat with more TotalProtect: 2 hours - 60 days @ 90ºF, 3 hours - 60 days @ 70ºF, 6 hours - 60 days @ 50ºF
- Dry Time to Overcoat with Antifouling Paint: 3-6 hours @ 90ºF, 5-8 hours @ 70ºF, 7-10 hours @ 50ºF
- Dry Time to Launch (Minimum): 12 hours @ 90ºF, 24 hours @ 70ºF, 5 days @ 50ºF
- Recommended Finish Coating: Ablative antifouling paint
- Colors: Gray or White
- Finish: Matte
- Mix Ratio by Volume: 3:1 (3 parts base to 1 part curing agent)
- Theoretical Coverage: 225 square feet per gallon (at 7 mils wet, not accounting for waste)
- VOC Content (g/L): 337 (Part A), 347 (Part B), 340 (Parts A and B Admixed)
- Thinner: Optional - Brush, Roll, or Spray application - TotalBoat Epoxy Primer Thinner 200 (maximum 10%)
- Induction Period: After mixing base and curing agent thoroughly, allow a 15-minute induction period before reduction and application
- Surface Prep Solvents: TotalBoat Dewaxer & Surface Prep (Fiberglass, Wood, Bare Steel, Aluminum); TotalBoat Special Brushing Thinner 100 (Wood)
- Cleanup Solvents: TotalBoat Epoxy Primer Thinner 200 or TotalBoat Dewaxer & Surface Prep

- Primer type:
- Substrates:
- Above/below waterline:
- Suitable topcoats:
- Application methods:
- Number of coats:
- Application temperature/RH:
- Units of measure:
- Best for: High-build epoxy primer for corrosion protection or osmotic blister prevention
- Primer type: Barrier coat
- Substrates: Wood, fiberglass, metals, and previously painted surfaces in good condition (except for 1-part paints)
- Above/below waterline: Above or below
- Suitable topcoats: Antifouling paints, topside paints, urethanes
- Application methods: Brush: (natural bristle, solvent safe); Roll: (3/16" - 3/8" nap or foam solvent-safe roller cover), or Spray: Conventional, airless, HVLP
- Number of coats: 2-3 coats (minimum), when using a 3/8" roller cover; 3-4 coats, when using a 1/4" roller cover; 4-5 coats, when using a 3/16" roller cover
- Thinner: TotalBoat Epoxy Primer Thinner 200
- Cleanup: TotalBoat Epoxy Primer Thinner 200 or TotalBoat Dewaxer & Surface Prep
- Coverage: 225 sq ft/gal (at 7 mils wet, not accounting for waste)
- Application temperature/RH: 50-90ºF; 0-85% RH
- Units of measure: Quart Kit or Gallon Kit in Gray or White

Aluminum Boat Barrier Coat Epoxy Primer
- Corrosion protection and waterproofing/water barrier on aluminum and underwater metals
- Barrier coat
- Aluminum and previously painted surfaces in good condition (not 1-part paints)
- Above or below
- Antifouling paints, topside paints, and urethanes
- Brush: (natural bristle, solvent safe); Roll: (3/8" nap or foam solvent-safe roller cover); or Spray: Conventional, airless, HVLP
- 2-3 (minimum); It's important to ensure 8-12 mils of dry film thickness for a proper barrier coat.
- TotalBoat Epoxy Primer Thinner 200
- TotalBoat Epoxy Primer Thinner 200 or TotalBoat Dewaxer & Surface Prep
- 225 sq ft/gal (at 7 mils wet, not accounting for waste)
- 50-90ºF; 0-85% RH
- Quart Kit and Gallon Kit in Gray

2-Part Epoxy Primer
- Sealing filler primers and fairing compounds before applying one-part and two-part urethane topcoats.
- Surfacing tie-coat primer or high-build tie-coat primer
- Fiberglass, carbon fiber, Kevlar, wood, steel, aluminum, and previously painted surfaces in good condition
- Above or below (not a barrier coat primer)
- Brush, Roll, or Spray
- 400 sq ft/gal @ 2 mils dry
- 45ºF to 125ºF
- Quart Kit (1 Quart Base & 1 Quart Activator) and Gallon Kit (1 Gallon Base & 1 Gallon Activator. Surfacing Primer Base and High Build Primer Base available in Gray or White.
- Fast-drying one-part primer for one-part and two-part topside finishes
- Tie coat primer
- Fiberglass, wood, previously painted surfaces, epoxy
- Polyurethane and enamel topside paints
- TotalBoat Special Brushing Thinner 100, for brushing and rolling applications; TotalBoat Spray Thinner 101, for spraying and cool weather brushing/rolling applications
- TotalBoat Dewaxer & Surface Prep or TotalBoat Special Brushing Thinner 100 or TotalBoat Spray Thinner 101
- 350-400 sq ft/gal
- 50-90ºF; 0-90% RH
- Gallons and Quarts (White and Gray)
Watch More Videos
YOU MAY ALSO LIKE

- TotalBoat TotalProtect Epoxy Primer Technical Data
FREQUENTLY ASKED QUESTIONS
What applications is this epoxy barrier coat most appropriate for?
What is the difference between totalprotect barrier coat and 2-part epoxy primer, what paints are compatible with totalprotect, can i use totalprotect as a filler, can you apply gelcoat over this primer, can i use totalprotect on plywood, can this primer be used above the waterline, does totalprotect need a topcoat, does it matter whether i use gray or white color totalprotect, what is the best way to apply totalprotect, how many coats should i apply, how much barrier coat primer will i need for my boat, what is the typical coverage of totalprotect, how long does totalprotect take to dry.
- Choosing a selection results in a full page refresh.

Step-By-Step Guide: How To Paint A Sailboat Like A Pro
Alex Morgan
Painting a sailboat can be a rewarding and creative endeavor that not only enhances the appearance of your vessel but also offers protection against the harsh marine environment. Whether you’re a seasoned sailor or a novice boat owner, knowing how to paint a sailboat is a valuable skill. This comprehensive guide will take you through the step-by-step process of painting a sailboat, from gathering the necessary materials to applying the final touches.
To start, you’ll need a few essential materials for the painting project. These include:
1. Paint: Choose a marine-grade paint that is specially formulated for boat surfaces to ensure long-lasting durability.
2. Primer: Apply a suitable primer to create a smooth and uniform surface for the paint to adhere to.
3. Brushes and Rollers: Use high-quality brushes and rollers designed for marine applications.
4. Sandpaper: Prepare the boat’s surface by sanding it to remove any existing paint or imperfections.
5. Tape and Drop Cloths: Protect areas that you don’t want to paint by using tape and cover the surrounding surfaces with drop cloths.
Before diving into the actual painting process, it’s essential to prepare the sailboat properly. This involves a few key steps:
1. Cleaning the Surface: Remove dirt, grime, and any other contaminants from the boat’s surface using a suitable cleaning solution.
2. Repairing Any Damage: Inspect the boat for any cracks, chips, or other damage. Repair these areas using the appropriate techniques and materials.
3. Sanding the Surface: Smooth out the boat’s surface by sanding it with progressively finer grits of sandpaper. This helps the paint adhere better and provides a uniform finish.
Next, apply a primer coat to ensure proper adhesion and longevity of the paint job. Consider these steps:
1. Choosing the Right Primer: Select a primer that is compatible with the type of paint you’ll be using and suitable for the boat’s material.
2. How to Apply Primer: Follow the manufacturer’s instructions and apply the primer evenly across the entire surface of the sailboat. Use smooth, overlapping strokes for optimal coverage.
Once the primer has dried, it’s time to start painting the sailboat with the chosen paint. Keep these points in mind:
1. Selecting the Right Paint: Use a high-quality marine-grade paint that is specifically designed for boat exteriors and can withstand the effects of sun, saltwater, and other environmental factors.
2. Applying the Paint: Apply the paint using consistent and even strokes, following the manufacturer’s instructions regarding drying times and the number of coats required.
Add the finishing touches to complete the painting process:
1. Adding a Clear Coat: Consider applying a clear coat for added protection and a glossy finish. Ensure the clear coat is compatible with the paint used for the main coat.
2. Cleaning up: Clean your brushes, rollers, and any other painting equipment with the appropriate solvents, and dispose of any waste materials responsibly.
By following these steps, you can achieve a professional-looking paint job on your sailboat and enjoy the benefits of a visually appealing and protected vessel.
1. Painting a sailboat requires specific materials such as paint, primer, brushes and rollers, sandpaper, and tape and drop cloths. 2. Before painting, it is important to prepare the sailboat by cleaning the surface, repairing any damage, and sanding the surface. 3. When applying primer and paint, choosing the right products and following the correct application techniques are crucial for a successful outcome. 4. After painting, adding a clear coat and cleaning up are essential finishing touches to ensure a professional and long-lasting result.
Materials Needed for Painting a Sailboat
When it comes to painting a sailboat, having the right materials is crucial. In this section, we’ll dive into the essential items you’ll need to get started on your sailboat painting project. From paint and primer to brushes , rollers , sandpaper , and tape , we’ll explore each of these elements and how they play a role in achieving a successful paint job. So, grab your supplies, and let’s sail into the world of sailboat painting!
Painting a sailboat requires choosing the right paint for a successful and long-lasting finish. Here are some important points to consider:
1. Type of paint: Choose from marine enamel, polyurethane, or epoxy paint, as each type has its own advantages and suitability for different surfaces.
2. Durability: Opt for paint specifically formulated for marine use, with high UV resistance and excellent adhesion properties to withstand sun, saltwater, and abrasion.
3. Color selection: Select a paint color that suits your preferences and matches the overall aesthetics of your sailboat. Consider that darker colors absorb more heat and lighter colors may stain easily.
4. Finish: Decide between glossy or matte finishes. Glossy finishes are more reflective, durable, and easy to clean, while matte finishes provide a subtle and natural look.
5. Application method: Choose the application method that best suits your skill level and project size. Common methods include brushing, rolling, or spraying.
6. Coverage and drying time: Check the paint’s coverage rate and consider the number of coats needed. Also, take note of the drying time between coats, as it affects the project timeline.
7. Compatibility: Ensure the chosen paint is compatible with the primer and existing paint layers on your sailboat to prevent issues like peeling or bubbling.
8. Environmental considerations: Look for eco-friendly and non-toxic paints to minimize the impact on the marine environment.
When painting a sailboat, the primer is a crucial element to achieve a professional and long-lasting finish. Here are the key points to consider about primer:
Choose the Right Primer: It is important to select a marine-grade primer specifically designed for sailboats. This type of primer adheres well to various surfaces such as fiberglass, wood, and metal.
Apply the Primer: Make sure the surfaces are clean, dry, and free from any contaminants. To achieve a thin and even coat, you can use a brush or roller. Pay special attention to joints and areas that have been previously repaired. Allow the primer to dry completely before proceeding further.
Always remember that using the correct primer plays a crucial role in obtaining a smooth and durable paint finish on your sailboat. So take your time to choose the right primer and follow proper application techniques for optimal results .
3. Brushes and Rollers
When painting a sailboat, it’s crucial to have the appropriate brushes and rollers for a seamless and professional finish. Here are some crucial factors to consider:
1. Choose brushes and rollers of excellent quality that are suitable for the type of paint being used. Synthetic bristle brushes are effective for water-based paints , while natural bristle brushes are perfect for oil-based paints .
2. Take into account the size of the brushes and rollers. For intricate work and smaller areas, opt for smaller bristle sizes. On the other hand, for larger surfaces, larger brushes and rollers provide greater efficiency .
3. Make sure that the brushes and rollers are thoroughly cleaned and free from any residual paint or debris before starting the painting process. This will prevent any unwanted texture or imperfections on the sailboat’s surface .
4. Utilize a paint tray or bucket to hold the paint and dip the brushes or rollers into it. This will ensure even distribution and prevent any excess dripping.
5. Apply consistent pressure and strokes when using the brushes and rollers. Start painting from one end and work your way to the other, maintaining a uniform coat by maintaining consistent pressure.
By carefully selecting the appropriate brushes and rollers and using them correctly, you can achieve a paint job on your sailboat that looks professional .
4. Sandpaper
When painting a sailboat, sandpaper is crucial in preparing the surface for a smooth finish. Here are important points to consider about sandpaper:
1. Grit selection: Choose the right grit based on the surface condition. For rough sanding or removing old paint, use a coarse grit (80 or 100). For finer sanding and smoothing, use a medium or fine grit (120 or 220).
2. Sanding technique: Hold the sandpaper firmly and sand in a circular or back-and-forth motion. Apply even pressure to prevent unevenness. Sand evenly across the entire surface to remove imperfections or roughness.
3. Progression: Start with coarse grit and gradually switch to finer grits. This smoothes the surface and achieves a professional finish. Clean the surface between grit changes to remove dust or debris.
4. Safety precautions: Wear goggles and a mask to protect against sanding dust. Work in a well-ventilated area or use a dust collection system to minimize airborne particles.
5. Surface evaluation: After sanding, inspect for smoothness and uniformity. If rough spots or imperfections are visible, resand those areas before priming and painting.
The first documented use of sandpaper dates back to 13th-century China. Crushed shells, seeds, and sand were glued to parchment to create abrasive sheets. Over time, sandpaper production techniques evolved, and it became widely used in various industries for surface preparation, woodworking, and finishing applications. Today, sandpaper continues to be an essential tool for achieving smooth surfaces in painting and other projects.
5. Tape and Drop Cloths
When painting a sailboat, the use of tape and drop cloths is essential to protect areas from paint. Here are some important points to consider:
Choose painter’s tape to create clean lines, avoiding regular masking tape.
Prepare the surface by cleaning and drying it to ensure proper adhesion.
Carefully apply the tape along the edges, pressing firmly for good adhesion.
Use drop cloths or plastic sheets to protect surfaces from paint spills or splatters.
Overlap the tape slightly for smooth, clean edges and prevent paint seepage.
Remove the tape at a 45-degree angle when the paint is dry to the touch but not fully cured.
Following these steps will help you effectively use tape and drop cloths while painting a sailboat, ensuring a professional look and protecting desired areas.
Preparing the Sailboat for Painting
Get ready to transform your sailboat into a work of art! In this section, we’ll dive into the crucial steps of preparing your sailboat for painting. From cleaning the surface and repairing any damage to sanding it down, we’ll cover everything you need to know to ensure a smooth and long-lasting paint job. So grab your brushes and let’s get started on this exciting journey of turning your sailboat into a masterpiece .
1. Cleaning the Surface
When cleaning the surface of a sailboat before painting, it is important to follow these steps for thorough cleaning .
Start by removing any loose or flaking paint using a scraper or wire brush.
Next, wash the surface with a mild detergent or boat cleaning solution to effectively remove dirt, grease, or grime .
Rinse the surface thoroughly with clean water to ensure all cleaning solution residue is removed.
Take the time to inspect the surface for any stubborn stains or marks .
If needed, utilize a specialized boat hull cleaner to effectively eliminate them.
To create a smooth and even surface for paint adhesion, gently sand the surface with fine-grit sandpaper .
After sanding, wipe down the surface with a clean cloth or sponge to eliminate any dust or debris .
If you come across areas with mold or mildew , treat them with a mildew remover and allow it to sit for the recommended time before rinsing.
Ensure that the surface is completely dry before proceeding with painting or other preparation steps .
By diligently following these steps, you can guarantee that the sailboat’s surface is thoroughly cleaned and ready for painting , ultimately resulting in a professional and smooth finish .
2. Repairing Any Damage
To effectively repair any damage on a sailboat, follow these steps:
1. Assess the damage: Carefully inspect the sailboat for any cracks, scratches, or holes in the hull or deck.
2. Gather necessary materials: Make sure you have epoxy resin, fiberglass cloth, sandpaper, and a putty knife on hand.
3. Clean the damaged area: Use a mild detergent and water to remove any dirt, grime, or loose particles.
4. Sand the damaged area: Lightly sand the area to create a smooth surface for the upcoming repairs.
5. Apply epoxy and fiberglass: Follow the manufacturer’s instructions to prepare and apply the epoxy resin to the damaged area. Place layers of fiberglass cloth, ensuring complete coverage.
6. Sand and smooth the repair: Once the epoxy cures, carefully sand the repaired area for a smooth finish that seamlessly blends with the surrounding surface.
7. Prime and paint: If necessary, apply primer before painting to ensure proper adhesion. Then, paint the area to match the rest of the sailboat.
8. Clean up: Dispose of waste materials properly and clean your tools and work area.
By following these steps, you can expertly repair any damage on a sailboat while maintaining its structural integrity and overall appearance.
3. Sanding the Surface
To achieve a smooth and uniform surface, it is important to properly sand the boat’s surface. Gather all the necessary materials, including sandpaper of different grits ( 60 , 120 , and 220 ), a sanding block or power sander, and safety goggles . Before starting, make sure to protect areas that you don’t want to sand by using masking tape or drop cloths .
Begin the sanding process by using 60 grit sandpaper. This will effectively remove rough spots, peeling paint, or any previous coatings. When sanding, use a circular or back-and-forth motion with even pressure. It is crucial to avoid aggressive sanding that could potentially damage the boat’s structure.
Continuously check the surface for smoothness and evenness. Once the desired level has been achieved, switch to 120 grit sandpaper. This will further refine the surface and eliminate any remaining imperfections. Repeat this process with 220 grit sandpaper to ensure a completely smooth and uniform surface.
After sanding, ensure that the surface is thoroughly cleaned. Use a vacuum or tack cloth to remove any dust and debris. Take the time to inspect the sanded surface for any areas that may require additional sanding or touch-ups before moving forward with the painting process.
Throughout the entire sanding process, it is crucial to prioritize safety. Always remember to wear safety goggles and a mask to protect yourself from any airborne particles and dust that may be generated while sanding.
Applying Primer on the Sailboat
Applying primer on a sailboat is a crucial step in the painting process, ensuring a smooth and durable finish. In this section, we’ll dive into the essentials, from choosing the right primer to the step-by-step application techniques . So grab your brushes and get ready to give your sailboat the perfect foundation for a flawless paint job!
1. Choosing the Right Primer
Choosing the Right Primer
When painting a sailboat, selecting the appropriate primer is crucial for achieving a smooth and durable finish. Here are the steps to follow in choosing the right primer:
Assess the surface: Inspect the sailboat’s surface for damages such as cracks, dents, or peeling paint before choosing a primer.
Determine the surface type: Different sailboats may have fiberglass, wood, or metal surfaces. Select a primer designed for the specific surface.
Consider the environmental conditions: Take into account the climate and weather conditions the sailboat will be exposed to. Choose a primer with excellent corrosion resistance if the boat will be in harsh conditions or saltwater.
Choose the right primer type: There are epoxy primers, self-etching primers, and high-build primers available. Consider the needs of your sailboat and choose a primer with good adhesion and durability.
Consult professionals: Seek advice from paint specialists or experienced boat painters if unsure about which primer to choose.
By following these steps, you can ensure you choose the right primer for your sailboat, leading to a successful painting project.
Sailboat painting has a long-standing tradition in maritime culture. In the past, sailors used a mixture called “ship paint” consisting of tar and natural materials. This protected the boats from rot and deterioration and improved their performance in the water. Nowadays, sailors have a wide range of primers and paints designed specifically for sailboats. The right primer choice is critical for preserving and enhancing the beauty and functionality of sailboats. So, when embarking on a sailboat painting project, take the time to carefully choose the right primer for a successful outcome.
2. How to Apply Primer
To properly apply primer on a sailboat, follow these steps on how to apply primer:
1. Clean the surface: Before applying primer, it is important to ensure that the sailboat surface is thoroughly cleaned and free from any dirt, dust, or debris. To clean it effectively, use a mild cleaner or soap and water.
2. Repair any damage: Take a close look at the sailboat to identify areas that require repair. If you find any cracks, dents, or holes, use a suitable filler or epoxy to fix them.
3. Sand the surface: To create a smooth and even surface for painting, lightly sand the entire area that needs to be primed. Make sure to use fine-grit sandpaper and remove any loose or peeling paint.
4. Choose the right primer: Selecting the appropriate primer is crucial. Look for a primer that is specifically designed for boats and marine surfaces. Consider factors such as the type of paint, boat material, and any requirements specified by the manufacturer.
5. Apply the primer: Before applying the primer, stir it thoroughly to ensure proper consistency. Apply a thin and even coat of primer using a brush or roller. Work in small sections, and make long, smooth strokes along the natural lines of the boat.
By following these steps, you can effectively apply primer to your sailboat, creating a smooth and durable base for the paint.
Painting the Sailboat
Painting the Sailboat is where the real magic happens! Get ready to transform your plain sailboat into a work of art. In this thrilling section, we’ll dive into the nitty-gritty details of painting your beloved vessel. Discover the secrets to selecting the perfect paint that not only adds a pop of color but also protects your boat from the harsh elements. Then, we’ll uncover the techniques for applying the paint like a pro, ensuring a flawless finish that will make heads turn. Get ready to unleash your creativity and make your sailboat truly shine!
1. Selecting the Right Paint
Selecting the Right Paint
– Type of paint: When selecting the right paint, it’s important to consider the options available such as marine enamel paint , epoxy paint , and polyurethane paint . Each type has its own set of advantages and disadvantages, so it’s important to choose the one that best suits your needs and budget.
– Compatibility: Making sure that the paint you choose adheres well to the sailboat’s surface is crucial. This will help ensure a long-lasting and durable finish.
– Color: The color you choose for your paint should not only be based on your personal preference, but also on how well it complements the overall aesthetic of the sailboat. It’s also important to consider how the color will be affected by sunlight and weathering over time.
– Durability and resistance: In a marine environment, it’s essential to select a paint that is formulated to withstand the harsh conditions. Look for paint options that offer UV resistance , saltwater resistance , and resistance to scratches and abrasions.
– Application method: Depending on the paint you choose, different application methods may be required. Some paints may need to be sprayed, while others can be applied with a brush or roller. It’s important to choose a paint that aligns with your level of expertise and the equipment you have available.
– Budget: Consider your budget when selecting the right paint. Different paints come at different price points, so it’s important to choose one that offers a balance between quality and affordability.
2. Applying the Paint
To apply paint on a sailboat, follow these steps:
– Preparation: Clean and dry the surface before applying paint. Remove dirt, dust, or grease using a cleaning solution and cloth.
– Tape and protect: Mask off areas that you don’t want to paint, such as windows or hardware, using tape. Cover surrounding areas with drop cloths to prevent accidental splatters.
– Primer: Apply a coat of marine-grade primer to the sailboat following the manufacturer’s instructions. Allow the primer to dry completely.
– Select the paint: Choose a marine-grade paint suitable for the sailboat’s material. Consider durability, weather resistance, and color. Follow the recommended applicator type.
– Application: Apply paint to larger areas of the sailboat first using a roller or brush. Use smooth, even strokes for a uniform finish. Work in sections, moving from one part to another.
– Second coat: Assess if a second coat is needed once the first coat has dried. Apply a second coat following the same technique for a vibrant and long-lasting finish.
– Clean up: Clean brushes and rollers according to the paint manufacturer’s instructions. Dispose of used materials properly.
By following these steps, you can effectively apply paint to your sailboat and achieve a beautiful and protective finish.
Finishing Touches
The Finishing Touches section is where we add the final elements to our sailboat painting, giving it that extra dose of awe-inspiring sophistication . In this part, we’ll dive into two key sub-sections: Adding a Clear Coat and Cleaning up . Prepare for the exhilarating moment of applying the clear coat, which not only enhances the colors but also protects the artwork for years to come. Plus, we’ll share some neat tips on how to clean up any stray brushstrokes or smudges effortlessly. Let’s make this sailboat masterpiece shine !
1. Adding a Clear Coat
To incorporate the provided keywords naturally in the provided text, the rewritten text can be as follows:
To add a clear coat to a painted sailboat and ensure long-lasting protection for your sailboat, follow these steps:
Ensure the painted surface is clean and completely dry .
Use a high-quality clear coat designed for marine applications , specifically for adding a clear coat.
Apply the clear coat in thin , even layers using a brush or spray gun .
Allow each layer to dry completely before applying the next layer, contributing to the process of adding a clear coat.
Cover the entire surface of the sailboat with the clear coat for maximum protection , fulfilling the purpose of adding a clear coat.
Check for any drips or uneven spots and sand them down before adding more coats, which is an essential part of adding a clear coat.
Follow the manufacturer’s instructions to determine the number of coats needed, a vital step in successfully adding a clear coat.
Adding a clear coat to a painted sailboat is crucial for protecting the paint job from UV radiation , saltwater , and other damaging elements. By following these steps and using the appropriate materials for adding a clear coat, you can achieve a professional-looking finish and ensure long-lasting protection for your sailboat.
2. Cleaning up
Cleaning up after painting a sailboat is an important step that ensures a neat finish and maintains the longevity of your painting tools. To effectively clean your sailboat, follow these steps:
- Remove excess paint from brushes and rollers.
- Clean brushes and rollers with warm soapy water.
- Rinse brushes and rollers to remove soap residue.
- Allow brushes and rollers to air dry completely.
- Dispose of leftover paint or materials according to local regulations.
- Remove protective tapes and drop cloths from the sailboat.
- Collect debris or trash and dispose of properly.
- Wipe down the sailboat with a clean cloth to remove dust or particles.
- Inspect the area for touch-ups or missed spots and make necessary corrections.
- Store brushes, rollers, and other painting materials in a clean and dry place for future use.
These steps will help you incorporate the cleaning up process into your sailboat painting routine effectively. Sailors have always taken pride in keeping their vessels clean for efficiency and well-being. Proper cleaning techniques have been passed down through generations to preserve sailboats. Today, sailors continue to adhere to these principles to honor the traditions of the sea.
Some Facts About How To Paint A Sailboat:
- ✅ Painting your sailboat is essential for its safety and protection. (Source: Life of Sailing)
- ✅ The paint acts as a barrier against salt, barnacles, and rotting, keeping your sailboat well-maintained. (Source: Life of Sailing)
- ✅ Painting your sailboat yourself can save you money and allow you to acquire a valuable skill. (Source: Life of Sailing)
- ✅ The frequency of painting depends on the type of paint and the amount of time your boat spends in the water. (Source: Life of Sailing)
- ✅ Choosing a sailboat paint that contains copper provides biocidal properties, preventing the attachment of sea life. (Source: Life of Sailing)
Frequently Asked Questions
How important is painting a sailboat for its safety and protection.
Painting your sailboat is essential for its safety and protection. The paint acts as a protective layer, guarding against saltwater corrosion, barnacles, and rotting. It also adds an added layer of aesthetic appeal to your boat, making it stand out.
What are the benefits of painting a sailboat yourself?
Painting your sailboat yourself offers several benefits. It allows you to save money as you won’t have to hire a painting contractor. It provides an opportunity to learn a valuable life skill. It allows you to add your creative flair and personalize the paint job according to your preferences.
Which paint brands are recommended for painting a sailboat?
When painting a sailboat, it is recommended to choose paint brands that contain copper. Copper acts as a biocide, preventing the attachment of sea life to the boat’s hull. This helps in maintaining the boat’s performance and reduces the need for frequent cleaning and maintenance.
What is the frequency of painting a sailboat?
The frequency of painting a sailboat depends on the type of paint used and the amount of time the boat spends in the water. Bottom paint, which protects the hull, should be applied annually. On the other hand, top paint, which adds color and gloss to the boat, can be done every 3 years.
What are the necessary tools for painting a sailboat?
When painting a sailboat, you will need various tools such as sandpaper, paint, primer, brushes, rollers, paint thinner, and solvent. It is essential to have a well-ventilated workspace and ensure you wear safety gear such as a face mask, goggles, and gloves.
What is the process for painting a sailboat?
The process for painting a sailboat involves several steps. First, inspect the boat for any damage and make necessary repairs. Next, sand the surface using different grits of sandpaper to achieve a smooth finish. Then, apply a layer of primer to improve adhesion. Apply multiple coats of paint, allowing sufficient drying time and sanding between each coat for a glossy looking boat. Good luck!
About the author

Leave a Reply Cancel reply
Your email address will not be published. Required fields are marked *
Save my name, email, and website in this browser for the next time I comment.
Latest posts

The history of sailing – from ancient times to modern adventures
History of Sailing Sailing is a time-honored tradition that has evolved over millennia, from its humble beginnings as a means of transportation to a beloved modern-day recreational activity. The history of sailing is a fascinating journey that spans cultures and centuries, rich in innovation and adventure. In this article, we’ll explore the remarkable evolution of…

Sailing Solo: Adventures and Challenges of Single-Handed Sailing
Solo Sailing Sailing has always been a pursuit of freedom, adventure, and self-discovery. While sailing with a crew is a fantastic experience, there’s a unique allure to sailing solo – just you, the wind, and the open sea. Single-handed sailing, as it’s often called, is a journey of self-reliance, resilience, and the ultimate test of…

Sustainable Sailing: Eco-Friendly Practices on the boat
Eco Friendly Sailing Sailing is an exhilarating and timeless way to explore the beauty of the open water, but it’s important to remember that our oceans and environment need our protection. Sustainable sailing, which involves eco-friendly practices and mindful decision-making, allows sailors to enjoy their adventures while minimizing their impact on the environment. In this…
- Shop eStore
- Boatbuilding
- Caulking & Adhesives
- Cleaners & Waxes
- Covers & Accessories
- Dinghies, Canoes & Accessories
- Electronics
- Fishing Commercial
- Fishing Pleasure
- General Tools
- Hatches & Portholes
- Teak Accessories
- Trailer Accessories
- Ventilation
- Watersports
- Current Ads
- Locations & Hours
Blisters & Barrier Coats
Gelcoat blisters.
When fiberglass boat building started, very little thought was given to the possibility that the fiberglass or the tough gelcoat surface might eventually break down. Gelcoat was developed to protect the fiberglass structure and was thought to be an impermeable layer that would keep the underlying resin and fibers dry for the life of the vessel.
As time has borne out, blisters (osmotic blisters) appear on some boats; sometimes quite quickly, and in other vessels only after many years of use. Water in warmer climates seems to encourage them (with the proportional longer boating season) and the builder’s specific choice of resin may also help deter them. The fact is, to date, we can’t accurately predict when a blistering problem might occur.
To understand more about blisters here is a quick review how the typical fiberglass boat is constructed. First, mold release wax is sprayed onto the inside of the mold, then the layers of gel coat, a specially formulated pigmented polyester resin that gives the boat its color and smooth exterior finish, are sprayed on. Laminated above the gel coat are layers of fiberglass, usually in the form of chopped-strand mat and woven roving, saturated with polyester resin. It is inside the laminated fiberglass matrix that osmotic blisters can begin when water seeps through the gel coat, seeking out pockets of incompletely cured resin within the fiberglass layers.
Tiny amounts of water get inside the fiberglass and begin to dissolve the chemicals found there. This solution then attracts additional water through the gel coat barrier by the process of osmosis. As more water enters, the pressure increases and eventually, a blister is formed. Under the right conditions this blister might expand and begin to delaminate the local area around the blister. As more blisters occur, the situation can become a problem that might threaten the structural integrity of the hull. Cored hulls present a complex problem in that both the core material and the fiberglass/ gelcoat may be damaged in extreme cases.
As builders determined that blisters resulted from water penetrating the gel coat surface, the barrier coat (usually an epoxy, or similar material that seals out the moisture better than polyester gel coat) was born. Water barrier techniques and products have grown into maturity over the past few decades.
Applying a barrier coat today is almost as easy as rolling on bottom paint, and thousands of boat owners have completed this project, protecting their boats from osmotic blisters. There are three types of barrier coat protection: 1) preemptive barrier coating on new boats; 2) blister repair alone; 3) blister repair with a barrier coat.
New Boat Preemptive Barrier Coating
New boats are sometimes delivered with a barrier coat applied at the factory, and may even include a 5 or 10 year blister warranty. It is important to note that you may have to treat the barrier coat in a specific way to keep the warranty intact, so consult your warranty before you do a thing to the bottom of your new boat. If your boat does not have a barrier coat, you may want to investigate whether the builder has used specific resins which are resistant to osmotic blistering (commonly, vinylester resins are used in this instance– this type of resin is considerably more costly) so that you may not have to apply a barrier coat to the underwater portion of the hull.
If the vessel has no special barrier protection and your boat is in the water year round, especially in a warm-water area, or if other boats from the same manufacturer (or of your model) have a history of blister problems, barrier coating as a preventative measure makes a lot of sense. It is far easier to apply a barrier coat to an intact hull than to clean out and fix blisters first, and then roll on the epoxy. A properly applied barrier coat may also increase the resale value of your boat.
If you want to take this preemptive action, then wipe-down the bare hull with a solvent dewaxer, sand thoroughly, but lightly, and apply the recommended thickness of barrier coat (usually 2 or 3 coats), followed by antifouling paint appropriate to the area’s waters.
Hamilton Marine offers barrier coat products from a number of paint manufacturers. A review of their manuals will reinforce how seriously they take this problem. They give drying times along with precise recommendations as to the number of coats that will give the optimal film thickness, after it dries. Follow these instructions closely and you will have satisfactory results.
Blister Repair
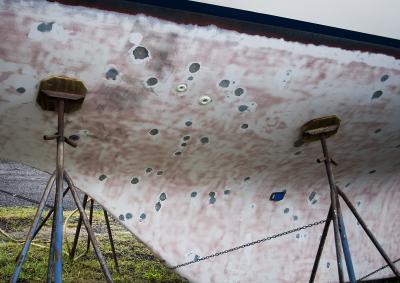
Many times when a boat is hauled you’ll see isolated blisters on the hull, or possibly on the rudder, but in general the gel coat looks smooth and there is little evidence of major damage. In these cases, it may only be necessary to fix the blisters and put off the much more costly barrier coat application for a few more years—with luck, forever!
As soon as the boat is hauled, scuff-sand lightly over the blisters before they ooze all of the liquid out, deflate, and become hard to identify. Mark the blisters, so you don’t miss any later. Open the blisters by scraping or grinding away the damaged material until there is no sign of delamination. Flush with water and allow the damaged areas to dry, which could require from several days to a few weeks. Circulating warm air will speed the drying process.
When the cleaned out areas are dry, the first step is to seal the laminate with low viscosity 100% solids epoxy resin. This coat penetrates the surface and prepares it for the epoxy filler, which is spread in place to fill the void. Deep pockets, or large areas, may require a few coats of epoxy filler compound, although the material will cure even if it is applied in a thick layer. When the void is filled, sand the surface to match the surrounding hull contours. A final coat of regular density epoxy (do not use 5-minute epoxy, as this is not waterproof) will seal the filler. Sand after curing and you’re then ready for bottom paint.
Blister Repair with a Barrier Coat
Older boats must be very dry before you attempt to repair them. By dry, we mean that the hull laminate must have the water evaporated from it, either through natural drying (very slow), by artificially warming the hull (expensive), or by using a vacuum to draw out the moisture (technically complex and expensive). Any moisture that is resident in the hull laminate will be trapped by the barrier coat, if it is applied prematurely. Avoid doing this—or all your efforts will be in vain. Sever problems might require stripping the gel coat entirely, testing the laminate with a moisture meter and letting the boat sit on the hard for as many months as it takes for the meter to read the same– both above and below the waterline. Six months or more is not unheard of.
The coating procedure is a combination of the first two procedures above: coat the areas of the hull where the gelcoat was removed with unthickened epoxy, fill the holes with epoxy filler and fair, and then apply 4–6 coats of the barrier coat material to the outside of the hull. Putting on all of these coats can be greatly speeded up by coating “wet on wet”. This means that you wait until the layer you are overcoating has reached a partial cure, but is still a little “tacky”. If you roll on another coat at this point, the two layers will chemically bond, and you won’t have to sand between coats, or wait for each coat to cure completely. This may allow three or more coats per day under ideal conditions, and it produces a better bond between coats of barrier coat epoxy.
Hamilton Marine recommends and sells a number of good books on hull repair: Don Casey’s Sailboat Hull and Deck Repair and This Old Boat are both good resources. We also recommend two introductory publications from Gougeon Brothers’ series of WEST SYSTEMS books: Fiberglass Boat Repair and Maintenance and Gelcoat Blisters: Diagnosis, Repair, and Prevention. They are inexpensive and full of information. For free information on the topic you also may want to check online at www.yachtpaint.com, or www.pettitpaint.com. You’ll also find up-to-date information based on current experience can be found in many boating magazines and on other web sites. Analyzing and following procedures outlined in these publications and web sites should help you find a solution to your boat’s particular blister problem.
- Privacy Policy
- Rebates and Promotions
- Return Policy
- Splicing Information
- Tide Charts
- California Consumer Protection Act
About Hamilton Marine

We accept the following forms of payment:

- BOAT OF THE YEAR
- Newsletters
- Sailboat Reviews
- Boating Safety
- Sailing Totem
- Charter Resources
- Destinations
- Galley Recipes
- Living Aboard
- Sails and Rigging
- Maintenance
- Best Marine Electronics & Technology
How to Strip Your Bottom Paint
- By Jen Brett
- Updated: May 14, 2013

Stripping Paint
For many, slapping on a new coat of bottom paint is a time-honored springtime ritual. That step, however, is merely the last task at the end of a long road. If you’re the owner of an older sailboat, you may be dealing with years of various bottom coatings, aging barrier coats, and possibly blisters, which all must be dealt with before you apply a new coat of antifouling.
If your boat’s bottom has reached the point where years, or perhaps even decades of paint buildup has started to make it look like a topographical map, you should consider taking all of the coatings off and starting over.
If doing some hard time on the hard is in your future, here are some steps to take that will renew your boat’s bottom and make your sailing that much sweeter. For a bottom that’s in decent condition, “sand lightly with 60- or 80-grit sandpaper and wipe off the sanding residue,” says Jim Seidel, the marketing manager for Interlux Paint. “When sanding, feather out the edges of any areas that may have been scratched or damaged. Once the bottom has been sanded and cleaned, go ahead and apply the new antifouling paint, first making sure that the new paint is compatible with the old. Most modern paints are compatible with one another, but there are still some that can cause problems.”
If you notice any old bottom paint that’s flaking, you’ll need to take a scraper and chip the loose bits off, then feather out from the area with a sander until you reach paint that’s adhering well. This is best if you encounter only a few relatively small areas of flaking paint. If much of the bottom is this way, you’ll probably want to remove all the existing paint down to the barrier coat, or possibly to the gelcoat. “We recommend stripping bottoms when there’s clearly excessive buildup and the bottom starts flaking in areas that’ll expand every year,” says Scott Murray, the yard manager at New England Boatworks in Portsmouth, Rhode Island. “Once that happens, you can sand and try to feather out the edges of the flaking areas, but when paint is applied, the solvents in the paint will attack those edges and can make the problem worse.”
“No matter how well the surface was prepared, there’s only a certain amount of paint that’ll adhere to it,” Seidel says. “As the boat is launched and hauled, the paint will absorb water and then release it, causing the paint to swell and contract. This buildup, as well as the absorbing and drying out of the paint, causes the oldest coats to get weaker, and they may start to crack or detach from the surface. When this happens, it’s time to start over.”
If you need to take off many paint layers, there are several ways to do this, and what you ultimately decide on will depend on your boat’s current condition, your budget, and the boatyard’s rules.
Sanding the boat’s bottom is the dreaded chore that most boat owners will face at some point. This is definitely a case in which having the right tools will really make your job easier. Using a vacuum sander helps keep most of the dust out of the air, producing a much cleaner work environment. Many boatyards also require them. Prices for a random orbital sander with a vacuum port range from about $60 for a Ridgid brand to about $450 for a top-of-the-line Festool. You’ll also need to buy a Shop-Vac-style vacuum.
You’ll want to sand down the bottom with 60- or 80-grit paper until the excess paint is removed and the bottom isn’t overly textured. Be careful not to damage the gelcoat. Most boatyards in the United States have strict rules about how bottom jobs are done and may require a ground cover or a tent around the boat from the waterline down to capture the dust and debris.
A quicker way to remove many layers of paint is through high-pressure blasting with either soda, sand, or a special glass material shot at the hull. It’s effective and faster than sanding, but it’s also not typically a do-it-yourself project. If having your hull blasted is something that you’re considering, do your homework and find a reputable blaster. Also check to see if your boatyard allows it. Expect to pay about $35 to $45 per foot for professional blasting.
Soda blasting is what many boat owners choose for bottom-coating removal on fiberglass boats because it’s less abrasive than other materials, though if you have a steel or aluminum hull, you can probably go with sand blasting. If the project is done by a skilled blaster, the soda will take off coatings down to the gelcoat or barrier coat—if it’s in good condition—without damage.
After soda blasting, the surface is typically too smooth for bottom paint and must then be sanded with 60- or 80-grit sandpaper. Before covering with new antifouling paint, wash the bottom with water and let it thoroughly dry. According to Mike Morgan from Chesapeake Blasting Service, “Most boats can be blasted unless they have serious issues with the gelcoat or fiberglass. If this is the case, they should be peeled and a whole new bottom applied.” (See “ Banishing Bottom Blisters ,” April 2012.)
A chemical paint stripper is another way to remove paint buildup and is the method of choice for some boatyards since there’s no dust or noise and the residue can easily be contained. Paint stripper is relatively easy to use—you brush it on with a paintbrush, wait the recommended time, then remove the resulting goo with a scraper—but it can be a time-consuming process, not to mention a messy one. A ground cover is essential, and you’ll need to discuss the debris disposal with your boatyard.
When choosing a chemical paint stripper, be sure to check that it can be used on your particular hull material, and expect to use 5 to 6 gallons for a 45-foot sailboat. Paint strippers work best when not used under direct sunlight, as the chemicals need to stay moist to work. After the old antifouling paint is removed, you’ll still need to sand the bottom with 60- or 80-grit sandpaper to rough up the bottom for paint.
Jen Brett is Cruising World ‘s associate editor.
Barrier Coat Q&A with Don Zabransky, Pettit Paints
What’s a barrier coat? A barrier-coat system is a heavy-duty, two-component epoxy coating for use where maximum resistance to fresh or salt water is required. It reduces water absorption in fiberglass hulls, making it an excellent choice for the prevention and repair of osmotic blisters.
Who needs one? People who want to protect their investments and those performing blister repairs on a hull. It’s also recommended that hulls stripped by methods such as soda blasting receive a barrier coat to provide a new protective skin to the bottom of the boat.
How long do they last? A 12-mils thickness of a properly applied, high-quality barrier-coat system should result in 10 or more years of blister protection.
How do you apply one? • Thoroughly prep the hull as per the manufacturer’s instructions. Don’t mix more material than can be used within the specified pot life shown on the label. • Apply the recommended number of coats of the epoxy barrier-coat system. A wet film thickness of our Pettit-Protect should be 7 mils per coat, which yields a 4-mils dry-film thickness. A wet-film thickness gauge should be used to monitor paint application. Total dry-film thickness for a three-coat application should be 12 mils minimum for maximum coating performance. • Always follow recoating windows set out by the manufacturer. These windows will be relative to the temperature of the hull and its surroundings. Typical windows between coats will be from two to six hours on the short side to 14 days on the long side. Missing these windows requires sanding between coats. • Apply the first coat of antifouling paint over the last coat of epoxy within the specified over-coating schedule set by the manufacturer. These times are also temperature related. This is known as “hot coating” because the paint is applied and a bond formed before the epoxy is fully cured.
- More: boat maintenance , How To , maintenance
- More How To

3 Clutch Sails For Peak Performance

It’s Time to Rethink Your Ditch Kit

8 Ways to Prevent Seasickness

How To De-Winterize Your Diesel Engine

Kirsten Neuschäfer Receives CCA Blue Water Medal

2024 Regata del Sol al Sol Registration Closing Soon

US Sailing Honors Bob Johnstone

Bitter End Expands Watersports Program
- Digital Edition
- Customer Service
- Privacy Policy
- Email Newsletters
- Cruising World
- Sailing World
- Salt Water Sportsman
- Sport Fishing
- Wakeboarding

- Mar 25, 2023
Why Applying a Boat's Barrier Coat Before Bottom Paint Is Recommended: Understanding the Difference

Barrier coat and bottom paint are both coatings that are applied to a boat hull, but they serve different purposes and are applied in different ways.
Below we not only explore the differences between these coatings but also provide you with step-by-step instructions on how to apply bottom paint effectively.
A barrier coat is a type of coating that is applied directly to the hull of a boat to protect it from water intrusion, osmosis, and other forms of hull damage. It is typically applied as a primer or base coat and is usually made of epoxy, vinyl-ester, or other specialized resins. A barrier coat is designed to create a robust and impenetrable layer that prevents water from seeping into the hull, which can cause blisters, delamination, and other forms of hull damage.
Bottom paint, on the other hand, is a type of coating that is applied to the bottom of a boat hull to protect it from fouling, such as barnacles, algae, and other marine organisms. Bottom paint is typically applied over the barrier coat and is designed to create a slippery surface that makes it difficult for marine organisms to attach to the hull. Bottom paint is usually made of a copper-based antifouling agent and is available in both hard and ablative forms.

Step 1: Prepare the Surface Before applying any coatings, ensure that the boat hull is properly cleaned and prepared. Thoroughly wash the hull to remove dirt, grime, and any existing bottom paint. Use a suitable hull cleaner and a stiff brush to scrub away stubborn debris. Once clean, rinse the hull with fresh water and allow it to dry completely.
Step 2: Sanding and Fairing Inspect the hull for any imperfections, such as dents or scratches. Use sandpaper or a suitable fairing compound to smoothen the surface, ensuring an even and level base for the barrier coat and bottom paint. Sand the hull in a consistent motion, following the manufacturer's guidelines for grit size and techniques.
Step 3: Applying the Barrier Coat Prepare the barrier coat as per the manufacturer's instructions. Use a roller or brush to apply a smooth and even layer of the barrier coat to the hull. Pay extra attention to potential problem areas, such as waterline sections and keel joints. Allow the barrier coat to dry completely before proceeding.
Step 4: Sanding the Barrier Coat Once the barrier coat has dried, sand it lightly to achieve a smooth surface. This step helps enhance adhesion and ensures a uniform application of the bottom paint. Be sure to remove any sanding residue and clean the hull thoroughly before proceeding to the next step.
Step 5: Choosing and Applying Bottom Paint Select the appropriate type of bottom paint based on your boating needs and local regulations. Consult with a marine specialist or refer to the manufacturer's recommendations to choose between hard or ablative bottom paint. Stir the bottom paint well before application to ensure proper mixing of any settled pigments.
Using a roller or brush, apply the first coat of bottom paint evenly to the hull, working from the waterline down. Allow it to dry as per the manufacturer's instructions before applying additional coats. Apply the recommended number of coats, typically two or three, for optimal protection against fouling.
Step 6: Finishing Touches Once the final coat of bottom paint has dried, inspect the hull for any imperfections or missed spots. Touch up any areas as needed to ensure complete coverage. Remove any masking tape or protective covers carefully, and clean up your workspace.
By following these step-by-step instructions, you can effectively apply both the barrier coat and bottom paint to your boat hull, providing optimal protection against hull damage and fouling. Remember, regular maintenance and recoating as recommended by the manufacturer are essential to maintaining the integrity of the coatings and preserving the performance of your boat."
Remember to provide proper safety precautions, equipment recommendations, and any additional guidelines specific to the products or materials being used.
In summary, a barrier coat is applied to protect the hull from water intrusion, while bottom paint is used to protect the hull from fouling. A barrier coat is usually applied as a primer or base coat, while bottom paint is applied over the barrier coat.
- Boat and Yacht Care
Recent Posts
Denison Yachting expands to Tampa Bay, bringing luxury yachts and boats to the area
Finding Your Perfect Boat: A Guide for Yacht and Boat Buyers
- Sports & Outdoors
- Boating & Sailing
- Maintenance Supplies
- Painting Supplies
Enjoy fast, free delivery, exclusive deals, and award-winning movies & TV shows with Prime Try Prime and start saving today with fast, free delivery
Amazon Prime includes:
Fast, FREE Delivery is available to Prime members. To join, select "Try Amazon Prime and start saving today with Fast, FREE Delivery" below the Add to Cart button.
- Cardmembers earn 5% Back at Amazon.com with a Prime Credit Card.
- Unlimited Free Two-Day Delivery
- Streaming of thousands of movies and TV shows with limited ads on Prime Video.
- A Kindle book to borrow for free each month - with no due dates
- Listen to over 2 million songs and hundreds of playlists
- Unlimited photo storage with anywhere access
Important: Your credit card will NOT be charged when you start your free trial or if you cancel during the trial period. If you're happy with Amazon Prime, do nothing. At the end of the free trial, your membership will automatically upgrade to a monthly membership.
Image Unavailable

- To view this video download Flash Player

TotalBoat Aluminum Boat Barrier Coat (Quart, Gray) 32 Fl Oz (Pack of 1)
32 Fl Oz (Pack of 1)
($1.44 / Fl Oz)
128 Fl Oz (Pack of 1)
($0.98 / Fl Oz)
Purchase options and add-ons
- High-build, two-component epoxy primer and barrier coat for excellent corrosion prevention on aluminum hulls and pontoon boats. Can be overcoated with bottom paints or other 1- and 2-part paints
- Provides superior corrosion protection on all underwater metals
- Fast drying, with no sanding needed between coats
- For use above and below the waterline
- Available in Gray in Quart or Gallon size kits. Coverage: Approximately 225 sq. ft./gallon @ 7 mils wet. Thinner: TotalBoat Epoxy Primer Thinner 200
Additional Details

Customer ratings by feature
Frequently bought together.

Similar items that may ship from close to you

From the manufacturer

About TotalBoat
Since 2012, we’ve been making the quality marine-grade products. What started out as a handful of durable repair products for hands-on DIY boaters has grown to include a range of expert solutions for makers of all kinds, from seascape artists to inland woodworkers. It’s been an evolution and education. As boaters and DIYers, we understand you need projects to go smoothly.
Videos for this product

Click to play video

Customer Review: Pretty good but does scratch off
TPP Refugee

Product information
Technical details, additional information, warranty & support, looking for specific info, product description.
Aluminum Boat Barrier Coat has a simple 3 to 1 mix ratio that’s easy to use, can be recoated with itself in as little as three hours at 90°F, and requires no sanding. After mixing thoroughly, allow an induction period of 15 minutes before reducing with TotalBoat Epoxy Primer Thinner 200, if needed, and applying by brush, roller, or spray equipment. Compare to Interlux Interprotect and Pettit Aluma Protect marine epoxy primers. Aluminum Boat Barrier Coat provides great protection at a better value for your money. All TotalBoat products are developed by boaters for boaters, to provide great value and great results. We know what works and what doesn't. 100% made in the USA.
Customer reviews
Customer Reviews, including Product Star Ratings help customers to learn more about the product and decide whether it is the right product for them.
To calculate the overall star rating and percentage breakdown by star, we don’t use a simple average. Instead, our system considers things like how recent a review is and if the reviewer bought the item on Amazon. It also analyzed reviews to verify trustworthiness.
Customers say
Customers like the quality, ease of use, adhesion, and coverage of the paint. For example, they mention it works perfectly, covers well, and adheres to bare aluminum. Opinions are mixed on the thickness.
AI-generated from the text of customer reviews
Customers are satisfied with the quality of the paint. They mention that it is a great primer that works well and provides a good barrier between metal and paint. Some say that the product is hard to use but is able to provide a perfect result.
"...again, buffed out all the rust and used this, and it is working incredibly well so far !!..." Read more
"This barrier coat is fantastic BUT make sure you sand the crap out of your aluminum boat, i mean really rough up the surface!!!..." Read more
"The only way to paint the bottom of your aluminum boat! Works great ." Read more
"Followed instructions, perfect results ! Coated my pontoon boat hulls in the Spring of 2021. In the salt and brackish water since. No corrosion...." Read more
Customers find the paint easy to apply with a roller. They say it comes with clear instructions and is straightforward. Customers also say it's easy to put down two coats in one day in 75 degree low humidity weather.
" Easy to use I put this on my 14 ' 1969 sears game fisher boat I put it on over gluvet prep work before I put on both I used a wire wheel and cleaned..." Read more
"...Once you get it mixed right it’s is easy to roll on ...." Read more
"...It was easy to put down the 2 coats in one day in 75 degree low humidity weather." Read more
"Easy to apply, came with clear instructions " Read more
Customers are satisfied with the adhesion of the paint. They mention that it covers great and adheres to bare aluminum like etching primer.
"Great product, finishes hard and strong !! Good adhesion with minimal prep !! Highly recommend" Read more
"Great barrier coat. Sticks well however it is extremely difficult to measure out the amount you need. The base product is so thick...." Read more
"Great primer. Excellent coverage, adhesion , and dry time. Exactly what I needed." Read more
"Work really well, covers great and adherises to bare aluminum like etching primer." Read more
Customers are satisfied with the coverage of the paint. They mention that it covers well, and is easy to use.
"...Barrier Coat mixes easily and goes on great with a foam roller. Excellent coverage and not having to sand between coats is huge...." Read more
"I was pretty impressed. Having used it for the first time it covered well and was easy to use." Read more
"Great primer. Excellent coverage , adhesion, and dry time. Exactly what I needed." Read more
Customers find the paint easy to sand. They mention that it provides excellent coverage and that not having to re-sand between coats is huge.
"...Excellent coverage and not having to sand between coats is huge. It was easy to put down the 2 coats in one day in 75 degree low humidity weather." Read more
"...easy to use, takes a day or two to achieve it's total hardness, fairly easy to sand ." Read more
" Easy to sand ..." Read more
Customers are mixed about the thickness of the paint. Some mention it's very thick and goes on easy, while others say it'll chip if it'd be thicker.
"... It is thick and that’s what you want. I use a drill and mixing attachment to blend the base then add the hardener...." Read more
"The primer was way too thick and the coverage was not at all per the advertised coverage at all, not even 100 sq ft, it has the viscocity of a tube..." Read more
"...It is rock solid . Hasn't chipped yet but time will tell. Recommended." Read more
"...Had to add a lot of thinner and it’s still too thick . We unfortunately can’t return it so threw it away. What a waste." Read more
Reviews with images

- Sort reviews by Top reviews Most recent Top reviews
Top reviews from the United States
There was a problem filtering reviews right now. please try again later..

- Amazon Newsletter
- About Amazon
- Accessibility
- Sustainability
- Press Center
- Investor Relations
- Amazon Devices
- Amazon Science
- Start Selling with Amazon
- Sell apps on Amazon
- Supply to Amazon
- Protect & Build Your Brand
- Become an Affiliate
- Become a Delivery Driver
- Start a Package Delivery Business
- Advertise Your Products
- Self-Publish with Us
- Host an Amazon Hub
- › See More Ways to Make Money
- Amazon Visa
- Amazon Store Card
- Amazon Secured Card
- Amazon Business Card
- Shop with Points
- Credit Card Marketplace
- Reload Your Balance
- Amazon Currency Converter
- Your Account
- Your Orders
- Shipping Rates & Policies
- Amazon Prime
- Returns & Replacements
- Manage Your Content and Devices
- Recalls and Product Safety Alerts
- Conditions of Use
- Privacy Notice
- Your Ads Privacy Choices
- New Sailboats
- Sailboats 21-30ft
- Sailboats 31-35ft
- Sailboats 36-40ft
- Sailboats Over 40ft
- Sailboats Under 21feet
- used_sailboats
- Apps and Computer Programs
- Communications
- Fishfinders
- Handheld Electronics
- Plotters MFDS Rradar
- Wind, Speed & Depth Instruments
- Anchoring Mooring
- Running Rigging
- Sails Canvas
- Standing Rigging
- Diesel Engines
- Off Grid Energy
- Cleaning Waxing
- DIY Projects
- Repair, Tools & Materials
- Spare Parts
- Tools & Gadgets
- Cabin Comfort
- Ventilation
- Footwear Apparel
- Foul Weather Gear
- Mailport & PS Advisor
- Inside Practical Sailor Blog
- Activate My Web Access
- Reset Password
- Pay My Bill
- Customer Service

- Free Newsletter
- Give a Gift
How to Sell Your Boat

Cal 2-46: A Venerable Lapworth Design Brought Up to Date

Rhumb Lines: Show Highlights from Annapolis

Open Transom Pros and Cons

Leaping Into Lithium

The Importance of Sea State in Weather Planning

Do-it-yourself Electrical System Survey and Inspection

Install a Standalone Sounder Without Drilling

When Should We Retire Dyneema Stays and Running Rigging?

Rethinking MOB Prevention

Top-notch Wind Indicators

The Everlasting Multihull Trampoline

How Dangerous is Your Shore Power?

DIY survey of boat solar and wind turbine systems

What’s Involved in Setting Up a Lithium Battery System?

The Scraper-only Approach to Bottom Paint Removal

Can You Recoat Dyneema?

Gonytia Hot Knife Proves its Mettle

Where Winches Dare to Go

The Day Sailor’s First-Aid Kit

Choosing and Securing Seat Cushions

Cockpit Drains on Race Boats

Rhumb Lines: Livin’ the Wharf Rat Life

Re-sealing the Seams on Waterproof Fabrics

Safer Sailing: Add Leg Loops to Your Harness

Waxing and Polishing Your Boat

Reducing Engine Room Noise

Tricks and Tips to Forming Do-it-yourself Rigging Terminals

Marine Toilet Maintenance Tips

Learning to Live with Plastic Boat Bits
- Inside Practical Sailor
- Boat Maintenance
Bottom Paint Removal Decision Time
Is the money saved removing bottom paint yourself worth the time and effort.

Tempis fugit . . . times a-waistin’ . . . fast flies the irreparable hour . . . However you choose to use your scarce time, we’ll wager that you’d rather not spend it removing bottom paint. If you are an owner of an older boat with a decade of accumulated hard bottom paint that is flaking and cracking, now is a good time to start weighing your options for removing the old paint. Should you do it yourself, or hire the professionals—or a bit of both?
In past reports on removing bottom paint and barrier coats, we’ve explored various methods to do the job safely. But more recently, in the light of our depleting youthful vigor, a diminishing number of do-it-yourself boatyards , and the need for personal protection against fine particles and organic vapors , our enthusiasm for a do-it-yourself approach has steadily waned. Although the substantial cost involved in renewing a bottom can be daunting, keep in mind that money and labor invested now will make subsequent bottom jobs faster and cheaper, so there is a residual benefit. Provided you have access to a do-it-yourself yard, are serious about personal protection, and don’t overextend the periods between reapplying bottom paint, your next decade of antifouling jobs could be do-it-yourself jobs.
As I recover from my own five-week long do-it-yourself paint removal project, I am reminded of a report by Ralph Naranjo, a former boatyard manager, marine safety expert, and Practical Sailor editor-at-large. Ralph was one of the last Practical Sailor testers to undertake a comprehensive test of coating removal methods and products (see “ A Smorgasboard of Tools Required for the DIY Epoxy Barrier Coat Removal ”). An excerpt from that report appears below (“Is It Worth It?”), along with Ralph’s guide for estimating the amount of time required for any boat bottom project (“A Mathematical Decision-maker”). The DIY work calculator first appeared along with Ralph’s report on Soda blasting, “ Soda Blasting 101 .”

Not long after Ralph’s report, we went back into the boatyard and followed the bottom restoration of a Bristol 35.5 owned by the publisher. The Bristol, however, got the royal treatment, as the owner handed the project over to local professionals. The work and materials tallied in the table below are detailed in the report “ Bottom Paint Makeover .”
If you are still in the water as you consider these options, we also have two helpful boatyard reports for those still choosing a yard “ Do it Yourself Boatyards ,” and “ Do it For Me Boatyards .” Hopefully, you are already out sailing, and the next haulout is from your mind. But if you have decided to finally “bite the bullet,” as Ralph puts it, I hope these reports can help. If you have specific questions about removing, choosing, or applying bottom paint, or if you have a boatyard to recommend, you can email us at [email protected] .

Is it Worth It?
At the conclusion of the paint removal ordeal (two full weeks), I asked myself, “Is this scale of commitment really what your typical DIYer should tackle?” The answer? An uncertain “maybe.”
The job certainly can be turned over to pros and is a prime candidate for media blasting, but many yards don’t want the airborne residue associated with the process. Tenting the boat or moving it into a building adds expense. And when all is said and done, the epoxy barrier coat is pretty immune to baking soda and may require blasting with a more aggressive grit that can tear into the gelcoat as well as remove the barrier coat. The slow and arduous combo of chemical stripping and sanding used to rid Wind Shadow of 26-year-old barrier coat left the gelcoat intact and provided an even surface over which to reapply the same epoxy system that had endured for over two decades.
Now that more and more barrier-coated boats are reaching the end of the paint’s lifespan, owners will be looking for answers about what to do next. If there is a significant amount of interlaminate blistering in addition to barrier-coat blistering, it may be time for a “peel.” This even more aggressive approach cuts all the way down to FRP laminate, removing barrier coat, gelcoat, and the pocked first layer of FRP laminate. Once the offending surface has been cleared away, the remedy is to re-laminate whatever schedule of material was removed. The new composite skin incorporates vinylester or epoxy resin, and the complete job includes re-fairing the surface, barrier coating, and finally bottom painting the underbody—a job that dwarfs the efforts bestowed on Wind Shadow , and one that will require professional intervention.

Those considering such a project as removing barrier coats should first evaluate their skill level, and then weigh the man-hours and cost of the project versus what it would cost to have a professional do it. In my case, removal options included subcontracting a soda blasting, which would cost $2,500 and would only rid the hull of antifouling paint, not the failed epoxy barrier coat. A heavy- grit media blasting to remove the epoxy—along with much of the gelcoat—was considered too aggressive for this project, although we did use it in a subsequent bottom job on another test boat.
Leaving the whole job to the pros would’ve been pretty costly: A “peel” or blast approach and the followup fairing, resurfacing, epoxy barrier coats, and bottom paint would run about $10,000-$15,000. Rates, of course can vary by region. We paid just under $8,000 to strip and refinish a Bristol 35.5 in Connecticut , and just under $5,000 to strip and refinish the bottom of a 30-foot Yankee 30 in Florida. Both were media blasted (soda-blasted in Connecticut, wet-abrasive blasted in Florida). In each of these two project, the paint and barrier coat removal accounted for $2,000 of the total cost.
Mathematical Decision Maker
So, how much work is it, really? An easy way to compute the do-it-yourself labor commitment involved is by timing how long it takes to scrape clean two 1-square-foot patches. The first is in the center of the least well-adhered paint; the second is in the midst of an intact portion of the bottom. Dry scrape each section with a thin-bladed putty knife and a sharp drag-type scraper, noting the time it takes to remove about 90 percent of the coating.

Next, estimate the percentage for the bottom that should be dubbed easy to scrape paint versus areas where the antifouling is stuck like glue. Finally, you need to roughly calculate the square footage of wetted surface area (WSA) that comprises the underbody. This is by no means an ordeal that requires advanced geometry. It’s a rudimentary calculation that requires only three bits of information (waterline length [Lwl], maximum waterline beam [Bwl] and draft [T]). The user-friendly formula (WSA = Lwl x (Bwl + T) applies to most heavy displacement cruising hulls. Multiply by 0.75 for medium-displacement vessels and 0.5 for light-displacement boats. This oversimplification of wetted surface calculation would provoke a scolding from David W. Taylor , William Froude , and other dons of naval architecture, but for a paint removal estimate, it works just fine.
Finally, take the results of the calculation and divvy it up according to the proportion of easy versus difficult regions of paint removal. For example, if only 15 percent of the bottom is cracked and peeling, and the removal time per square foot in this region is 30 seconds—as compared to four minutes per square foot in the well-adhered section—the ratio is by no means encouraging. Applying the ratio to the wetted surface calculation drives home the level of paint scraping required.

Let’s assume that the vessel has a 30-foot waterline, 6-foot draft, a waterline beam of 10 feet, and is a medium-displacement vessel. Our fuzzy math for a medium-displacement sailboat fills in the WSA equation as follows: WSA = 30 x (10 + 6) (.75), and the result is 360 square feet.
Next comes the all-important apportionment of easy versus difficult paint removal. In this case, 85 percent falls into the tough-going regime that equates to four minutes of toil per square foot (0.85 x 360 x 4 = 1,224 minutes of misery). Add in the easy scraping (0.15 x 360 x 0.5 = 27 minutes), and the result is 1,251 minutes, or just under 21 hours of serious scraping. This is unequivocal arm-in-action time, and the ride to the boatyard, coffee breaks, and chats with sistership owners, stops the clock.
This method to estimating work on the hull bottom could also be applied to a topside or deck project. Just be sure include some awkward work areas in your “sample” panels for estimating the total time required. Removing paint in some areas—cockpit corners, or near trim—can require two to three times more work than flat areas of the hull, and this needs to be taken into account.
Chemical paint removers, a large crew, or true friends can soften the blow, and so can a more deteriorated surface. If 70 percent of the bottom paint has a cornflake-like look, it will allow a thin bladed putty knife to effortlessly separate it from the hull skin, and a very different labor picture arises. Run the numbers, and you’ll find that in this scenario, 9.3 hours of toil would strip away the residue. In short, it’s not the bad spots you need to worry about, it’s where the paint looks good that causes all the problems. This is why procrastination rules, and we tend to postpone bottom paint removal in favor of spot prepping and feathering in the bad spots. At some point, it’s time to bite the bullet and tackle what’s been pushed down the road.
RELATED ARTICLES MORE FROM AUTHOR
I did this job over two months late last year on my new-to-me Nor’West 33. I’ve sworn to leave boating before I ever do it again!
I had my 1982 Sea Sprite 34 “glass-blasted” several years ago. I was afraid that the glass would be too aggressive (no apparent blisters- just 30+ years of bottom paint flaking in a lot of places). The contractor was well-recommended (here in Maine), tented the boat from waterline down and under, operator in full air-supplied suit inside the tent, and did a fantastic job. In most all areas, the pre-existing barrier coat remained on the boat. The work was done on my property, so no boatyard rules to negotiate, but there was not a spec of residue left on site when the contractor was finished. I faired the very few gelcoat voids that were opened up by the blasting, as well as “battle scars”, then 4 coats of Interprotect, hard bottom paint over partially cured last coat of barrier, then two coats of ablative- 3 seasons later (with ablative renewals), no lifting or any other issues. Well-worth the expense!
In all situations where mechanically powered sanding is to be done, a high quality sander with very good dust collection is an investment within long term returns. But, it only works as well as the dust extractor–the vacuum attached. The options for the vacuum are either an expensive system with high dust collection efficiency and down to potential HEPA ratings with an upgraded HEPA filter. Or, the same performance is available with a shop vacuum and the addition disposable paper bag liners and an upgrade to the standard pleated filter to high-performance or HEPA-rated fllter, both at very reasonable costs.The noise and cfm perform are very comparable at a fraction of the cost of the aforementioned commercial dust extraction systems.
LEAVE A REPLY Cancel reply
Log in to leave a comment
Latest Videos

Island Packet 370: What You Should Know | Boat Review

How To Make Starlink Better On Your Boat | Interview

Catalina 380: What You Should Know | Boat Review
- Privacy Policy
- Do Not Sell My Personal Information
- Online Account Activation
- Privacy Manager
- Forums New posts Unanswered threads Register Top Posts Email
- What's new New posts New Posts (legacy) Latest activity New media
- Media New media New comments
- Boat Info Downloads Weekly Quiz Topic FAQ 10000boatnames.com
- Classifieds Sell Your Boat Used Gear for Sale
- Parts General Marine Parts Hunter Beneteau Catalina MacGregor Oday
- Help Terms of Use Monday Mail Subscribe Monday Mail Unsubscribe

2 Part epoxy barrier paint
- Thread starter sailme88
- Start date Oct 3, 2016
- Catalina Owner Forums

Hi all, I am having the old bottom paint removed. Following this my plan is fair out any blister or gel coat imperfections and then apply a 2 part epoxy barrier coat. The question: Have any of you used a 2 part system i.e. Interlux, Pettit etc. and were the results as you hoped for? Pros//cons Thanks, Rick

Ralph Johnstone
sailme88 said: Have any of you used a 2 part system i.e. Interlux Click to expand

i used west system barrier coat with there additive...i applied 6 coats and satisfied with the results

sailme88 said: Hi all, I am having the old bottom paint removed. Following this my plan is fair out any blister or gel coat imperfections and then apply a 2 part epoxy barrier coat. The question: Have any of you used a 2 part system i.e. Interlux, Pettit etc. and were the results as you hoped for? Pros//cons Thanks, Rick Click to expand

I can't think of any "cons" to putting a barrier coat on your boat... the most important thing is to follow the instructions and watch your weather. The Interprotect product, like all epoxies, will be pretty susceptible to temp and humidity. You need to sequence the coats over a relatively short period of time... again.. study the instructions... Interlux has a lot of videos and a customer service line. I can't imagine leaving my boat out of the water for 2 months to let a few blisters dry... I made repairs on my boat 16 years ago with one day drying time and a little heat gun....before applying the 3M product. No failures or new blisters in all these years.

I had blisters... Stripped the old bottom paint AND the gelcoat down to bare glass below the Boot Stripe. Stripping the gelcoat is NOT required, but in yards they do this with a machine that peels it. I let my hull dry inside of my shop for two months. I used straight epoxy resin and then a single layer of 8.9oz cloth w/ resin. Then faired and painted with 2 gallons of Interlux Interprotect, then bottom, paint. Still haven't been in the water yet but I'm close, LOL. The question is, DO you actually have blisters? If you do, like Centerline suggested, you will need to let it dry out for several weeks after removing the bottom paint. If blisters are present it will become obvious, after sanding off the old bottom paint you will end up with various sized 'spots' where the gelcoat is sanded off to bare glass. That's because the osmotic pressure has lifted the gelcoat slightly and you will end up taking off that raised area while sanding the old bottom paint. Any bad blisters that are large and have formed the styrene smelling goo on the inside must be ground out. Don't fill anything until after the 6 to 8 week drying period. Believe it or not, one thing that speeds drying is freshwater rinsing the hull once a week, kinda the same concept as hosing down concrete as it cures. Small blisters can just be filled with epoxy filler (I like Interlux Water-Tite, easy 1:1 mix). Larger ones it would be a good idea to lay in layers of new glass tape with epoxy. I used 2 gallons on a 22 ft hull, keel, and rudder... You would need at least 3. Use a 1/4" nap roller, don't mess with foam rollers, they will break down and fall apart while not putting on a good enough film thickness.
Thanks, I was wondering if after baring the hull I should wait until spring to barrier coat..
Here in Maine you have to take the good with the bad.... a weather shortened season requires the prudent to haul out for 6-7 months... a small price to pay when one sails the best grounds in this country...
Can't tell if blisters are present. Multiple layers of bottom pain in various states of condition.
sailme88 said: Can't tell if blisters are present. Multiple layers of bottom pain in various states of condition. Click to expand
Minor blister repair is far less intensive that CloudDiver's process. When you haul your boat.. you'll easily notice any blisters, bottom paint won't hide them... but they will shrink the longer you leave the boat out of the water. So mark them and follow the instructions in this 3M link . Unless you have serious delamination and hundreds of blisters... this solution will work fine. Warning.... be really careful with power sanders and grinders around your gelcoat..... I used a sharp chisel to puncture them initially... then carved out a large enough area so I could rinse and dry..... When you prep for repair... use a slow speed rotary sander with 150 grit or higher.to feather out the opening. The 3M repair kit uses a "vinylester" filler.... it is very hard when it dries..not easy to sand... so get it smooth when you apply it. I recommend a a pair of metal, rather than plastic, spreaders to mix and apply the filler....and to smooth it over the repair area. After getting the blisters fixed.. you can develop you plan of attack for the barrier coat project. Good luck. By the way, blisters tend to be non re occurring... there's like a window of time during the boat's life when they occur.... Catalina Yachts had their worst epidemic with boats produced in the late 70's to early 80's... With luck you may have no problems at all..... I hope that is true. 3M Minor Blister Repair PDF
Joe said: Minor blister repair is far less intensive that CloudDiver's process. When you haul your boat.. you'll easily notice any blisters, bottom paint won't hide them... but they will shrink the longer you leave the boat out of the water. So mark them and follow the instructions in this 3M link . Unless you have serious delamination and hundreds of blisters... this solution will work fine. Warning.... be really careful with power sanders and grinders around your gelcoat..... I used a sharp chisel to puncture them initially... then carved out a large enough area so I could rinse and dry..... When you prep for repair... use a slow speed rotary sander with 150 grit or higher.to feather out the opening. The 3M repair kit uses a "vinylester" filler.... it is very hard when it dries..not easy to sand... so get it smooth when you apply it. I recommend a a pair of metal, rather than plastic, spreaders to mix and apply the filler....and to smooth it over the repair area. After getting the blisters fixed.. you can develop you plan of attack for the barrier coat project. Good luck. By the way, blisters tend to be non re occurring... there's like a window of time during the boat's life when they occur.... Catalina Yachts had their worst epidemic with boats produced in the late 70's to early 80's... With luck you may have no problems at all..... I hope that is true. 3M Minor Blister Repair PDF Click to expand
CloudDiver said: * By the way, blisters tend to be non re occurring... - That's true if the repairs are done correctly, the most important part being adequate drying time followed by a correctly applied barrier coat with proper film thickness There are dozens of horror story around the web about expensive 'professional' yard blister repairs where new blisters formed a year or two later... because yards rush the jobs and don't let the hull dry out enough; it isn't new water molecules coming in through the barrier coat, its the water that was already in the laminate that got sealed back in under the new paint. Click to expand
[QUOTE="CloudDiver, post: 1330319, member: 127132 You have to understand the 3M repair document is designed to get you to buy all of those 3M products shown.[/QUOTE] Yeah.... but.... it works!
UPDATE UPDATE UPDATE...Had the opportunity to speak with an Interlux rep at a boat show.. The advise is thus: You can apply barrier coats with up to 6 mos between coats. BUT, your first ablative needs to be applied while the last barrier is still tacky ! Adhesion failure during the 2nd year out is a real possibility.

sailme88 said: The advise is thus: You can apply barrier coats with up to 6 mos between coats. BUT, your first ablative needs to be applied while the last barrier is still tacky Click to expand
Gunni, Following your comment I went directly to InterLux. They were specifically asked about the application and they responded, "Yes, you need to apply the antifouling over a tacky barrier coat. Tacky to the touch with no paint transfer to your fingers." This is a direct quote from InterLux....
Yes, when you get the barrier coat epoxy build complete you apply the antifouling paint to a "thumbprint soft" final layer of epoxy. That is different from doing the barrier coat buildup which is typically 4 or more coats as you work to a 10 mil barrier thickness, those need to be applied per the schedule I provided in the linked Interlux guidance doc. I'm hoping that my comments help you to avoid the many, many failures and wasted hours of others as they do this job. This is tedious work, do it scrupulously right. Interlux has lots of exact guidance on their website.
Interlude 2
I’ve been selling barrier coatings for years made by Interlux, Pettit and now Sea Hawk. Now they are a recommended bottom paint primer for new boats. Just follow manufactures instructions for each one. I prefer Sea Hawk products, personally. Blistering problems are now rare on boats manufactured in the last 20 years or so since the problem was discovered and addressed at resin and boat manufactureing along with proper bottom paint priming processing having been instituted. It was a bigger issue in the 90’s.
- This site uses cookies to help personalise content, tailor your experience and to keep you logged in if you register. By continuing to use this site, you are consenting to our use of cookies. Accept Learn more…
Please verify you are a human
Access to this page has been denied because we believe you are using automation tools to browse the website.
This may happen as a result of the following:
- Javascript is disabled or blocked by an extension (ad blockers for example)
- Your browser does not support cookies
Please make sure that Javascript and cookies are enabled on your browser and that you are not blocking them from loading.
Reference ID: f44d3728-e6e1-11ee-aa12-fb000af9c1ff
Powered by PerimeterX , Inc.
Fatal heat wave strikes unspoiled swath of Great Barrier Reef

Seven months after Florida corals faced what scientists called their worst bleaching event ever , a similar emergency grips the Great Barrier Reef: Its famed corals are under unprecedented and, in some spots, fatal stress as relentless summer heat in Australia stretches into early fall.
The bleaching event appears likely to be the worst on record in southern sections of the 1,400-mile-long reef, and could bring the first significant coral fatalities observed there. In other sections, what is the fifth major bleaching event in nine years could serve as a test of how resilient the world wonder will be going forward.
Water temperature data suggests the toll could approach that of 2016, when some 30 percent of the reef’s corals died after suffering through what were then unprecedented levels of heat stress.
“Those records have now been broken,” said Terry Hughes, director of the Australian Research Council Center of Excellence for Coral Reef Studies.
It is the latest symptom of off-the-charts ocean heat around the world. While the oceans have steadily absorbed rising levels of global heat for decades, a record-setting spike in global ocean temperatures has persisted for over a year .
On the Great Barrier Reef, the relatively rapid succession of such extreme bleaching events is a clear sign of human-caused climate change, said David Wachenfeld, research program director at the Australian Institute of Marine Science. There is no evidence of mass bleaching occurring before 1998 but, since an episode that year, marine heat waves have returned with increasing frequency, in 2002, 2016, 2017, 2020 and 2022.
How those events compare with this latest one will become clear in coming months as scientists survey the famous formation of some 2,900 coral reefs spread across an area the size of Italy.
“This is an anxious time as we continue to collect information,” Wachenfeld said.
Coral surveys, temperature data paint a bleak picture
Australian authorities declared the emergency last week. In a video posted to social media Thursday, Tanya Plibersek, minister for the environment and water, called the latest “bad news about the Great Barrier Reef” an alarming sign of the risk climate change poses “to coral reefs around the world.”
But Hughes said the crisis had been building in plain sight all summer, with warmer-than-normal waters persisting for months.
By February, the final month of Southern Hemisphere summer, a measure of cumulative heat stress to corals had shown steady gains throughout the Great Barrier Reef. In its southern region, the heat stress far surpassed record levels by the beginning of this month.
Though past marine heat waves have delivered more-extreme ocean temperatures, this one has lasted much longer, Hughes said. It comes as Australia posted its third-hottest summer on record, with little respite from the heat on land. In Brisbane, the closest major city to the reef, overnight low temperatures failed to drop below 68 degrees Fahrenheit (20 degrees Celsius) for more than two months straight.
Aerial surveys and dive missions to evaluate the extent of the crisis are still underway but so far show severe bleaching — when corals expel algae that normally live within their tissue — and already some mortality. Bleaching is typically a warning sign rather than a guarantee that corals will die. After a bleaching event, they can bounce back.
But in this case, the heat stress is so extreme that Hughes said there is little doubt mortality will be widespread. The full death toll won’t be clear for perhaps six months, he said.
Wachenfeld said that two-thirds of the reef had been surveyed but that rough seas are preventing scientists from inspecting the rest of the vast system, either by air or in dive missions. He called surveys of the reef’s southern region “really critical” because temperature data shows that corals there have experienced the greatest amounts of heat stress.
In the meantime, the bathwater-like conditions are not going away any time soon, unless weather patterns bring clouds, rain or waves to ease them. That means the corals’ heat exposure has not yet peaked, Hughes said.
It puts reef lovers in a position of begging for a different sort of dangerous weather.
“We are hoping for an extreme cyclone to reduce the impacts of another extreme weather event,” said Anna Marsden, managing director of the Great Barrier Reef Foundation.
Why this bleaching event is different — and so alarming
Reef watchers say no two bleaching events occur in the same way. They tend to be patchy, and can affect some regions of the Great Barrier Reef more than others. This time, the pattern and prevalence are particularly alarming, scientists said.
One unusual factor is that the bleaching is so dramatic in the southern sections of the reef, farthest from the equator. In the northern reefs, heat mortality was dramatic in 2016 and 2017. But in the south, corals have been the least exposed to extreme heat during past events, Marsden said.
“There’s concern corals there won’t make it through,” she said.
Elsewhere across the reef, the concern is that heat waves have been occurring all too often. Most reefs within the Great Barrier have experienced bleaching perhaps two or three times since 2016. But for a smaller number, the latest surge could be a fourth or fifth bleaching in that span, Hughes said.
The frequency of the severe bleaching events is affecting the density and diversity of some reefs.
“If you lose a 30-year-old coral, it takes at least that length of time to replace it,” Hughes said. “We just don’t have that kind of time anymore.”
What remains to be seen is how reefs that have recovered from past severe bleaching events are faring this time, Wachenfeld said. In those areas, corals are either survivors of past heat waves, or the offspring of those survivors.
“Are they perhaps a little tougher?” he asked. “That’s important for understanding how the impacts of climate change are likely to unfold.”
Risks of more-frequent bleaching in the future
And then there is the likelihood that severe bleaching events will become more common as the planet warms.
In many cases, the events coincide with episodes of the El Niño global climate pattern, which tends to increase planetary warmth. That was the case in the first major bleaching in 1998, in the devastating bleaching event of 2016, and again this year. Though an El Niño that began last year is waning, its effects are still expected through the Northern Hemisphere spring .
But rising global temperatures, the result of humans burning fossil fuels, meant that severe bleaching even occurred in 2022 during La Niña conditions — which tend to have a slight cooling effect around the world. La Niña is likely to return this year .
“We no longer need an El Niño to make a hot summer dangerous,” Hughes said.
Scientists have been fearing and anticipating what could happen on the Great Barrier Reef since marine heat waves hit the Atlantic basin during this past Northern Hemisphere summer, bringing some surface temperature readings into triple digits off the Florida coast. The heat stress was so high, Hughes said, some corals “died more or less instantly. They didn’t have time to bleach.”
He said he fears some of the same consequences for the world’s most famous corals.
- You’re not crazy. Spring is getting earlier. Find out how it’s changed in your town. March 13, 2024 You’re not crazy. Spring is getting earlier. Find out how it’s changed in your town. March 13, 2024
- Boaters and surfers called Dial-A-Buoy for 27 years. Now NOAA is hanging it up. March 12, 2024 Boaters and surfers called Dial-A-Buoy for 27 years. Now NOAA is hanging it up. March 12, 2024
- Earth posts warmest February and ninth straight record-setting month March 6, 2024 Earth posts warmest February and ninth straight record-setting month March 6, 2024

IMAGES
VIDEO
COMMENTS
Published: August 26, 2020. 16. Ralph Najranjo applied Pettit Protect (left) for a new test of barrier coats. He also switched to Trinidad Pro, a hard antifouling paint. There's more than a little irony in the need to keep a fiberglass boat away from water. The reason revolves around chemistry and the fact that water is the universal solvent.
Applying a barrier coat is often about as easy as rolling on bottom paint, and boat owners by the thousands have completed this project, protecting their boats from osmotic blisters. ... A barrier coat will also increase the resale value of your boat. We offer several barrier coat products. WEST System Epoxy and the InterProtect 2000E system ...
Boat Paint: Barrier Coat. For banishing blisters, below-the-waterline barrier coats can't be beat. For the underbodies of sailboat hulls, the first barrier coats were born of necessity. In the 1970s an insidious malady began to plague fiberglass yachts, growing in strength and frequency over time. By the 1980s, the condition known as osmotic ...
InterProtect® 2000E is a unique two-part epoxy coating developed to protect new and used fiberglass hulls from water absorption, which can lead to poor hull performance and osmotic blistering. Formulated with Micro-plates® that create an overlapping barrier to eliminate any direct path for water migration. In addition to use as a barrier coat ...
Enhance durability with quality barrier coats for your boat. Explore a range of barrier coat paints at Wholesale Marine to safeguard against the elements. Need Help? Call Toll Free: 877-388-2628; ... This epoxy barrier coat paint reduces water absorption in fiberglass hulls, making it an excellent choice for the prevention and repair of osmotic ...
Interlux Interprotect Epoxy Barrier Coat Kit - Gray. Applying Interlux 200E can help protect hulls from damaging water absorption that can cause long-term, costly repairs to your boat. Interprotect 200E is a two-part epoxy coating that will provide protection for your new and used fiberglass hulls by providing an overlapping barrier of ...
Interlux Interprotect 200E Epoxy Barrier Coat Kit - White. Formulated with a unique two-part epoxy coating, Interlux Interprotect 200E is the perfect product to protect and seal hulls from moisture and water absorption that can cause rotting and long-term damage to your boat hulls.
A barrier coat seals a fiberglass hull, blocking water entry and inhibiting blister formation in underwater gelcoat and fiberglass. If your boat has a fiberglass hull, you MUST protect it with a barrier coat beneath your bottom paint. Just 10 mils (about 4 to 5 coats) of a barrier coat like TotalProtect Epoxy Barrier Coat Primer is all it takes ...
Barrier coat prevents water migration and absorption in fiberglass hulls. Compatible with all antifouling paints. Bonus: Each Gallon order includes a paint roller frame, 3/16″ nap solvent-safe roller cover, metal tray, 10-in. stir stick, XL paint suit, 2-in. chip brush, a Scotch-Brite™ pad, and 1 roll of 1-in. painter's tape.
The intact barrier coat stuck to the hull like a thumb and forefinger bonded with Super Glue. After some misleading easy scraping of flaking barrier coat, the epoxy paint proved to be immune to assaults with a scraper. This meant that 75 percent of the paint removal process would be anything but a walk in the park.
A barrier coat primer is typically applied prior to applying bottom paint. TotalBoat TotalProtect Epoxy Barrier Coat Primer is a high-build, two-component epoxy primer applied at 8-12 mils thickness for barrier coating to protect against water absorption, migration, and gelcoat blistering. TotalProtect can also be used above or below the ...
The bottom paint was to be Eco-Clad Fast Coat antifouling and he wanted the barrier coat and the bottom paint to be compatible. The barrier coat dried to the was sanded lightly before a third coat was applied shortly before the boat was to be launched. Photos by Roger Marshall
3 results. Fisheries Supply is your premier supplier of barrier coat boat paint from top brands. We offer a full range of quality barrier paint for boats to create a protective layer over the fiberglass which helps safeguard against blisters caused by water immersion. Protect your fiberglass with boat barrier paint today or browse our wide ...
Painting your sailboat is essential for its safety and protection. (Source: Life of Sailing) The paint acts as a barrier against salt, barnacles, and rotting, keeping your sailboat well-maintained. (Source: Life of Sailing) Painting your sailboat yourself can save you money and allow you to acquire a valuable skill. (Source: Life of Sailing)
Applying a barrier coat today is almost as easy as rolling on bottom paint, and thousands of boat owners have completed this project, protecting their boats from osmotic blisters. There are three types of barrier coat protection: 1) preemptive barrier coating on new boats; 2) blister repair alone; 3) blister repair with a barrier coat.
As far as hot coating barrier coats, Interlux InterProtect 2000E can be over coated up to 6 months per Maine Sail. I just used some on a keel cleanup and the only mention to hot coating was after the last coat of IP2000E to put on bottom paint while the barrier coat was "thumb print" soft.
Most boatyards in the United States have strict rules about how bottom jobs are done and may require a ground cover or a tent around the boat from the waterline down to capture the dust and debris. A quicker way to remove many layers of paint is through high-pressure blasting with either soda, sand, or a special glass material shot at the hull.
Bottom paint is typically applied over the barrier coat and is designed to create a slippery surface that makes it difficult for marine organisms to attach to the hull. Bottom paint is usually made of a copper-based antifouling agent and is available in both hard and ablative forms. Step 1: Prepare the Surface Before applying any coatings ...
boat paint & solvents marine primer barrier coats; Barrier Coats. 7 Items Sort ... Barrier Coats selected Currently Refined by Category: Barrier Coats Price. Price. $50 to $100 (3) Refine by Price: $50 to $100 $100 to $500 ...
TotalBoat Aluminum Boat Barrier Coat two-part epoxy primer is the dependable way to prime aluminum in preparation for bottom paint or other 1- or 2-part paint finishes. It's easy to use and adheres extremely well to properly prepared aluminum hulls and pontoons to create a waterproof tie-coat barrier that offers exceptional protection against ...
Removing the bottom paint and barrier coat from the Ericson required 140 hours of actual work (see " Smorgasbord of Tools and Patience" are Required For DIY Epoxy Barrier Coat Removal "). Not long after Ralph's report, we went back into the boatyard and followed the bottom restoration of a Bristol 35.5 owned by the publisher.
Bad advice. You might want to ask the Interlux rep why published Interlux guidance for barrier coat specifies a maximum 24 hour re-coat time (5 hours if it is really hot). All epoxies rely on one of two types of bond, 1)chemical, or 2) physical. By recoating prior to full set of the epoxy you obtain the maximum chemical bond strength.
Now get to work! First, lay out a large tarp or dropcloth to cover the entire work area. Knock off any loose paint with a scraper and, using either a sanding block or a dustless DA sander, lightly sand the entire bottom with 80-grit sandpaper. Spend a little extra time on any high or uneven areas.
Coral surveys, temperature data paint a bleak picture. ... Most reefs within the Great Barrier have experienced bleaching perhaps two or three times since 2016. But for a smaller number, the ...