Building a custom navigation station
A well-designed navigation station is crucial for any sailor embarking on long journeys with their family, providing a dedicated space for planning routes, monitoring weather, and managing communication systems.

Building a Custom Navigation Station
Welcome to another informative article in our Boat Modifications and Upgrades section. Today, we will be discussing how to build a custom navigation station for your boat. A well-designed navigation station is essential for any sailor embarking on long journeys with their family. It provides a dedicated space for planning routes, monitoring weather, and managing communication systems. In this article, we will cover the following topics:
- Why build a custom navigation station?
- Key components of a navigation station
- Space and layout considerations
- Materials and tools needed
- Step-by-step guide to building your custom navigation station
- Tips for maintaining and upgrading your navigation station
Why Build a Custom Navigation Station?
While many boats come with a built-in navigation station, these may not always meet the specific needs of your family and sailing adventures. Building a custom navigation station allows you to:
- Tailor the space to your needs: A custom navigation station can be designed to accommodate your preferred navigation tools, communication systems, and storage requirements.
- Maximize space efficiency: By designing your navigation station, you can optimize the use of available space on your boat, ensuring that every inch is utilized effectively.
- Personalize the aesthetics: A custom-built navigation station can be designed to match the style and theme of your boat’s interior, creating a cohesive and visually appealing space.
Key Components of a Navigation Station
Before diving into the design and construction process, it’s essential to understand the key components that make up a functional navigation station. These include:
- Chart table: A large, flat surface for laying out paper charts, plotting courses, and planning routes.
- Navigation tools storage: Dedicated storage for essential navigation tools such as dividers, parallel rulers, pencils, and erasers.
- Electronics and communication systems: Space for mounting and operating electronic navigation equipment, such as GPS, chartplotters, VHF radio, and AIS.
- Weather monitoring equipment: Instruments for monitoring weather conditions, such as a barometer, thermometer, and hygrometer.
- Lighting: Adequate lighting for nighttime navigation, including a red light to preserve night vision.
- Seating: A comfortable and secure seat for the navigator, ideally adjustable and with a safety harness attachment point.
- Storage: Additional storage for cruising guides, logbooks, and other essential documents.
Space and Layout Considerations
When designing your custom navigation station, consider the following factors to ensure a functional and efficient space:
- Location: Choose a location that is easily accessible from the cockpit and main living areas but provides some separation to minimize distractions.
- Size: Determine the size of your navigation station based on the available space on your boat and the number of components you wish to include.
- Ergonomics: Design the layout with ergonomics in mind, ensuring that all components are within easy reach and that there is sufficient legroom and headroom for the navigator.
- Visibility: Ensure that the navigator has a clear view of the boat’s surroundings, particularly when seated at the chart table.
- Ventilation: Provide adequate ventilation to prevent condensation and maintain a comfortable temperature in the navigation station.
Materials and Tools Needed
To build your custom navigation station, you will need the following materials and tools:
- Marine plywood or solid wood for the chart table and storage compartments
- Varnish or paint for finishing the wood surfaces
- Hinges and latches for doors and drawers
- Screws, nails, and other fasteners
- Mounting brackets and hardware for electronics and instruments
- Marine-grade wiring and connectors for electrical components
- Tools such as a saw, drill, screwdriver, sandpaper, and measuring tape
Step-by-Step Guide to Building Your Custom Navigation Station
- Plan your design: Begin by sketching out your desired navigation station layout, taking into consideration the space and layout factors discussed earlier. Be sure to include measurements for each component and the overall dimensions of the station.
- Prepare the space: Clear the area where your navigation station will be built, removing any existing furniture or fixtures if necessary.
- Construct the chart table: Using your chosen material, cut and assemble the chart table according to your design. Ensure that the table is sturdy and level, and apply a finish to protect the wood from moisture and wear.
- Install storage compartments: Build and install any drawers, shelves, or cabinets needed for storing navigation tools, documents, and other essentials. Use hinges and latches to secure doors and drawers in place.
- Mount electronics and instruments: Install mounting brackets and hardware for your electronic navigation equipment, weather monitoring instruments, and communication systems. Be sure to follow the manufacturer’s guidelines for proper installation and ventilation.
- Wire electrical components: Run marine-grade wiring from your boat’s electrical system to the navigation station, connecting all electronic devices and lighting. Use connectors and cable management solutions to keep wiring organized and secure.
- Install seating: Choose a comfortable and adjustable seat for the navigator, ensuring that it is securely fastened to the boat and has a safety harness attachment point if desired.
- Test and troubleshoot: Power up your navigation station and test all components to ensure they are functioning correctly. Address any issues or make adjustments as needed.
Tips for Maintaining and Upgrading Your Navigation Station
To keep your custom navigation station in top condition and up-to-date with the latest technology, consider the following tips:
- Regularly inspect and clean: Routinely check your navigation station for signs of wear, damage, or moisture intrusion. Clean surfaces and electronics as needed to prevent dust and dirt buildup.
- Update charts and software: Keep your paper charts and electronic chartplotter up-to-date with the latest information and software updates.
- Upgrade equipment as needed: As technology advances, consider upgrading your navigation and communication systems to stay current with the latest features and capabilities.
- Add personal touches: Personalize your navigation station with decorative elements, such as artwork, photographs, or a favorite navigational tool, to make the space feel more inviting and inspiring.
By following this guide, you can create a custom navigation station that meets your family’s unique needs and enhances your sailing adventures. With a well-designed and functional navigation station, you’ll be better prepared to navigate the open sea and enjoy the freedom and fulfillment that comes from choosing an unconventional path.
United States
Netherlands
Sailing electronics
Technology that knows the ropes. Marine Electronics for Sailing.

Have wisdom in your sails
With over 40 years of sailing innovations and proven performance, our Raymarine sailing electronics serve as a trusted member of your crew. From the powerful Axiom chartplotter, the intelligent and customizable high-resolution Alpha Performance Displays, award-winning Evolution autopilots and the latest Quantum 2 Doppler radar technology - we can create the perfect sailboat electronics package for your time on the water.
Smooth sailing begins onboard

The horizon is just your starting line
Electronics for cruising sailboats.
Whether you’re just dipping your toe into sailing or full-on club racing, explore the best electronics for sailing – from navigation to safety equipment. Discover the right sailboat electronics package for any size or type boat, dinghy to keelboat. Choose from an assortment of technologies that can make your time on the sea feel like a breeze.

Voyage into the known for a change
Electronics for bluewater sailboats.
Deeper waters require serious marine electronics that can pull you through unpredictable conditions. Explore our bluewater sailing electronics, ruggedly designed for precisely these kind of port-to-port and cross-ocean voyages. Our innovative and time-tested technology has everything you need to handle the wild seas with ease.

Our race to perfection never ends
Electronics for club racing.
Your team can run with more precision using our marine electronics for race sailing, built for fast decision making. Equip your crew with the right intelligence from wind strength to the effects of tide as you navigate the course. Just because you love the time-honoured simplicity of sailing doesn’t mean you can’t take it to the next level with high-performance marine electronics.

Nurture that competitive streak
Dinghy and keelboat electronics.
Smaller, nimble boats still benefit from the same technology used on larger sailboats. Because they’re more responsive, you can sharpen your sailing skills faster with the ability to see and feel the effects of every adjustment. Our marine electronics for dinghies and keelboats can help by providing real-time intelligence to pivot sooner and more stats to inform those quick thinking decisions.
Sailing Solutions

Chartplotters
Raymarine navigation displays put you in command with the speed and simplicity of our LightHouse operating systems. Our award-winning Axiom line brings the full power of Raymarine chartplotter navigation into a single touch display or networked system.

Day and night, radar systems from Raymarine keep you aware of surrounding traffic, hazards and obstacles, approaching weather and so much more. Use your radar to navigate in dense fog or rain, or confirm your boat's position with super-accurate radar ranges.

Evolution Autopilot
With over 40 years of autopilot research and development, Evolution is the pinnacle of Raymarine autopilot technology. Designed for razor-sharp course keeping and steady control, Evolution autopilots require virtually no calibration or complicated setup.

Instrument Displays
Raymarine instruments are world-renowned for accuracy, innovative features and high-performance. From the space-saving, multifunction i70s series to the customizable Alpha Performance Displays - there are Raymarine instruments available to fit every sailor's requirements.

NEW - LightHouse 4 Operating System
The easy-to-use operating system inside every Raymarine chartplotter display.
Marine Charts for Sailing
Raymarine navigation displays give you the power to explore, plan and navigate the open water, with confidence. High definition displays and quad-core performance brings electronic charts from leading mapmakers to life. Enjoy fully featured vector charts, high-quality raster charts, plus advanced features like 3D maps, satellite overlays and automatic routing options.

LightHouse Charts
Raymarine LightHouse Charts offer a superior nautical chart visual presentation, combined with rich detail and accurate GPS navigation from official hydrographic sources, including NOAA. Choose between various nautical chart styles, matched with colour palettes for any time of day. For even more detail, subscribe to LightHouse Premium and unlock data-rich points of interest (POI), high resolution satellite aerial overlays from Mapbox, and regular chart updates.

Find your nearest Raymarine dealer
Search Raymarine’s global network of sales and service dealers here.
Editor's Note: A perfect fit for any nav station. Check out our new 2019 guide books for The Bahamas, Chesapeake Bay and the Atlantic ICW, now available via our website . If you have been thinking about upgrading or are looking for the perfect holiday gift for the boater in your family, this is a great time to do it!

Aft-facing: On the Boreal 47, the compact pilothouse is situated just inside a door opening directly into the cockpit. Photo Jon Whittle
Once upon a time, every seagoing sailboat had a broad table in the saloon with sightlines to the helm, plenty large enough to spread out a big NOAA chart folded in half. Of course, that meant your boat couldn’t offer other things, particularly if it was smaller than 40 feet. Queen-size berths and separate shower stalls? Not likely.
But the times and designs have changed. Cruising World ’s Boat of the Year judges examined roughly two dozen new sailboats in October 2017, and in so doing, we marked the ways today’s builders either hewed to tradition or innovated with their boats’ navigation stations.
The Traditionalists

The Bavaria Cruiser 34 won the prize as the Best Pocket Cruiser for 2018. The tidy nav station, far left, is well-executed, with comfortable space to work on a laptop. Photo Tim Murphy
Big chart tables aren’t entirely gone. Six boats in this year’s fleet of new boats exhibited traditional nav stations with ample room to slide parallel rules and swing a pair of dividers. The smallest of these was the Hallberg-Rassy 412, whose very name evokes traditional design. Situated to starboard just forward of the companionway steps and across from the galley, this forward-facing nav station features a hinged surface that opens into a space large enough to contain a couple of ChartKits and a full suite of plotting tools. It places the navigator in easy reach of the orderly electrical panel. On the boat we sailed, a single-sideband radio was installed in the outboard corner, with a shelf above it for smaller items. Hallberg-Rassy’s always exquisite mahogany joinery incorporates a high fiddle on the table’s inboard edge to catch rolling pencils, and no fiddle on the aft edge to interfere with arms and elbows.
Read the full story.
Add Comment
Thank you for submitting.
Your comments will be approved and displayed once they are reviewed by our editors.
Waterway Guide reserves the option to edit comments submitted here for clarity and facts. The opinions expressed are always the writer's own. We may confer with letter writers about editing to the extent that deadlines allow.
The bow is at the end of the boat.
The captcha question was answered incorrectly.
Current Review Policies
Waterway Guide reserves the option of editing reviews and comments for grammar, clarity and the removal of defamatory or potentially slanderous language. When appropriate, reviews are forwarded to businesses for response prior to being made public. We will make every effort to be objective and impartial when posting reviews, but do not publicize details of disputes between parties.
- Comments are reviewed and/or verified by Waterway Guide staff and do not post immediately. Please use a valid email address so that we can contact you if we need clarification (email address will not be published).
- Name will be published. Anonymous comments may not be posted.
- Comments will be shared with the reviewed marina to offer them an opportunity to respond. If they choose to do so, the marina’s comments may also be posted in response to the original comment.
- Comments containing foul or obscene language will be rejected or returned for resubmission.
- Comments containing personal attacks will be rejected or returned for resubmission.
- Off-topic content will be rejected.
- Comments must describe commenter's personal experience – “hearsay” reports will be rejected.
- Comments must be understandable and clear enough to inform other boaters.
- URL links are allowed only if they inform the content – no “advertising” your business or blog.

- 4,000 Marinas
- Thousands of anchorages
- Updated Charts
- Mile-by-Mile Navigation
- Highlighted Alerts & Cautions
- Full-Color Aerial Photographs
The Waterway Guide App Makes it easy to leave reviews, use our explorer, and view waterway guide materials all on the go!

- Download The App
- Destinations
- Knowledge Center
Apple Sign-In

Sign up to get Navigation Alerts and News delivered to your inbox!
Invalid Email
Invalid Captcha
Check out our latest newsletter
Newsletter Sign-Up
The email is invalid. Please close the modal window and try again.
Signing-up...
- Yachting Monthly
- Digital edition

Rebuilding a yacht’s navigation system using Raspberry Pi
- February 15, 2023
When David Bishop bought a 30-year-old boat, the batteries were dying and the wiring was a mess. He decided to rebuild the nav system using several Raspberry Pis

Back in May 2021, my wife Lydia and I purchased our first boat, a 1994 Dehler 34 called Troppo Bella , and spent the summer exploring the beautiful waters around Conwy. Planning to venture further afield the following year, I decided it was time to rebuild the somewhat vintage navigation station.
With much of the wiring 30 years old and a scant complement of switches, the navigation station hadn’t kept pace with the numerous navigational devices, lights and living comforts that had been added over the years. Unfortunately, half of these additions had since been decommissioned due to faults, including the Navtex receiver, SSB weather fax receiver and autopilot. Sat at anchor using camping lights in the saloon to preserve our fading batteries, it was also clear we had to be able to control power consumption if we wanted to spend more than a night away.
We set a couple of aims for the revamp. Firstly, we wanted to make full use of the existing equipment that was still functional. This included the Furuno GP32 Navigator GPS at the navigation station and the Raymarine C80 multi-function display that was mounted on the binnacle. These devices are robust, waterproof and adventure-ready. Budget was also limited so upcycling what we had, rather than installing the latest navigational tech, was essential.
Secondly, we wanted to use the navigation station to plan and plot a route on screen, push it to the GPS, chartplotter and Navionics on our tablet, and be able to view our progress while sailing. While a laptop could do this job, space at the chart table was tight, plus recharging a laptop would be a hefty draw on house batteries during extended trips. We’d need something small and low power for the job.

Lydia at the old and very cluttered nav station.
But before any of this could be achieved I had to take out the moulded switch panel and instrument board and remove all of the old switch wiring. I was then left with a simple set of power and data wires coming in from instruments around the boat, which I carefully labelled. Realising I had now effectively made the boat unusable, the project suddenly felt epic: there would be no sailing until this project was complete!
The original layout had 10 switches and I calculated that I would ideally like around 30 to give complete control of our power usage. There was no room for ready-made switch panels, so I opted for a collection of individual Blue Sea Systems Contura switches that I could group and mount easily as space allowed.
Having decided we wanted an integrated computer for route plotting, the next step was to decide which one to use, how to fit it into the small space available and where to mount the display.

Two of the Raspberry Pis hidden in the old Navtex box
Raspberry ripple
My daughters and I had already been tinkering with Raspberry Pis, a cheap computer no bigger than a pack of cards, designed to encourage children to learn about technology. These computers are easy to set up and well documented with many free books available from the Raspberry Pi Foundation .
Since their invention, Raspberry Pis have been used by sailors in boat computers for a range of purposes including navigation and autopilot systems, to monitor engines, bilges and tank levels, as well as manage solar power generation. This miniature computer was ideally suited to power our new navigation solution.
To plot a course, display our position on a digital chart and see AIS Targets, I wanted to use OpenCPN chartplotting software with licensed charts from o-charts.org and was delighted to discover OpenPlotter to get me started. This software bundle provided everything I needed, including the Raspberry Pi operating system, OpenCPN and Signal K. This last bit of software can be used to connect up the boat’s instruments (wind, speed, depth, GPS, routing, AIS) and make the data available over WiFi and so was going to be vital in pushing information to our Raspberry Pi-powered chartplotter and Navionics.
I realised that the decommissioned Navtex box would make the perfect, protected place to hide two little Raspberry Pis; I would use one of the mini computers for getting the instruments to talk to each other via Signal K and another to power my OpenCPN chartplotter.

David at work at the new nav station using the inbuilt computers and touch-screen display
Like a couple of hermit crabs they were soon installed in their new home. Moving things around on the instrument board I was also able to find a space for a 7-inch LCD touchscreen which could be used for our route plotting as well as reviewing weather information or as an instrument panel.
I hadn’t fully realised how much extra wiring three times the number of switches would create but, armed with many cable ties, I managed to fit it all in and the system was ready for its first sea trial in May 2022 when we set off for the Isle of Man.
The OpenCPN chartplotter and screen proved an immediate hit and we settled into a routine of creating the route on OpenCPN and then loading it via a GPX file into Navionics. In this way all our devices followed the same route and displayed the same data.
Updating the logbook became a quick and easy task, plus both helm and navigator had a real-time view of our progress. We were also really pleased to have the Raymarine C80 we’d inherited fully integrated into our navigation. While we like the portability of the iPad and the clarity of Navionics charts when on deck, in bad weather or when the helm wants to view a simple feed of boat data, the C80 comes into its own. So far so good!

The new nav station, complete with a red night light and three times as many switches
Power savers
Our onboard power consumption was also back under control thanks to the additional switches I had fitted and we could now keep the depth and wind instruments on while at anchor without the drain of other electronic devices hanging off the same wires.
This switch-per-device approach which was one of the main objectives of the upgrade has had some other unexpected benefits too – if AIS targets stop being received, for example, being able to reboot the AIS receiver without turning everything off and on is a real plus.
I’ve a few more plans for the navigation system, mainly to improve our access to weather forecasts when at sea or in anchorages off the Welsh coast that 4G can’t penetrate. Top of this list is to use it to receive and display in-depth weather information via WeatherFax and Navtex. I think I could squeeze another Raspberry Pi in there somewhere if I needed to!
Lessons learned
Reduce the drain
Managing power consumption is key. Modern tablets and phones use a lot more power than you think, especially compared to older purpose-built marine technology. Removing your dependency on them for long trips will give you greater sailing range.
Legacy backup
Make intelligent use of your navigation aids. In a storm, tablets and smart phones are not reliable and you may be unable to escape the helm to consult paper charts. Legacy marine navigational equipment was designed for the sea so make sure you have loaded your route in case the weather takes a turn for the worse.
Know your electrics
Most sailors know how to bleed their engine, but few have a working knowledge of the boat electrics. However, depth and wind speed/direction are vital for sailing. Gaining a basic understanding of your boat’s electrics and boat data is a sensible skill for modern seamanship.
Prepare for frustration
Rebuilding my navigation station was a hugely rewarding and exciting project. However, I had never tinkered with boat electrics or boat data before and the process required a lot of learning, dead-ends and frustration along the way as I tried to get devices to talk to each other.
Add extra time
Don’t underestimate the effort and time required to rebuild or rewire your switch panels. This project was only just completed in an off-season and it took many hours of effort.
Enjoyed reading this?
A subscription to Yachting Monthly magazine costs around 40% less than the cover price .
Print and digital editions are available through Magazines Direct – where you can also find the latest deals .
YM is packed with information to help you get the most from your time on the water.
- Take your seamanship to the next level with tips, advice and skills from our experts
- Impartial in-depth reviews of the latest yachts and equipment
- Cruising guides to help you reach those dream destinations
Follow us on Facebook , Twitter and Instagram.
- BOAT OF THE YEAR
- Newsletters
- Sailboat Reviews
- Boating Safety
- Sailing Totem
- Charter Resources
- Destinations
- Galley Recipes
- Living Aboard
- Sails and Rigging
- Maintenance
- Best Marine Electronics & Technology
Nav Station Transformation
- By Roger Hughes
- Updated: April 24, 2019
Since the arrival of GPS , I haven’t had much use for the chart table on my brigantine schooner, Britannia . Most of our passagemaking navigation is done on the Raymarine multifunction display on the helm pod, then transferred to a paper chart on the saloon table roughly every hour. The chart table was only used to store things that didn’t have a permanent home and as a desk for my laptop.
Considering that the chart table and seat took up over forty percent of the length of the portside saloon, it was not a very efficient utilization of space. The layout also left a lot to be desired. The space between the table and companionway ladder was a narrow 10 inches, and squeezing into the seat frequently resulted in accidentally tripping breakers on the master power distribution panel at the side of the table. The half bulkhead also impeded sliding in and out of the seats when the saloon table was up. It had to go.
Repurposing: I’ve always thought “outside the box” when contemplating new refit projects. In this instance, I found the perfect solution to my new nav area at an Orlando antique mall.
I’m a traditionalist; I wouldn’t have built a square-rigged schooner if I wasn’t. However, advancements in equipment, particularly electrical and navigational devices, should cause us to rethink some of the more traditional methods and layouts … such as chart tables. Our trusty sextant served us well on past ocean passages but now hangs in its teak box on the bulkhead, a nod towards bygone days.
I thought about extending the saloon seating into the corner, where it would have made a lovely, snug spot in a seaway. However, not having a chart table at all might be a drawback if I eventually decide to sell.
I found a compromise in one of the antique malls around Orlando, Florida, where I live. It was a beautiful secretary desk, with a hinged drop-down lid with drawers and compartments inside and four large drawers below, adding nicely to our storage. With the lid open, it is nearly the same size as the chart table and easily fit in the existing space. Unfortunately, it was stained a horrible brown/black color and I wasn’t quite sure what type of wood it was made of, but I took a chance and bought it for $214.
The Dismantling
The chart table and seat were built 9 inches higher than the remainder of the saloon sole, for which I could only think of one reason: so anyone sitting there could look out the ports. I knew dismantling it would be a tough job, because in some places the molding was a sandwich of ¾-inch marine plywood plus two layers of fiberglass, all heavily bonded to the side of the hull. I christened it “Stonehenge” because the manufacturers clearly never meant it to be removed or to fall over! It certainly was well-made, but a pity it was so big and unergonomic. I think the Druids who built Stonehenge could have actually designed it better.
Before starting to dismantle this edifice, everything loose was removed from the saloon and galley, and things which could not be moved covered with cloths. I knew what was about to happen.
Unscrewing the teak chart table was easy enough, it was just sitting on top of the molding. However, it was so heavy two people had to lift it off the boat. The circuit-breaker panel at the side of the table also came out, along with the two small drawers, the cupboard and all the teak fiddles.
I then set about sawing the fiberglass support structure into small enough pieces to pass through the companionway. I used a combination of circular saw, reciprocating saw and oscillating cutter, along with a big hammer and pry bar! It was hard going, with fiberglass dust all over the place. I tried to minimize this by positioning my Shop-Vac nozzle near the cutting edges of the saws. Altogether, including the chart table, the pieces weighed an astounding 200 pounds.
Next, I attacked the half bulkhead which no longer needed to be so high. This was two sections of ¾-inch plywood bulkheads, with fiberglass in between. I cut the inner bulkhead out, carefully removed the teak edging trim, reshaped the panels and then refitted the trim to form an arm rest. During this exercise, I needed to keep the boat’s electrics running — particularly the air conditioning — so I had to be very careful not to cut through any wires.
I soaked my aching back in Britannia ‘s hot tub every evening.
Unfortunately, the builders had not extended the teak and holly cabin sole under the chart table, as they had on other parts of the boat. It was just raw plywood, under which were the conglomeration of wires leading to the electrical panel. I cut the floor completely out and after rerouting the wires I made a new floor with ¾-inch plywood, including a hatch to give easy access to three seacocks and filters below.
With Stonehenge fully excavated, I now had a large open space to play with.
Wired Up: For the new wiring, a 20-foot length of multi conductor cable solved the problem of purchasing individual lengths of wires and saved a bundle in the process.
The Rewiring
The next task was to relocate the electrical panel which was a spaghetti maze of wires, bus bars, connectors and relays; some were original (circa 1977), some I’d installed when I fitted new equipment. The whole conglomeration could only be described as a wiring nightmare that had needed sorting out for a long time. Some wires went to devices not in the cockpit and some to the engine instruments mounted lower down on the pedestal.
Rewiring the panel, with its hodgepodge of wires, could easily turn into a real mess if I got the wires muddled up. At moments like this, my wife always reminds me of the timeless sailor’s adage: “If it ain’t broke, it will be when I fix it.” Actually, that slogan really needs to be tattooed on my right arm, so I can contemplate it before I start complicated projects like this.
I planned to reposition the panel higher up, where the breakers could no longer be accidentally tripped. For this I built a teak framework under the curve of the deck, then modified a spare louvered door to give access to the wires leading to the panel above. I fitted a piece of ½-inch plywood below the panel to carry the four generator and water-tank gauges.
There are different ways to rewire an old boat. You can buy individual lengths of wire. Or you can convert to a National Marine Electronics Association (NMEA) networking system, which interconnects nearly everything and which can be read on a multifunction display screen, including engine instruments. You can even convert to Wi-Fi wireless and have hardly any wires at all. The last two options were well outside my budget for this project.
I decided to use regular wire, but instead of buying individual lengths I bought a 20-foot length of multiconductor cable containing 20 wires of 14 AWG (American wire gauge). These are all different colors and very much cheaper than buying individual wires.
However, a problem can occur when using multiconductor covered wire: individual wires can become hot, even with just 12 volts. So the first thing I did, using a box cutter, was to completely strip off the outer rubber casing and pull the wire loom out. This separated the wires and made them less susceptible to overheating. I could also easily pull a few strands out of the cluster, which went to places other than the electrical master panel.
I drilled a hole in the cockpit sole and wound the cluster of wires all the way to the back of the electrical panel, supporting them as necessary. I enclosed all the wires coming out of the pod in a nice, plastic, split-wire casing, just to keep them tidy down the side of the pedestal.
I then disconnected the AC shore input and hung the distribution panel from a hook in the ceiling beams so I could easily work on the back. For temporary lighting and power, I used an extension cord direct from the marina dock.
As each wire was replaced, I switched the power back on to check if the equipment still worked. It was a slow, tedious and at times strenuous process to reach behind the panels and pull the old wires out. I also used an awful lot of crimp connectors.
On the 120-volt AC side, the heavy-duty cables leading from the two ship/shore power plugs were long enough to reach the repositioned panel and thankfully did not need extending, just sorting out from the hopeless tangle in which they had been installed.
It took four weeks to completely rewire the panel and then fix it to the framework I had built, next to where the new desk was to fit.
I was actually quite amazed that everything continued to work as it had previously. For once I proved the old adage wrong. I didn’t actually need that tattoo just to remember to work carefully and methodically.
Think Boldly: One thing I’ve learned in my many projects is that space can often be made more efficient, especially on small boats, than the original layouts. It just takes a little courage!
The Nice New Desk
During breaks between all this dismantling and rewiring, I found time to renovate the bureau/desk in my garage. The moment I put my sander to it I knew I had a gem; it was real wood with a beautiful walnut veneer! It was therefore a pleasure to strip all the stain, clean the veneer and revarnish it with Total Boat wood varnish from Jamestown Distributors. I even found some ornate brass drawer handles online to replace the horrible black-painted handles. They were only $2 each and look superb on the curved walnut drawers.
To fit my large-screen laptop, I removed the vertical dividers and mounted the five small drawers in the top of the desk. With the flap open, the table is about the same size as the original nav table, but when closed it takes up less than half the space.
I hoped my companionway measurements were accurate as my wife and I carefully manhandled the posh new desk down the deck and into the cockpit, trying not to scratch the newly varnished sides. On its side, it slid through the opening with about a half inch to spare. Whew. But an inch is as good as a fathom for a job like this. The desk then slid sideways and fit under the curve of the deck. I infilled between the ornate feet with a plywood plinth to stop things from rolling under the desk.
I already had a comfortable folding deck chair which nestled perfectly up to the desk, and it can be used at the dining table when needed. As an added touch, I bought an antique-looking globe for bottle storage that fits nicely next to the bureau. This is located in two teak collars in the floor. It is now considerably easier and much more comfortable to sit at the desk, and the saloon appears very much bigger. The electrical panel is easier to operate, and not a single breaker has been accidentally tripped. I even sold the old chart table, offsetting some of the cost.
The remodeled area is now more akin to a neat little office than a boat’s navigation area. Smaller boats than Britannia might greatly increase living space by redesigning their chart table area. It just needs a bit of bold thinking.
Serial do-it-yourselfer Roger Hughes is a frequent contributor to Cruising World.
Materials, Costs & Suppliers
Sheet of plywood Local hardware store $47
Multiconductor wire wireandcableyourway.com $75
Terminal connectors Local hardware store $20
Secretary desk Local antique mall $214
Varnish for desk jamestowndistributors.com $32
New drawer handles lawlesshardware.com $23
Bar globe homedepot.com $96
Sale of chart table ($100)
- More: Hands-On Sailor , How To , interior , navigation , projects , saloon
- More How To
How to Protect Your Spars from Corrosion
Sailing totem refit series: the forward head makeover, fatty goodlander: dealing with chafe while cruising, how to rig everything in your favor, one mile offshore with christian williams, winds of change.
- Digital Edition
- Customer Service
- Privacy Policy
- Email Newsletters
- Cruising World
- Sailing World
- Salt Water Sportsman
- Sport Fishing
- Wakeboarding
Navigation Lights for Sailboats (And How To Read Them)

Last Updated by
Capt Chris German
June 15, 2022
Navigation lights on a sailboat can be confusing. If you understand the reason behind why they are the way they are however, they can make a lot more sense.
At their heart, sailboats are really just a power boat and as such must adhere to all power boat rules such as navigation lights. Other times however, a sailboat is classified in a special category. They have a set of additional lights they CAN show as an option, but are not always required to do so.
That’s about as clear as mud if you ask me and I contend that that is where the confusion about lighting a sailboat begins.
Just because you can show a light to identify yourself in times of low visibility, does not mean you have to and then we add in a little sibling rivalry between power and sail and things get downright adversarial when it comes to navigation and the night.
Table of contents
The USCG says You’re a Power Boat Whether You Like It or Not
Much to the consternation of many a sailor who has earned a commercial license to drive their sailboat, when you received your credential from the USCG it says you are a master of steam and power across the top with no mention of wind as a source of propulsion.
It is not until you read the back pages of your little red book that feels like a passport and looks like a US Sailing credential, that you will see the term “sail auxiliary”. That is because most of the time the U.S. Coast Guard knows that you are primarily reliant on your mechanical power to propel your vessel.
It's a sad thing, but the days of commercially viable sail boats are done and all but the most select few even have sails let alone use them as their primary power source. All sail boats by law are powerboats, but not all powerboats are sailboats.
Navigation Lights for a Power Boat
As a power boat, you are required to show certain lights and have been required to do so before power was even invented.
In the days of man powered vessels like the viking ships who relied on oars while in close quarters to power their vessels, they needed to show other boats, friend or foe, where they were by showing lanterns in the dark to identify themselves. As you know, it is a time honored rule among all the nations of the world both past and present, that you must avoid a collision at all costs while at sea and even the viking knew that you should not run into things.
By lighting the front and back of your boat, you could warn other boats of your presence as well as identify which way you were heading. As such there is a very specific rule in the Code of Federal Regulations Number 46 (CFR46 by common name) that spells out with detail how many, the color, the luminosity or brightness, the angle of visibility and the location of all of the lights required for navigation on every single boat, seaplane, submarine and other nondescript vessel conceived by man to date that they must show while underway in reduced visibility.
And there is no flexibility in the rules.
As such a power boat, and by extension all sailboats, MUST, without question show one green light on the starboard bow and one red light on the port bow and one all around white light or lights while operating in reduced visibility. These lights should shine at all 360 degrees of visibility with the bow lights shining at an angle of dead ahead to 22.5 degrees abaft the beam and the stern lights shining 225 degrees dead aft. A forward facing masthead light that is white in color shall shine forward to comply with the directive that all vessels must carry an all around white light. For more read here .
As you can see, there isn’t much wiggle room when it comes to lights that must be shown.
Sailboats get a little flexibility with lights
Sailboats however, are a little different when they are in fact sailboats, which is only when you are entirely reliant on the wind for power and in no way reliant on any mechanical or manual means of propulsion. And for good reason.
Back in the day when men were men and sailboats were wooden, fire was a major concern. Sails were coated with wax and other flammable substances and the wood on boats was saturated with oils and grease. Even the ropes were plant materials saturated with oils to keep them pliable and strong.
Add those highly flammable substances to a parching environment like the sea and you had what was essentially a giant floating tinderbox.
Then tell that giant floating tinderbox that they need to identify themselves to the world at large at night using oil lamps with flames because batteries and lights were not invented yet. It didn't take very long or very many ships burning to the water line for the Governments to say to the sailboats, you get to do things a little different.
As such, sailboats are given special dispensation when it comes to lights aloft. They don't have to show an all around white light in their rigging because no one wanted to set their rig on fire with oil lamps 60 feet up in their rig.
However, when a sailboat takes their sails down such as when they are powered or at anchor, they must resume the display of an all around white light or lights aloft. That became a real challenge with aluminum masts and the disappearance of rat lines on the shrouds because there was no easy way to climb the rig and check the bulbs up the mast on a regular basis.
Red over Green Sailing Machine
I have no idea where the history of this particular light comes from, but if you ever take a deck exam with the USCG, you better remember this mnemonic. An all around red light over an all around green may be displayed on a vessel during times of reduced visibility to indicate that a vessel is operating under sail power alone.
I won’t even speculate on how or why they came up with this particular light configuration, but if you want to use these lights as a sailing vessel, you can do so, but that means that you will need three all round lights at the top of your mast, an all around white, an all around red and an all around green, just in that order.
The red over green is to be displayed in addition to the running lights or the red and green bow lights with the 225 degree stern light. As always, when the motor comes on, so does the steaming light or the forward facing white light that is also usually about ¾ of the way up on your mast to complete the requirement of an all around white light that indicates a power vessel.
What is a “steaming light” and why are you mentioning it now?
Most sailboat electrical panels will have a switch that is labelled “steaming light” and it will only come on when your anchor light is off. This is probably the most confusing part of sailboat navigation lights so if you are confused about this, you're in good company as most people are.
A “steaming” light is named thusly, going back to the days of steam powered sailboats where when they fired up their boilers and doused the sails, they became a power boat once again. There aren’t too many steam powered boats, let alone steam powered sailboats, but the name stuck and it is a vestige of a bygone era.
Either way, when you fire up your motor, you turn on your “steaming light” and that locks out the all around white light which is used for anchoring to minimize the number of switches on your panel and reduce the number of wires in your mast. The fewer wires, the less chance of something not working or becoming disconnected.
The steaming light and the anchor light both go up the mast, but you can’t use an all around white light while using the 225 degree stern light at the deck level because to other boaters you would look like you have two white lights from the stern and that would be confusing.
The anchor light is used exclusively for anchoring while the steaming light is used to indicate you are a power vessel while underway.
As to why I am mentioning it now in the article, is because this would have blown your mind if I started with this subject cause it can be really confusing stuff.
Aspect Recognition with Lights
Remember when I said earlier that lights can help you tell others which way you are heading as well as tell you which way other boats are heading? That is called the aspect of the vessel and the USCG tests you on this for your deck exam as well.
Knowing that the bow lights go 22.5 degrees abaft the beam on both sides or 112.5 degrees on each side, and the stern light faces 225 degrees aft for a total of 360 degrees of visibility, you can tell a lot about where a boat is heading and who has the right of way.
One thing that's easy to remember is red means stop and if you see a vessel's red light, it means stop as you are the give way vessel and approaching the other vessel from his port side. Conversely it works with green as well as that means you are approaching from the other vessel's starboard side and you are the standon vessel.
If you see a red and green light equally low on the horizon, that means your heading dead on into another vessel's path and conversely if all you see is a white light low on the horizon, it means you are overtaking another vessel power or sail, we don’t care because it is an overtaking situation. However, any time you do see a white light aloft in addition to the red and green bow lights, you know you are encountering a power boat.
Then there are angular approaches as well, where you see white and red or white and green light low on the horizon. You know in that case you are seeing a portion of the bow lights and stern lights from the side approaches of a vessel. Based on which direction those lights are heading, you can deduce which way that boat is going in relation to your boat.
So put it all together and you see a green light and a white light low on the horizon with a red over green light aloft, you know that you are approaching a sailboat that is traveling to your port and that might make you the standon vessel. That is of course, if we didn’t concern ourselves with windward and leeward and port tacks and starboard tacks, but that is a discussion for another article. So stay tuned when we talk about sailing rules and the right of way. But for now, do good, have fun and sail far.
Related Articles
Capt Chris German is a life long sailor and licensed captain who has taught thousands to sail over the last 20 years. In 2007, he founded a US Sailing-based community sailing school in Bridgeport, CT for inner city youth and families. When Hurricane Sandy forced him to abandon those efforts, he moved to North Carolina where he set out to share this love for broadcasting and sailing with a growing web-based television audience through The Charted Life Television Network.
by this author

Most Recent

What Does "Sailing By The Lee" Mean?
Daniel Wade
October 3, 2023

The Best Sailing Schools And Programs: Reviews & Ratings
September 26, 2023
Important Legal Info
Lifeofsailing.com is a participant in the Amazon Services LLC Associates Program, an affiliate advertising program designed to provide a means for sites to earn advertising fees by advertising and linking to Amazon. This site also participates in other affiliate programs and is compensated for referring traffic and business to these companies.
Similar Posts

How To Choose The Right Sailing Instructor
August 16, 2023

Cost To Sail Around The World
May 16, 2023

How To Drive A Pontoon Boat
Jacob Collier
December 19, 2022
Popular Posts

Best Liveaboard Catamaran Sailboats
December 28, 2023

Can a Novice Sail Around the World?
Elizabeth O'Malley

4 Best Electric Outboard Motors

How Long Did It Take The Vikings To Sail To England?

10 Best Sailboat Brands (And Why)
December 20, 2023

7 Best Places To Liveaboard A Sailboat
Get the best sailing content.
Top Rated Posts
Lifeofsailing.com is a participant in the Amazon Services LLC Associates Program, an affiliate advertising program designed to provide a means for sites to earn advertising fees by advertising and linking to Amazon. This site also participates in other affiliate programs and is compensated for referring traffic and business to these companies. (866) 342-SAIL
© 2024 Life of Sailing Email: [email protected] Address: 11816 Inwood Rd #3024 Dallas, TX 75244 Disclaimer Privacy Policy

- How to Make a Portable "Nav-Station" . . .
How to Make a Portable "Nav-Station" for Sailing or Cruising
If you are anything like me, you find chart navigation to be a challenge on a small sailboat. Wind, spray, and foul weather can cause big headaches for any sailing skipper. Should you just forget the paper nautical charts and use electronics?

You might have read the disclaimer on that black box when you fire it up. It's often the first page you see before any other. And it tells you the limitations of the system you are about to use. The manufacturer reminds you not to rely on GPS alone for your safety.
GPS receivers and chart plotters are wondrous, but paper navigation charts give you the best detail for close coastal or inside navigation. And paper charts give you the "big picture" without scrolling. I believe both methods complement one another to give you a powerful navigation system that will work most anywhere you sail or cruise.
Five Steps to Make a Portable "Nav-Station"
Make your own portable chart nav-station that you can use in the cockpit or down below. It will work aboard all boats of any type and size. Matter of fact, I've used this aboard ships inside and outside, and exposed cockpits in search and rescue boats and sailboats in driving rain and tough seas. Follow these five easy tips to make a portable nav-station for your small sailboat.
1. Buy a Clipboard
Purchase an artist sketch-board or large clipboard. You can fold or cut your chart to size to fit the board. This makes for a compact, portable chart table that can take a licking and keep on ticking.
2. Highlight the Chart
Grab your highlighters, colored pencils. Enhance dangerous shoals or wrecks with yellow or blue. Circle major aids to navigation so that they stand out. Put small anchor symbols in areas off the main course line that you might use for emergency anchorages. Now, you have a customized chart that will be easy to read at-a-glance.
3. Pencil-in Each Compass Course
No need to make permanent course lines on your nautical chart. Instead, draw light pencil lines to mark each course line. Cover each line with transparent tape (the kind you can mark on). That way, your chart will be protected and last a long time.
4. Draw Bold Course Lines
Make those light lines beneath the tape stand out. Use a black, waterproof fine-tip marker and straight edge to make each course bold and easy to see. Write the course on top of each leg. If you have room, write the distance on the bottom beneath the course label. Now you have an instant view of your sailing route and can stay oriented to keep your small sailboat in safe water.
5. Band It and Bag It
Snap one or two oversized rubber bands around the base of your clipboard or sketch-board. For a more waterproof affair, buy one of those giant Ziplock© bags, put your board inside, and zip it shut. You can find these online, with sizes over 2 feet per side (0.6 meters) or larger. Type ' giant Ziploc bags ' into any Google search window. Now you're ready to face wind, spray, or any other sailing weather that comes your way.
~~~~~~~~~~~~~~~~~~~~
Use these five sailing navigation tips to make "cockpit" chart navigation fun, easy and portable. And, this method will boost the safety and reliability of your navigation--wherever in the world you choose to sail or cruise.
NOTE: The nautical or electronic charts, drawings or sketches used in articles, newsletters, ezines, videos, eBooks, photographs and images on this site are for training only and should not be used for navigation.
- Five Getting-Started Skills to Master Coastal Sailing Navigation
- Coastal Navigation Secrets - Does Your Chart Tell a Complete Story?
- Chart Navigation Secrets - Seven Steps for Sailing Navigation!
- Unlock the Mystery of Magnetic Variation!

- Dec 12, 2020
Pilothouse Sailboats: The Myth of Inside Steering
Updated: Feb 2, 2021
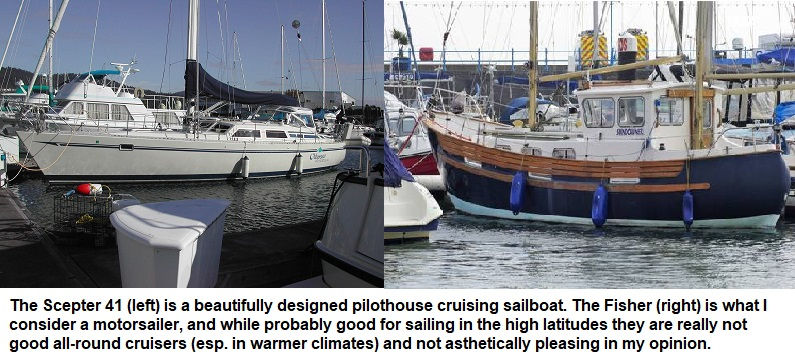
Prior to buying my Cooper 416 more than 20 years ago I was a "traditionalist" when it came to sailboats. I thought Pilothouse sailboats had way to much windage, the big doghouse was hard to see over, the inside steering station added additional maintenance, and they were hotter than a greenhouse in the Mohave Desert when cruising in tropical climates. And, I had not seen too many that were aesthetically appealing. I also felt that "real" sailors should be out in the elements with the wind and rain and the occasional dousing of salt spray peppering your face.
First, and most importantly let me clarify a distinction between modern pilothouse sailboats and motorsailers. For example, the Cooper 416, the Sceptre 41, the Dufour 12000CT, and others are what I consider "modern pilothouse" sailboats that have raised doghouses with sleek lines. Compare these to motorsailers such as the Nauticat 33 & 44, the Cabo Rico PH, and Fishers that look like someone took a sailboat and threw a giant window box on top of the coachroof. I am not a fan of motorsailers as theses types of sailboats embody all the negative connotations of pilothouse designs.
But, as my father was getting on in years, and after sailing (motoring) in the Pacific Northwest (PNW) for a few years where the winds are fickle, the currents strong, and the rain virtually constant...I decided that perhaps a pilothouse was the way to go for the PNW. The pilothouse layout would be more comfortable for my father than the full-keeled True North 34 sailboat that I had prior to my Cooper 416. And besides, if the weather was inclement with no wind and we were motoring (which is quite common in Puget Sound) it would be nice to be able to go below, throw some hot water on the stove for some hot chocolate, and keep watch in the warmth of the cabin while continuing my voyage.
But now, after owning my pilothouse sailboat for more than 20 years with thousands of sea and ocean miles below her...let me debunk the notion of the inside steering station and some of the common myths of a modern pilothouse sailboat.
As I said, after "sailing" in the PNW for 5 years, and with my father getting on in years I considered a pilothouse design as a reasonable compromise. For those of you not familiar with sailing in the PNW, the winds are usually light and variable due to the mountain ranges. There are days of pea soup fog that doesn't dissipate until after noon, and yes...more rain days than dry days. Hell, I even sailed in the snow. So sure, the idea of being able to go below and still keep a watch was more appealing to me. I was also getting older and wiser. Spending 6 hours in the cockpit sitting in the rain when it is 35F outside while motoring from Port Townsend back to Seattle was not fun. Sailing should be fun!

So, in 2000 I bought a Cooper 416 pilothouse sailboat designed by Stan Huntingford and built by Cooper Yachts in Coquitlam, BC, Canada. I also had my eye on a Sceptre 41. I liked the lower profile hull design of the Sceptre, but the interior layout of the Cooper won out. I sailed the boat around Vancouver Island twice, down to San Francisco, up and down the Salish Sea, and in 2019 sailed across the Pacific to Hawaii. And, after 20 years and more than 15,000 miles I realized that I probably actually steered using the inside steering station less than 1 hour.
OK...I acknowledge that I have an autopilot (and also windvane steering added in 2019). In my opinion every "cruising" sailboat should have an autopilot. There are times when I love the feel of the helm such as short day-sails with friends, teaching crew how to steer and maneuver, and beer can regattas such as the Downtown Sailing Series out of Elliott Bay Marina. And sometimes I like to give Tardis (the Garmin Reactor autopilot) and Hephzibah (the Hydrovane wind vane steering) a break, and take over the steering duties and rekindle the sense of sailing rather than just riding on a sailboat. But, it is pure folly to think that you are going to sit at the helm and steering a cruising sailboat for 6 or more hours day after day; it's just impractical.
But, even during these times when I took the helm, it was the helm in the cockpit. When I leave a berth or anchorage I am at the helm in the cockpit. When I am docking or dropping the hook I am at the helm in the cockpit. When I out with friends for a day sail I am at the helm in the cockpit. When I trim sails and setting Hephzibah I am in the cockpit. Even when I am motoring on windless days...I am usually in the cockpit standing watch and Tardis is steering the desired course.
Yes, during inclement weather and really cold days I would stand watch inside. The pilothouse is warm and dry and safe. Of course, I go below to cook nice meals and use the head feeling quite comfortable with Hephzibah or Tardis keeping S/V Discovery on course. The navigation station inside the pilothouse has radar, the primary chartplotter with AIS interfaced, and the autopilot master controller (an AP remote is located in the cockpit). So, with the electronic navigational systems and a 270 degree view ahead and abeam of the boat I feel pretty confident in adequate watch keeping. And more importantly, even during these times below deck either Hephzibah or Tardis were steering the course while the inside helm sat idle.
So, in October 2020 I decided the inside steering station added no benefit, and was just a meaningless "feature." So, I removed the inside helm and built a navigation console. Removing the inside helm pump also meant removing the old copper hydraulic lines and simplifying the hydraulic steering system (e.g. bleeding is easier and uses less fluid). It also removed the redundant gear and throttle control cables. And also, since the navigation station is the epicenter of the boat's electrical system, it also meant some electrical work. I also moved the electronic navigation systems into the console so they have easier access and visibility while sitting at the navigation station.

While the inside steering station on a sailboat seems like a pretty good idea, and certainly adds a "WOW" factor for guests, I must say that unless you sail in northern latitudes in blizzard-like conditions and all your sail controls are controlled via electric switches and motors, the inside steering station really doesn't make a lot of sense. This is not to say the pilothouse design isn't great...but steering from inside a pilothouse is done via an autopilot...not with a wheel .
Some other thoughts about pilothouse sailboats...
The windage myth...
Any surface area above the boat create windage. A J-boat has very little windage. A J-boat has very little if any creature comforts. A Nauticat 44 (motorsailer) has a huge doghouse and a lot of windage. Many of the sleeker pilothouse designs found on the Cooper, the Scepter, etc have less windage than a comparable sized Hanse or Beneteau or Janneau...especially the deck salons, or after adding a dodger and full enclosure around the cockpit.
The Greenhouse Effect myth...
There is a reason why many sailboats berthed or anchored for any length of time in the tropics is virtually covered from stem to stern with Sunbrella. The key to keeping any sailboat cool and comfortable in the tropics is ventilation and shade . This cannot be overstated enough. This means a tent over the foredeck, a boom tent over the doghouse, and a Bimini over the cockpit. Side curtains made from Phifertex around the cockpit also help keep things cool; they provide shade and allow airflow. New cruisers, or casual rally-rat cruisers are easy to spot...they are the folks who anchor their boats (sans canvas coverings) and hightail it to the nearest pub ashore to escape the heat.
Dual steering is difficult to maintain...
This puzzles me a bit. Most pilothouse boats with inside steering stations use hydraulic steering. This actually adds a bit of redundancy in the system should the pump at one of the helm stations break. But, the maintenance on a hydraulic steering systems involves checking the fluid level once a month once the system has been bled of all air (which can be challenging if done improperly). Also, it sure seems to me that if you're going to have 2 helms on a cruising sailboat to have one inside station and one cockpit station. Dual helms in the cockpit on a cruising sailboat makes about as much sense as 2 steering wheels in a car.
Cramped cockpits....
Yes, this is one of the real downsides of many pilothouse sailboats in the 30-50 foot range. The cabin interior is larger which mean the cockpits are smaller. Personally, I don't mind the small cockpit on passages because I sail alone or with 1 or 2 other crew and everything is within easy reach. But, for casual day sails with friends....the cockpit can get quite cramped and there is very little "social distancing" going on. But, the cockpit is still comfortable for 2 people to stretch out and relax on long passages.
- Boat Projects
Comentários
- ALL MOSCOW TOURS
- Getting Russian Visa
- Top 10 Reasons To Go
- Things To Do In Moscow
- Sheremetyevo Airport
- Domodedovo Airport
- Vnukovo Airport
- Airports Transfer
- Layover in Moscow
- Best Moscow Hotels
- Best Moscow Hostels
- Art in Moscow
- Moscow Theatres
- Moscow Parks
- Free Attractions
- Walking Routes
- Sports in Moscow
- Shopping in Moscow
- The Moscow Metro
- Moscow Public Transport
- Taxi in Moscow
- Driving in Moscow
- Moscow Maps & Traffic
- Facts about Moscow – City Factsheet
- Expat Communities
- Groceries in Moscow
- Healthcare in Moscow
- Blogs about Moscow
- Flat Rentals
River navigation season opened in Moscow

River navigation season has opened in Moscow. This year, embankments await big renovation, several new berths and a water taxi route may appear. Officials hope that the Moskva River will become one of the main tourist attractions.
Season of river navigation opened on April 17, and cruise navigation will start on April 30 at the North River Station. It is planned that there will be organized ten major river routes, including those beyond the city.
The main feature of the current navigation season is an updated design of waterbuses. On the ships, there will be made separate areas for children, as well as a space for carrying bicycles. Melodies of pre-war years will sound at the waterbuses and passengers will be met by heroes of the Soviet avant-garde era at the deck. In addition, it is planned to pay more attention to children’s programs and family vacations, as well as organization of mini-tours on certain topics.
As for the price of boat trips in the city, they will remain the same as the last year: 500 rubles (€5.03) for adults and 300 rubles (€3.02) for children. Routes and berths will also remain the same. It will be possible to take a river bus at the berth near the Kievsky Railway Station, Novospassky Bridge in Gorky Park, at the Sparrow Hills and other traditional places.
As for the North River Station, its historical building, constructed in 1937 is finally planned to be repaired. South Port will also be upgraded and adapted not only for loading function, but also for the use of passengers.
However, the river is expected to be used not only for pleasure trips, but also as a natural transport artery limited by the warm season. Officials plan to introduce the concept of a water taxi in the second half of the year. To make the project popular, water taxi fares should not exceed the price of a ticket in the subway.
Special attention is going to be paid to renovation of the embankments. According to the chief architect of Moscow, Sergei Kuznetsov, only 60 km of embankments are now used effectively in the capital, while the total length of the coastline of the Moskva River is more than 200 km. In this connection, there will be three large-scale reconstruction projects at the banks of the river – Tarasa Shevchenko embankment, the embankment near the ZIL and coastal area in Strogino.
You might also like

The Moskva River will be cleaned for safe swimming and fishing

Wowhaus has developed the concept of the Nagatinskaya embankment

New Concept of City Embankments
Our moscow tours, gastronomic moscow private tour, «day two» moscow private tour, layover in moscow tailor-made private tour, whole day in moscow private tour, all-in-one moscow essential private tour, moscow metro & stalin skyscrapers private tour, moscow art & design private tour, soviet moscow historical & heritage private tour, tour guide jobs →.
Every year we host more and more private tours in English, Russian and other languages for travelers from all over the world. They need best service, amazing stories and deep history knowledge. If you want to become our guide, please write us.
Contact Info
+7 495 166-72-69
119019 Moscow, Russia, Filippovskiy per. 7, 1
Mon - Sun 10.00 - 18.00
Download audio sample
E07 is the English language mode of the Russian 7 operator.
Null format:
Traffic format, single message:
Traffic format, two messages:
In case of an unexpected interruption during the transmission, the station restarts with the intro, repeated for one minute, followed by the current message continued from some groups before the failure; the preamble is omitted.
All E07 schedules are twice weekly and consist of 3 identical transmissions 20 minutes apart. Each successive transmission is 1-2 MHz lower or higher in frequency. The third transmission does not take place in case of a null message. The frequencies are typically changed on a monthly basis.
There exists a female E07 voice, as heard below from test transmissions on October 2nd, 2021:
Download audio recording
Get the best experience and stay connected to your community with our Spectrum News app. Learn More
Continue in Browser
Get hyperlocal forecasts, radar and weather alerts.
Please enter a valid zipcode.

Coast Guard searching for missing boater off Oak Island
The U.S. Coast Guard and police from Oak Island, North Carolina, are searching for a boater who went missing on Saturday, officials say.
Jeffrey Kale, 47, went fishing in his 32-foot boat Saturday and has not been seen since, according to police.
"The United States Coast Guard is still actively searching fishing grounds and specific areas in the Atlantic Ocean based on previous trips and information from the family," Oak Island Police said late Sunday.
The Coast Guard is using boats and aircraft to search a grid off the southeastern tip of North Carolina for Kale.
Kale's boat is a 32-foot Cape Horn with hull number NC4431FA, officials said.
Police ask anyone who has seen Kale or his boat to call 911.
Moscow Boat Tour
- Page active

Description
See all the gems of historical and cultural center of the capital in short time and without traffic jams or tiresome walking.
Depending on the itinerary and duration of the Moscow River boat trip, the tour can be 3 or 5 hours.
Highlights of the tour
- St Basil’s Cathedral;
- Stalin skyscraper on Kotelnicheskaya (Tinkers) embankment;
- The Kremlin;
- “House on the Embankment” Stalin skyscraper;
- Monument to Peter I;
- The Central House of Artists;
- Christ the Savior Cathedral;
- Gorky Park;
- Moscow State University;
- Russian Academy of Sciences;
- Luzhniki stadium;
- Novodevichy Monastery;
- Kiev railway station;
- Europe Square;
- Moscow City Hall;
- Government House;
- Expocentre Exhibition Complex;
- and other famous sights.
You will learn about the different epochs of the city from the foundation in 1147 till Soviet times of 20 th century.
Moscow River
Moskva river has the form of a snake and is the main waterway of Moscow, consisting of a cascade of reservoirs. Within the city, Moskva river is 80 km long, 120 m - 200 m wide and up to 14 m deep. The narrowest part of the river is the Kremlin area in the city center, and the most extensive is around the Luzhniki Stadium in the south.
Bridges in Moscow
Undoubtedly, bridges and embankments are among the most scenic spots and main attractions of Moscow. Plus, they are so romantic.
- Bolshoy Kamenny Bridge – Great Stone Bridge – is the main bridge of Moscow . The first stone bridge was constructed here in the 17th century.
- Patriarshy Bridge is one of the youngest pedestrian bridges, built in 2004. The bridge connects the iconic Christ the Saviour Cathedral with funky Bersenevskaya embankment, extremely popular place among locals for its trendy art galleries, cafes and panoramic views. Patriarshy Bridge used to be a shooting location for ex-Russian President Dmitry Medvedev's New Year speech to the nation.
- Borodinsky Bridge, erected in honor of the 100th anniversary of the glorious victory in the Battle of Borodino (which every Russian kid knows about), a fierce legendary battle during the Russo-French war of 1812.
- Bagration Bridge one of the pedestrian bridges with most picturesque views of the Moskva River with its numerous upper-level observation platforms. The bridge was erected to celebrate the 850th anniversary of Moscow city in 1997.
- Krymsky Bridge used to be in Top 5 Europe’s longest bridges some 100 years ago. The bridge got its name after the ancient Krymsky ford which Crimean Tartars used to invade Moscow in the 16 th century.
Embankments of Moscow
Moscow river boats 37 embankments, the most popular being Kremlevskaya, Sofiyskaya, Pushkinskaya, Vorobyovskaya and Kolomenskaya.
You can get the most spectacular views of the Kremlin from Kremlevskaya and Sofiyskaya embankments.
- Pushkinkaya embankment is the most romantic in Moscow. It meanders along Gorky Park and Neskuchnyi garden and is rich for all kinds of entertainment as well as cozy nooks, including Olivkovy beach, the famous Zeleny theater as well as a pier for river cruisers.
- Vorobyevskaya embankment is part of Sparrow Hills nature reserve. This place opens a beautiful panorama of the river and city from the observation deck and is considered to be the place for taking serious decisions in life.
- Embankment in Kolomenskoye Museum-Reserve has a special charm due to its peculiar geographical relief. The boat trip around Kolomenskoye would be the most peaceful in your life.
- Taras Shevchenko embankment is popular among photographers for its modern Moscow City skyscrapers. Highly recommended for your night boat trip.
- Embankments of Moscow are the pride of the capital. A distinctive feature of each of the promenades is its architecture and beautiful views. In addition, almost all the embankments of Moscow have a rich history and a lot of notable buildings.
Different epochs
Taking a walk along the Moskva River by boat, you will witness the architecture of Moscow from different eras and styles. Archaeological studies indicate that already in the XI century there stood a fortified settlement on Borovitsky hill, which is now called the Kremlin. Little fortress could not accommodate all the residents of the rapidly growing city, and the Grand Duke ordered the construction of a new Kremlin, larger than the former.
Boat trip around Kolomenskoe Park
Moscow river boat trip starts from the pier Klenovy (Maple) Boulevard and provides reat views of Nicholas Perervinsky monastery.
Nicholas Perervinsky monastery was founded at the time of the Battle of Kulikov (1380). The monastery, got its name from the surrounding area – “Pererva”, which can be translated like “tear off” and because of the location – here it abruptly changed its course, turning to Kolomna, standing on the opposite bank.
Nowadays Kolomenskoye is State Art, Historical, Architectural and Natural Landscape Museum-Reserve, which doors are open to everyone who wants to get in touch with the ancient history of Russia.
Take a break from the big city hustle in the shady parks and gardens of the Kolomenskoe Museum-Reserve. Don’t miss a wonderful Church of the Ascension and Tsar Alexey’s Palace in Kolomenskoye!
Monasteries and temples
- Novospassky Monastery
- Founded in the 13th century on the site where now is located the Danilovsky monastery. After a few decades, in 1330, Ivan Kalita moved the monastery onto the Borovitskii hill of the Kremlin. However, in the 15th century, Spassky Monastery again moved, this time to a more spacious place on Krasnoholmskaya waterfront.
- Church of St. Nicholas in Zayaitskom
- Erected in the middle of the XVIII century in baroque style. The building survived after the 1812 fire, but the utensils were destoyed. Parishioners collected donations and restored the temple on their own. In Soviet times, it was closed and re-opened only in 1992.
- Cathedral of Christ the Savior
- The church was originally erected in honor of the victory over Napoleon and was being under construction for long 44 years. Notoriously demolished in 1937 to be a giant swimming pool under open sky. The current building was constructed in 1990s. It is the tallest and one of the largest Orthodox churches in the world.
- The temple was built in 1679-82, during the reign of Tsar Fedor Alekseevich, in late Muscovite Baroque style and can be characterized as bonfire temple. Each gable is a symbol of a heavenly fire.
- Novodevichy Convent
- The most famous concent and monastery in Moscow, presumably founded in 1524. Novodevichy’s status has always been high among other monasteries, it was in this monastery where the women of the royal blood, the wives of Tsars and local rulers of Moscow were kept in prison as nuns.
- St. Andrew’s church (male acts as Compound Patriarch of Moscow)
- St. Andrew’s church stands right on the slopes of the Sparrow Hills, on the way down to the Moskva River, on the territory of the Nature Reserve “Sparrow Hills”. The monastery is small in size but is very cozy. It’s situated in a quiet courtyard surrounded by temples, fruit trees and flowers.
What you get:
- + A friend in Moscow.
- + Private & customized Moscow river cruise.
- + An exciting pastime, not just boring history lessons.
- + An authentic experience of local life.
- + Flexibility: changes can be made at any time to suit individual preferences.
- + Amazing deals for breakfast, lunch, and dinner in the very best cafes & restaurants. Discounts on weekdays (Mon-Fri).
- + A photo session amongst spectacular Moscow scenery that can be treasured for a lifetime.
- + Good value for souvenirs, taxis, and hotels.
- + Expert advice on what to do, where to go, and how to make the most of your time in Moscow.
Write your review
Space Station
Three Crew Members Departing Station Live on NASA TV

Live coverage of NASA astronaut Loral O’Hara, Roscosmos cosmonaut Oleg Novitskiy, and spaceflight participant Marina Vasilevskaya of Belarus’ departure from the International Space Station is underway.
At 11:54 p.m. EDT the Soyuz MS-24 spacecraft will undock from the Rassvet module, heading for a parachute-assisted landing at 3:17 a.m. (12:17 p.m. Kazakhstan time) on the steppe of Kazakhstan, southeast of the remote town of Dzhezkazgan.
Supporting NASA’s Artemis campaign, O’Hara’s mission helped prepare for exploration of the Moon and Mars. She is completing approximately 3,264 orbits of the Earth and a journey of more than 86.5 million miles. O’Hara worked on scientific activities aboard the space station, including investigating heart health, cancer treatments, and space manufacturing techniques during her stay aboard the orbiting laboratory.
With the undocking of the Soyuz MS-24 spacecraft with O’Hara, Novitskiy and Vasilevskaya, Expedition 71 will officially begin aboard the station. NASA astronauts Michael Barratt , Matthew Dominick , Tracy Dyson , and Jeannette Epps as well as Roscosmos cosmonauts Nikolai Chub, Alexander Grebenkin, and Oleg Kononenko make up Expedition 71 and will remain on the station until this fall.
Learn more about station activities by following the space station blog , @space_station and @ISS_Research on X, as well as the ISS Facebook and ISS Instagram accounts.
Get weekly video highlights at: https://roundupreads.jsc.nasa.gov/videoupdate/
Get the latest from NASA delivered every week. Subscribe here: www.nasa.gov/subscribe
Leave a Reply Cancel reply
Your email address will not be published. Required fields are marked *
Save my name, email, and website in this browser for the next time I comment.
IMAGES
VIDEO
COMMENTS
The largest boat in our fleet, the Oyster 745, also features one of the largest nav stations among the monohulls. This aft-facing desk area, on the port side of the companionway, will serve its owners and crew as an ample office space. This station has room for two large multifunction displays, plus smaller instruments.
All these physical qualities must be taken into account when designing any nav station. For example, the navigator must be able to reach the most frequently used instruments easily. "Be sure to place the units used most often, such as radar, GPS or chart plotter and VHF radio, lower and closer to the navigator than lesser used items.
Maximize space efficiency: By designing your navigation station, you can optimize the use of available space on your boat, ensuring that every inch is utilized effectively. Personalize the aesthetics: A custom-built navigation station can be designed to match the style and theme of your boat's interior, creating a cohesive and visually ...
The home of B&G Sailing. The leading manufacturer of Sailing Electronics including Chartplotters, Instruments & Autopilots around the world. ... Superfast smart, dual-screen multifunctional navigation system. Learn more. Wind Sensors Spares & Accessories Sailing Processors The Ultimate Sailing Systems . Racing. Coastal Sailing. Offshore Sailing ...
With the boat in the grip of a savage and seemingly never-ending New England winter, not to mention a seriously tight budget, my options were limited. I settled on the nav-station makeover, which would involve refacing a couple of beat-up instrument panels, and replacing the ugly old DC and AC switch panels that had been annoying me for years.
Marine Charts for Sailing. Raymarine navigation displays give you the power to explore, plan and navigate the open water, with confidence. High definition displays and quad-core performance brings electronic charts from leading mapmakers to life. Enjoy fully featured vector charts, high-quality raster charts, plus advanced features like 3D maps ...
Cruising World's Boat of the Year judges examined roughly two dozen new sailboats in October 2017, and in so doing, we marked the ways today's builders either hewed to tradition or innovated with their boats' navigation stations. The Traditionalists. The Bavaria Cruiser 34 won the prize as the Best Pocket Cruiser for 2018.
Rebuilding a yacht's navigation system using Raspberry Pi. When David Bishop bought a 30-year-old boat, the batteries were dying and the wiring was a mess. He decided to rebuild the nav system using several Raspberry Pis. Back in May 2021, my wife Lydia and I purchased our first boat, a 1994 Dehler 34 called Troppo Bella, and spent the summer ...
The original navigation station layout on Britannia was not particularly well-thought-out or efficient. Roger Hughes. Since the arrival of GPS, I haven't had much use for the chart table on my brigantine schooner, Britannia.Most of our passagemaking navigation is done on the Raymarine multifunction display on the helm pod, then transferred to a paper chart on the saloon table roughly every hour.
Moderator Emeritus. Join Date: Oct 2013. Location: Jacksonville/ out cruising. Boat: Island Packet 38. Posts: 31,351. Re: Nav Station Design Ideas. If it's opens like a desk, have a couple of blocks so that you can block it open level, that way it can be used as a table as well, remove the blocks, back to a desk.
My new nav station is now considerably more comfortable to sit at the desk, and the saloon appears very much bigger with Stonehenge gone. The electrical panel is also easier to operate and accidentally tripped breakers have become a thing of the past. The remodeled area is now more akin to a neat little office than a boat's navigation area.
GPSMAP® 86sci. This handheld marine GPS provides everything you need for a safe day out on the water. With its built-in inReach® Satellite Communicator 1, it also acts as an emergency beacon. Install it at your helm or take it with you to a different boat — portable marine navigation, made easy.
Knowing that the bow lights go 22.5 degrees abaft the beam on both sides or 112.5 degrees on each side, and the stern light faces 225 degrees aft for a total of 360 degrees of visibility, you can tell a lot about where a boat is heading and who has the right of way. One thing that's easy to remember is red means stop and if you see a vessel's ...
Follow these five easy tips to make a portable nav-station for your small sailboat. 1. Buy a Clipboard. Purchase an artist sketch-board or large clipboard. You can fold or cut your chart to size to fit the board. ... Use these five sailing navigation tips to make "cockpit" chart navigation fun, easy and portable. And, this method will boost the ...
A 30-something friend and Google employee who's currently on a mid-career sabbatical sailing his Outbound 46, Pineapple, in Mexico, said of modern helm-stations, "Folks seem to want a command center, with lots of fancy knobs and buttons and screens.But the reality of shorthanded cruising is that you're almost never at the helm.
Posts: 21. Here is an interesting navigation station layout on a St. Croix 40ft IMS racer I designed in 1991. The table is under the forward cockpit sole on the centreline of hull and a seat on both port & starboard side. Regardless of tack, the navigator always have a firm seating position relative to the table.
The navigation station inside the pilothouse has radar, the primary chartplotter with AIS interfaced, and the autopilot master controller (an AP remote is located in the cockpit). So, with the electronic navigational systems and a 270 degree view ahead and abeam of the boat I feel pretty confident in adequate watch keeping.
Welcome to The Nav Station. I'll be teaching you Practical Celestial Navigation, helping you become a more self-sufficient sailor and navigator. I learned navigation in the US Coast Guard, have ...
E07a. E07a is a variant of E07 that adds a 5-digit group to the transmission intro. It affects only the traffic format, while the null format is unchanged. It was retired from regular activity when its two known schedules both went inactive together at the end of January 2022. It is not known how multiple messages are handled in this variant.
Season of river navigation opened on April 17, and cruise navigation will start on April 30 at the North River Station. It is planned that there will be organized ten major river routes, including those beyond the city. ... As for the price of boat trips in the city, they will remain the same as the last year: 500 rubles (€6.80) for adults ...
E07. E07 is the English language mode of the Russian 7 operator. Null format: Traffic format, single message: Traffic format, two messages: In case of an unexpected interruption during the transmission, the station restarts with the intro, repeated for one minute, followed by the current message continued from some groups before the failure ...
The U.S. Coast Guard and police from Oak Island, North Carolina, are searching for a boater who went missing on Saturday, officials say. Jeffrey Kale, 47, went fishing in his 32-foot boat Saturday and has not been seen since, according to police. "The United States Coast Guard is still actively searching fishing grounds and specific areas in ...
Moskva river has the form of a snake and is the main waterway of Moscow, consisting of a cascade of reservoirs. Within the city, Moskva river is 80 km long, 120 m - 200 m wide and up to 14 m deep. The narrowest part of the river is the Kremlin area in the city center, and the most extensive is around the Luzhniki Stadium in the south.
Live coverage of NASA astronaut Loral O'Hara, Roscosmos cosmonaut Oleg Novitskiy, and spaceflight participant Marina Vasilevskaya of Belarus' departure from the International Space Station is underway. At 11:54 p.m. EDT the Soyuz MS-24 spacecraft will undock from the Rassvet module, heading for a parachute-assisted landing at 3:17 a.m. (12: ...